In the famous words of Ned Stark: WINTER IS COMING! So I thought this would be the perfect time to highlight some winter destinations, specifically Lapland, Finland. During my time in Lapland I was able to partake in my first photo expedition, and it was a blast!
Photographing the Stunning Arctic Landscapes of Lapland, Finland
What is a Photography Expedition?
As someone who loves photography, I have always wanted to do a photo expedition. But honestly, I didn’t really even know what that meant. Is it like an on-site photography class? Well, yes and no.
This was my first (and hopefully first of many) photo expeditions, and from my experience it was more like a fun venture out to a photography lover’s dream landscape, and they help you with taking the photos when it comes to settings, technique, position, etc.
You have to have a basic knowledge of photography I think. I consider myself super amateur, and when people start talking about aperture and shutter speed I get a little anxiety. But this trip was perfect and because of the small group size, we got personalized attention, which was key!
Most the photos I featured in this article were shot with my Sony Alpha6000 with my 10-18mm wide angle lens that I’m obsessed with. I also used my GoPro and iPhone for a few shots.
Note: battery life is severely decreased in freezing weather so make sure to bring some extra batteries along!
Beyond Arctic Photography Expeditions
Beyond Arctic is a tiny Finnish company ran by 2 awesome guys, both named Juho! They personally lead all the expeditions themselves and work their butts off!
With Beyond Arctic, no 2 expeditions are the same! That’s because they have several different areas around which they can visit and tailor make the tour based on the groups wishes (& also based on weather).
Juho photographing me photographing him 🙂
Their expeditions have a max of 8 people, so the group always stays small and intimate. I had 2 others on my tour and we really got to know each other and it was really nice not having to be herded around in a large group.
Beyond Arctic also offer Northern Lights photography tours, ice fishing, skiing, and wilderness snowshoe adventures. They also offer summer and autumn expeditions, where you can experience and photograph the midnight sun!
What Kind of Clothes/Equipment Do You Need to Go on this Expedition?
Honestly, you can basically show up naked and they will dress you from head to toe. But please, if you do, wear underwear! But really, even if you don’t have the proper winter gear, it’s no problem at all, they will provide everything you need. They gave us hats, ski gloves, overall ski suit, waterproof boots, and a backpack to store all our stuff.
Photographing the Stunning Arctic Landscapes of Lapland, Finland: Where We Visited
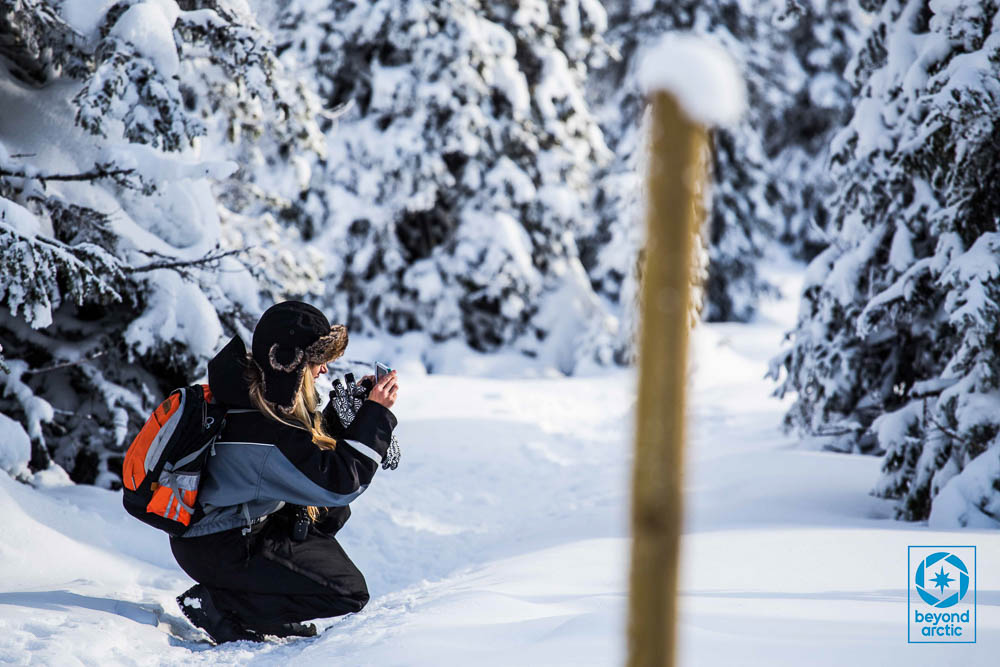
We drove for about 2 hours to Riisitunturi National Park. We began our trek through the park up hill for about 1 hour, through the snowy forest, stopping frequently to take pictures and take in the views. The trek is 4.5 km and requires a moderate level of physical fitness.
The views from the top of the fell were incredible. You get a stunning 360-degree view of the national park and the nearby lake which was frozen, adding to the dramatic arctic landscape.
GoPro shot of me fighting the arctic wind
If you’re dreaming of a winter wonderland (which I was) this will for sure satisfy your needs!
We stopped at this cute little cabin base camp where we started a small fire and began to grill some lunch. We were provided with some yummy sausages and a grilled cheese sandwich.
I alerted them ahead of time of my allergy and they even made mine with gluten free bread. Oh, and they even had a gluten free apple cake made for me for dessert! I’m so not used to getting such goodies (with my past luck, the tour “forgets” about my allergy and I end up starving half the time).
The trek back down was a lot easier and quicker and the lighting was a bit better. The sun was starting to fall so there wasn’t any more glare or brightness blinding you.
Sunset caught on my iPhone 6
It was very cold, but I felt bundled up enough. Overall, the trek wasn’t as bad as I thought, mainly because we kept stopping for photo ops.
After the tour, Beyond Arctic sent us some photos they took during the expedition, which was cool to see some candid shots. Here are a few Juho took below:
There’s me trying to get some good iPhone pics.
The view from the top of the fell where you can see the frozen lake.
Me looking satisfied (and bundled up) at the end of the tour. Can we do that again?♥
RECOMMENDED TRAVEL GEAR FOR LAPLAND:
1.Sony Alpha 6000 Mirrorless Camera: I made the switch from my huge DSLR and I wouldn’t go back. It’s light, compact, and takes amazing photos!
2. Sony 10-18mm Wide Angle Zoom Lens: this wide angle lens is the key to landscape shots. I use this lens more than the original and am super happy with it. It’s not cheap, but super worth it if you want to get those special nature shots. Honestly, I would purchase the Sony alpha 6000 camera body only and save up for this lens to go with it.
3. E Bags Packing Cubes: the biggest life changer to keep me packing light! This is my biggest travel gear obsession and I have NO idea how I traveled without them before.
4. Anker Portable Charger: this helps me recharge my iPhone several times a day when I travel. It also has dual ports so you can also charge your camera or other electronics simultaneously. I couldn’t travel without it.
5. GoPro Hero 11 Black: I am a proud GoPro ambassador and obsessed with GoPro selfie pics if you didn’t notice! The Gopro cameras are the best for action and underwater shots, and of course for taking those selfies when you’re traveling solo. It’s super small, compact, and easy to travel with. Plus it’s so much fun to use! 🙂
Tips: The one thing I will recommend if you do this tour is to bring sunglasses (wait, what, on a winter tour?). It’s actually really sunny and the wind at the top is no joke. My eyes were watering for like 30 minutes straight and I could barely see. Also, staring at the bleach white snow for hours on end can put a little strain on the eyes. Oh, and bring tissues. Your nose will be running.
If you enjoyed this, click photo to PIN for later♥
Disclaimer: I was a guest of Beyond Arctic; however, my opinions are my own and I am in no way obligated to write a positive review. This small company was awesome and I would highly recommend them to my family, friends, and fellow travellers. ♥
*this post contains affiliate links, which means I receive a super small commission if you make a purchase using these links, at no extra cost to you. I wouldn’t recommend anything I didn’t already use and love! ♥
The Nusas consist of 3 gorgeous islands off the coast of Bali, Nusa Lembongan, Nusa Ceningan, and Nusa Penida.
All 3 islands have something special to offer so if you have time, I highly recommend checking out all three!
I based myself in Lembongan for 3 days and was able to visit all 3 islands during my time there.
You can see Ceningan in a half day as it is the smallest of the three. It is accessed by a bright yellow bridge from Lembongan.
Penida is the largest and most rugged of the 3. It is completely devoid of mass tourism and has so many awesome things to see!
*I want to especially thank Jackie from @getlostwithjackie for introducing me to Lembongan and Christina from @jetsetchristina for introducing me to Penida. These girls’ amazing Instagram photos really enticed/inspired me to visit these places that I had never heard of before! ♥
If you’re short on time and want to see all 3 islands in 3 days it’s totally doable.
This was my 3 day itinerary in the Nusa Islands (see below for all the details on each place):
Day 1:Nusa Lembongan (Mushroom Bay, Dream Beach, Devil’s Tear, The Deck)
Day 2: Nusa Penida full day
Day 3: Nusa Lembongan private tour to Manta Point + half day in Nusa Ceningan
What to Do on the Nusa Islands
Nusa Lembongan
What to Do and See in Nusa Lembongan
Dream beach– beautiful beach where Dream Beach Huts overlooks. The waves are huge and you can’t really swim in it as it’s dangerous. You can pay a small fee to use their pool and facilities if you want to spend the day there.
A post shared by 🌍World Traveler/Blogger✈️ (@crazytravelista) on
Devil’s Tear-a 5-10 minute walk from dream beach (to the right if you’re looking at the water) will bring you to Devil’s Tear. Watch as the waves crash into the crescent shaped rocks leaving a huge cloud of mist behind. It’s a petty cool site! Be careful as the waves come up on the rocks so don’t try to be that person to get the perfect selfie on the edge.
Mushroom Bay-a gorgeous blue/green bay with cute little restaurants and some water activities nearby.
The Deck-a cute little spot overlooking Nusa Lembongan Beach and probably the best place to view the sunset on the island. It’s a bit more expensive than other places and serves a bunch of Western food. I didn’t even care as the view was well worth it. They have sunset sessions with a live DJ in the evenings as well, so it’ a great place to mingle.
Swim with Manta Rays-one of the main attractions of the Nusas is swimming with Manta Rays! You can take a group tour that will take you to Manta Point and a few other snorkelling spots. Or you can do what I did and get a private tour and make up your own schedule with the stops of your choice.
This obviously isn’t the cheapest option, but I liked the idea of a tailored tour! I negotiated a rate of 400k for 3 stops (about $30 USD), including swimming with manta rays, and snorkelling in Crystal Bay and Secret Beach. It was also great because I started early and was back by 11am, which gave me enough time to eat lunch and then head to Ceningan for the rest of the day to explore.
Note: you aren’t guaranteed to see manta rays, but I got lucky and saw a huge one! My captain told me to jump in, and honestly I was scared sh*tless when I saw the huge shadow of the creature on the surface. The only bad part about being alone on a tour. Another boat showed up and I waited until they jumped in to go in (I’m such a chicken). It swam within a foot of me! I scrambled to turn on my GoPro but it had already passed so i don’t have the best pictures to show for it. Manta rays are massive! Yet so angelic and graceful. It was such a once-in-a-lifetime experience to be up close and personal with these amazing creatures! Don’t miss out on this!
Nusa Penida
Nusa Penida was my favorite of the 3 islands as it was the most rugged and untouched. I only saw a handful of tourists the entire day. To explore, you need to take a tour or rent a scooter and do it on your own (which is what I did).
What to Do and See in Nusa Penida
Atuh Beach–This beach took a steep hike to get down, but was totally worth it. It’s absolutely breathtaking! The plunging cliffs are freakishly tall and provides a beautiful setting. It takes about an hour drive from the port of Penida, then about a 10-15 minute hike down onto super steep steps/rocks.
There are a few little shacks serving drinks and fried rice or noodles. It’s pretty secluded and a great place to relax.
There is no parking fee.
Kelingking T-Rex (aka the money shot)–This is probably the most popular beach in Penida and it’s shaped like a T-Rex! You can walk down the vey steep steps/rocks down to the beach, bit it may take you awhile. You must go very slow as it is very steep! I made it 1/3 way down and didn’t have time to go all the way as it took way longer than I imagined!
Parking is 5k (~$0.30).
A post shared by 🌍World Traveler/Blogger✈️ (@crazytravelista) on
Angel’s Billabong (Gambar Untuk)–anatural infinity pool of blue and green hues that plunges into the ocean. You can swim in it, but be careful when the tide is high as the huge waves will come crashing down and could take you out to sea.
It’s about a 5-10 minute walk from Broken Beach (on the right). You’ll see the signs.
Broken beach (Pasih Uug)-the ride down to this place is the worst road conditions I’ve ever experienced on a motorbike. It’s extremely rocky and bumpy with many potholes so just go very slow! The epic view over the top of Broken Beach is spectacular. And the color of the water is stunning! Parking is 5k.
How to Get to Nusa Penida
By public ferry from Lembongan (near the yellow bridge).
The ferry goes at 7am. Be there at 6:30am to assure a spot. Costs for tourists is 50k (~$3.76).
To get back, you may need to hire a private transfer that costs 200k (~$15).
If you can find more people, you can split the cost. I had to wait about 10-15 minutes and 3 other people joined so it was only 50k each, the same as the public ferry!
It takes less than 15 minutes for the crossing.
There are also ferries from Bali(Sanur) that go to Penida.
The public boat will drop you in the port of Toyapakeh in Penida.
How to get around Nusa Penida
Rent a motorbike for around 50k (~$3.76). The vendors will start at 80k but make sure to negotiate. You can also rent a car, but I enjoyed the adventure on a motorbike.
Note: the roads are VERY bumpy and unfinished with many potholes, especially going to Broken Beach and Angel’s Billabong. If you feel confident on a motorbike and have good balance, you should be fine! However, if you’ve never driven a motorbike before (or on the left side), this isn’t a good place to start! And remember, they drive on the LEFT side in Indonesia!
Nusa Ceningan
Nusa Ceningan is the smallest of the Nusas, but it thoroughly surprised me with its sheer beauty!
What to Do and See in Nusa Ceningan
Blue Lagoon-a natural cliffside lagoon with super vibrant turquoise waters that will leave you in awe.
A post shared by 🌍World Traveler/Blogger✈️ (@crazytravelista) on
Secret Beach– a secluded beach overlooked by Villa Travally Resort. There were only a few people there and it was a great place to relax. You must buy something to stay.
Mahana point for cliff jumping- there is a place to go cliff jumping a few minutes from the Blue Lagoon(although they charge 25k per jump!)
Last Stop Bar and Cafe-cutest little spot on the water with bean bags and a super chill vibe. They also have a great selection of fruit drinks. You can go right in the water from the steps and cool off. I loved this place!
Ceningan cliffs-a restaurant/viewpoint overlooking Penida island. There are swings overlooking the viewpoint. It’s a little bumpy to get there, so if you don’t have time, it wouldn’t kill you to skip it.
Where to Stay in Nusa Lembongan
D’mas Huts-this family run place was absolutely fantastic. It’s composed of only 5 private huts and has a spectacular view over Nusa Ceningan and the gorgeous blue water in between. Oh, and it was only $18 per night!
The owner Nyoman was the best host and catered to just about anything I needed. He always had a smile on his face and really made my stay more enjoyable.
They also have a nice restaurant which serves a big varieties of foods at a super reasonable price. Plus the views over the pool and landscape below are fantastic! The food was super delicious as well!
I got a special deal on hotels.com and paid only $18/night. It was half off, but even at full price it’s super affordable. The value for money is incomparable and I cannot recommend this place enough! And no, it was NOT sponsored in any way!
They also have onsite scooter renewals for 50k/day. D’mas Huts was such a great find!
Have you Been to the Nusa Islands? Which one was Your Favorite?
Click photo to PIN for later♥
MY TOP 5 RECOMMENDED TRAVEL GEAR FOR BALI:
1.Sony Alpha 6000 Mirrorless Camera: I made the switch from my huge DSLR and I wouldn’t go back. It’s light, compact, and takes amazing photos!
2. Sony 10-18mm Wide Angle Zoom Lens: this wide angle lens is the key to landscape shots. I use this lens more than the original and am super happy with it. It’s not cheap, but super worth it if you want to get those special nature shots. Honestly, I would purchase the Sony alpha 6000 camera body only and save up for this lens to go with it.
3. E Bags Packing Cubes: the biggest life changer to keep me packing light! This is my biggest travel gear obsession and I have NO idea how I traveled without them before.
4. LifeProof NUUD Waterproof Case (iPhone 6): this helps protect my phone from water, sand, dirt, and the numerous drops that incur while I travel. I love it!
5. GoPro Hero 5 Black: I am a proud GoPro ambassador and obsessed with GoPro selfie pics if you didn’t notice! The Gopro cameras are the best for action and underwater shots, and of course for taking those selfies when you’re traveling solo. It’s super small, compact, and easy to travel with. Plus it’s so much fun to use! 🙂
Disclaimer: this post contains affiliate links, which means I receive a super small commission if you make a purchase using these links, at no extra cost to you. I only recommend products that I have used before on my own and that I truly love 🙂
Istria is one of the lesser known regions in Croatia, and very underrated in my opinion. Istria is a wine lover’s paradise as it is a prime wine harvesting region in Croatian. Also specific to the Istrian region is the coveted (and super expensive) truffle. Not to mention the food in Istria is known as some of the best in Europe. Go see for yourself!
Go truffle hunting, wine tasting, admire the medieval hilltop villages, or have a culinary field day with all the amazing food that comes from this region. Istria is incredible and it’s surprising that it hasn’t gotten too touristy…yet.
If you’re planning on exploring the Istria region of Croatia, a car is actually the only way you can do it. Public transport does not go to most of these hilltop towns so your options are limited.
Istria is very small and you can easily explore the best spots in one day.
I have highlighted the perfect 1-day road trip in Istria below:
Istria, Croatia 1-day Road Trip
First Route: Rovinj to Hum
Journey time: 1 hour 15 minutes
Parking cost: 10 kuna
HUM
Hum has been coined the “smallest town in the world” and has recently been recognized officially by the Guinness Book of World Records. The town has a population of 17….SEVENTEEN!
Does it get any more fairytale than this?
Walking through this town will literally take you about 5-10 minutes, it’s that small. What we saw in this town included a few residences, a tractor trailor, a cute little shed, a little farmhouse, a field with some crops, a single restaurant with great views of the countryside, and a handful of visitors.
As you can tell by the description, there is not much to see; however, I would recommend a stop here as it is very quaint and unique in its own sense. Also, if just for the mere fact that you can say you’ve been to the smallest town in the world…officially.
(Note: when we were there it was not yet “official”)
2nd Route: Hum to Motovun
Journey time: 40 minutes
Parking cost: 20 kuna
MOTOVUN
Motovun is a medieval hilltop town that rivals the top towns in Tuscany in terms of sheer beauty. Situated on the top of a hill and overlooking the plush Istrian countryside, make sure to grab a glass of the local wine in a cute little restaurant overlooking the land.
Istria is famous for truffle hunting and you will not have a problem findings specialty shops with free truffle tastings. I honestly do not like truffles (they make me gag) so I passed on this. But if it’s you’re forte, make sure to grab a few small bottles for the perfect souvenir to bring back.
Make sure to set aside some time to get lost in the streets and have a mini photo shoot. The town is gorgeous and you’re going to want to take it all in. It wasn’t overcrowded in the least bit and that made it extra enjoyable!
3rd Route: Motovun to Grožnjan
Journey time: 25 minutes
Parking cost: free street parking
GROŽNJAN
I think I may have found my new home
Grožnjan might be my favourite town on our Istrian road trip. Also located on a hilltop, it was a lot smaller and quaint than the other towns and had a more local feel.
How cute are these blue shutters?
You could sense the artistic vibe as soon as you entered Grožnjan and it was nice strolling through all the quirky art shops. I wish we would have had more time here, as it was unexpectedly pleasant.
UMAG
Our next and last stop (kinda) was the city of Umag. As we arrived into the city and attempted to find parking, we weren’t too impressed. The city was more run down and didn’t have much character from what we could see (but hey, we could have been totally wrong and it could have been awesome). We just didn’t get a good vibe from it and made a quick executive decision to head to Novigrad for our final sunset stop. It turned out to be a great choice!
4th Route: Umag to Novigrad
Journey time: 15 minutes
Parking cost: free
NOVIGRAD
In our brief venture in Novigrad, we strolled the main street covered in colourful umbrellas and had an impromptu photo shoot. It was such a lovely street we couldn’t resist.
We then quickly rushed to the waterfront for the sunset and found the cutest little spot called Pepe Bar. There were cushions placed on the rocks and served as the perfect spot to view the sunset.
It was more on the pricy side but the view and ambiance surely made up for it. Try the mojito if you go, it was really delicious!
CareBear and I enjoying the sunset in Novigrad
Last Route: Novigrad to Rovinj
Journey time: 1 hour
Parking cost: free
Where to Base Yourself in Istria
Rovinj without a doubt is the ideal location to base yourself for your Istrian road trip. You can reach all the above-mentioned locations in one hour and 15 minutes max. Also, ROVINJ IS INCREDIBLE and probably my favourite city in Croatia. For reasons why you should visit Rovinj, check out my post What to do in Rovinj: The Ultimate Guide to Croatia’s Most Underrated City
Where to Rent a Car in Istria
About a 10 minute stroll south along the water in Rovinj, you will find a little car rental agency called Vetura. We didn’t make advanced reservations and it wasn’t a problem at all. We reserved the car the afternoon before and it costed 450 kuna (about $69/day) for an automatic last minute rental. It was way more expensive than if you book in advance, so we learned our lesson.
My first time renting a car outside of the USA. I look calm enough, huh?
We were pleased with the company and the owner was very relaxed about return times. I would definitely use them again.
To come along on our fun road trip, check out this video that my travel partner Carebear Abroad made of our awesome day! Hint: it may involve getting our car stuck in the middle of nowhere.
Have you been to Istria? What was you favorite hilltop town?
As holiday seekers flock to Dalmatia for the popular sailing trips on the Adriatic Sea, the Istria region in Croatia is often overlooked. It only took my 8TH TRIP back to Croatia to finally venture to this lesser-known peninsula, due to my intense (and some might say unhealthy) attachment to the mesmerising Dalmatian coast.
Rovinj is located on the coast of the Istria peninsula, in the Western part of Croatia. Istria is known for its impeccable wine, world class gastronomy, coveted (and expensive) truffles, and storybook hilltop towns. What’s not to love about Istria? Please tell me. I’ll wait…
Last September, my friend CareBear and I decided on a more slow-paced holiday and to spend an entire week in Rovinj, using it as a base to explore the Istrian peninsula. Let me start by saying Rovinj is the perfect place to base yourself when exploring this region, given its central position along the coast. Not only that, it’s f***ing gorgeous! That fact is undeniable.
I will say that I wasn’t expecting to love Rovinj as much as I did. The Dalmatian coast has set the bar super high for me and I must admit I am quite biased to that area. You could go as far to say that I’m passionately obsessed with it. But Rovinj absolutely blew me away and it quickly moved to the top as one of my favourite Croatian cities, if not my favourite.
The best way I can describe Rovnj is quaint, charming, clean, colorful, and rustic…all in one perfect package. It sounds cliche, but there are no other words I can use to describe the awesomeness that is Rovinj.
There is not much to see in Rovinj in terms of historical landmarks, monuments, or museums. However, it is one of those places where you can just relax and take in all the surroundings in a peaceful atmosphere. The people are extremely friendly and the service was excellent overall.
First Impressions of Rovinj
Rovinj has such a huge Italian influence, understandably given its close proximity. The city of Rovinj felt like a blend between Italy and Croatia, my 2 favorite countries in the entire world. The food, the rustic architecture, and the colours are like a spitting image of the Ligurian region in Italy (my favourite region in Italy!). At times, I forgot that I was actually in Croatia and felt as if i was in Cinque Terre. That’s how strong the Italian influence was.
What really surprised me about Rovinj is that Croatian didn’t seem to be the dominant language, although technically it is. We heard just as much Italian and German as we did Croatian. And when the locals spoke Croatian, it sounded like it was with an Italian accent. The dialect is completely different from further south along the coast, and it was distinctly apparent. I was extremely surprised to hear how much German was spoke there, until we were informed that these were Austrians speaking and it made sense as this region used to be ruled by Austria in historical times!
Why is Rovinj so Lovely? Let me Count the Ways…
The Picturesque Streets of Rovinj
Rovinj is the epitome of Picture Perfect. The streets of Rovinj are a photographer’s dream. In fact, Rovinj was one of the most picturesque towns I have ever seen. Period. My favourite part about Rovinj by far was the consistently stunning streets. Every day we found ourselves just getting lost in the maze-like alleys and having a blast. Around every corner, it was more and more beautiful.
There were numerous little cafes with funky/colourful furniture that were just so visually inviting it made you want to go in for a coffee every 5 minutes. One can only drink so much coffee in a day, but damnit they were just so stinkin’ cute!
The stores were so unique and the eclectic displays were very pleasing to the eye. The immaculate design of each little shop astounded me and silently lured me in. I could have shopped all day, even though I didn’t buy anything. We experienced boutique heaven in Rovinj.
What To Do in Rovinj
The Farmer’s Market
I could never leave a city without visiting the local farmer’s market. In fact, it’s usually the first place I visit when arriving to a new city in order to stock up on some healthy snacks. The Farmer’s Market in Rovinj does not disappoint. The fruit is super fresh, juicy, and robust. The vendors are also very friendly and inviting, often giving you loads of tasting samples.
Honey, olive oil, truffles, and figs, you name it and they had it there. What’s best about this specific one is that it’s basically open all day until about 10pm, unlike most farmer’s markets that are only open in the mornings.
We went there so often that everyone started knowing us by name, and eventually free fruit was thrown in here and there.
Monte Beach
Let me start by saying Rovinj isn’t known for its beaches. The one I would recommend is called Monte Beach and is located just a hop skip and a jump from the center (did I really just say that?).
Monte Beach isn’t really technically a beach, it’s more like a rocky cove frequented by sunbathers brave enough to lay on the rigid rocks. It was super cute and not too crowded, and this became our little go-to spot every day. We even went here a few times to watch the sunset over the rocks and it was incredible. Check it out at least once if you’re in Rovinj. Oh, and bring some wine.
Church of St Ephemia Clock Tower
This is where you can find the best panoramic views over the city. You have to walk up some wobbly/narrow stairs to get to the top, but it’s worth it for the 360 degree views.
This was a great way to see more of just the centre of Rovinj. You can’t really ride the bikes inside the narrow streets. Instead, we went along the coast where some of the other more populated beaches were located. There were rental places all throughout the city, so no need to book in advance.
Go Boutique Shopping (or in our case, window shopping)
There was no shortage of specialty boutiques in the city, from eclectic jewellery shops selling one-of-a-kind pieces to musical shops selling cool vintage instruments. The displays in these stores were outstanding and you could really appreciate the attention to detail. All were so funky and different, it was nice to just browse through them one by one, entertaining our curiosities.
Find the Most Instagrammed Spot in Rovinj
As you’re walking through the city, you may stumble upon the cutest little street ever and your head will turn (as did mine). Can you see why it’s the most Instagrammable street in Rovinj?
This was by far our absolute favorite place in Rovinj and we came back every single day. The irresistible archway framing the steps leading into the sea is what initially drew us in. A cozy cafe by day and a coveted drinking spot during sunset, this is the place you will want to be.
Newly opened in May 2015 by a Rovinj native, Jasmin Huskic, Mediterraneo Bar serves coffee and speciality cocktails in a cozy seaside retreat. The staff is warm and inviting, always making sure you are enjoying your time.
The cafe/bar is nicely decorated with an eclectic and bohemian inspired flare. Plush colourful cushions placed on the rocks and mismatched furniture give it a vibrantatmosphere. During the day, you have the option of jumping from the rocks and swimming right in front of the cafe. How cool?
The best part about this bar is the “secrete escape” spot that is, well…a secret. Tucked away in a private corner on the rocks, there is a magical spot that offers privacy in a romantic setting with a small table, cushions, and soft blankets offered for the cold night breeze.
The secret escape has become so popular that reservations are now warranted for this coveted spot. It was truly a unique experience watching the sunset in our own private little nest.
Mediterraneo Bar is seriously one of my favorite cafes I have ever been to! Hands-down. And no, this isn’t sponsored in any way, it’s really that awesome! If you make it over there, tell Jasmin that Crazy Travelista and CareBear Abroad say hi!
Where to Stay in Rovinj
As I usually do, I highly recommend using Airbnb for accommodation. During my search, I came across a big variety of choices in the center of the city and at very reasonable prices. We chose to stay in the center and it was the absolute perfect location, everything within a few minutes walk.We picked a private apartment and we couldn’t have been happier. It happened to be on what became our favourite street in Rovinj, with a restaurant and coffee bar conveniently outside our door.
The one-bedroom apartment had a full kitchen, private bathroom and shower, wifi, a flat screen TV, and a pull out couch. The apartment could fit 3 people comfortably. We really enjoyed utilizing the kitchen to save money on eating out every meal. The total price for one week including all taxes and fees was $350 ($175 each split between us). It could have been even less if we had one more with us. We paid a little more this time for the prime location and it was well worth it.
You can check out our Airbnb rental here. (Update: the price has increased a bit since we stayed here, wahhh). And if you’re new to Airbnb, feel free to use my $40 off coupon! They really do have a great referral program! (PS: even if you already have a AirBnb account, you can sign up with a new email and still get the $40 OFF. YAY)
Where to Eat in Rovinj
As a Gluten-free eater, my restaurant recommendations are often limited as I can only sample a small selection of foods, unfortunately. I also tend to cook most my meals if I can, even when I’m traveling. Nevertheless, I did manage to find a few Gluten-friendly options that I really enjoyed.
Pano e Vino-I was so excited to find an Italian place that served Gluten-free pasta. I sampled the gluten-free bolognese and the seafood risotto which were both flavourful and rich. I loved the fact that they brought out gluten-free bruschetta as an appetizer on the house, as well as gluten-free bread with our meals. I highly recommend this place even if you are not gluten free. The staff was super friendly and even gave us a whole bottle of honey grappa on the house. If we hadn’t eaten here the last night, I would have definitely returned again.
Squid 2-this restaurant has a great view of the riva and offers a variety of fresh seafood. We opted for the fish platter for 2 and it was very good and filling. The bonus is that they take credit cards.
Scuba-this restaurant also offered a variety of gluten-free options at a reasonable price. I also sampled the seafood risotto here, which was delightful and a very big portion.
B52-this place had the best gelato we tried in Rovinj and with the biggest selection. This is also the ONLY place that would allow us to sample the flavors. The scoops were huge and well worth the price. I recommend the fig gelato, unusual, yet mouthwatering.
How to Get to Rovinj
Planes, trains, and automobiles…literally. The only airport located in the Istrian region is in Pula, about 40 minutes by bus to Rovinj (costs 43 kuna). There are many affordable flights to Pula within Croatia on Croatia Airlines. I flew from Zadar to Pula for around $75 and it took less than an hour.
There are also busses from Split and Dubrovnik by Bus Croatia, but they are less frequent, take 9-12 hours, and some cost almost as much as a flight. Busses from Zagreb take about 6 hours.
You could also rent a car and drive to Rovinj; however, parking in the city can be a pain in the butt. Also, you really would only need a car for a day or 2 at the most, so if you are staying for a week it’s kind of a waste of money in my opinion.
Your best bet is snagging a cheap flight from Dalmatia or Zagreb!
How to Get Around Rovinj
By foot! It’s a total walkable city given its small size. You can get anywhere in 15 minutes max. I do however, recommend renting a car for one day to explore the surrounding region.
Exploring Istria (day trip)
One thing you must do in this region is get out and explore the countryside by car. In fact, this is the only way to reach the nearby hilltop towns, as public transport doesn’t serve most of these areas.
Highly recommended on your Istrian road trip are the towns of Motovun, Hum, Groznjan, and Novigrad. You can do them all in one day as they are all less than an hour and fifteen minutes from Rovinj! Just make sure to get an early start. To get all the details, read my post Exploring Istria, Croatia by Car: the Perfect 1-Day Road Trip
Day Trip It to Pula
Pula lies on the southern tip of the Istrian Peninsula and is a short 35-ish minute bus ride from Rovinj. The main attraction in Pula is the magnificent Pula Area, which was constructed back in the 1ST CENTURY! In fact, it’s older than the Colosseum in Rome! It’s also the 6th largest Roman arena in the world that still exists today!
There are also a few cute beaches to visit in Pula, as well as the nearby Kamenjak National Park, which I’m kicking myself for not getting to (I was short on time). If you make it over to Kamenjak, please let me know what I missed!
Moral of the Story?
GO TO ROVINJ! It’s an overlooked Croatian splendour that doesn’t get the hype it very well deserves. Rovinj is very relaxing and romantic, the perfect base for exploring the Istria countryside, is filled with hospitable people, has great food, and is undeniably drop-dead gorgeous! All the elements of THE perfect city if you ask me!
Do you have any other tips for what to do in Rovinj? Any secret finds I failed to mention? Please let me know in the comments below! I would love to check them out when I finally return!
Click photo to Pin for later♥
MY TOP 5 RECOMMENDED TRAVEL GEAR FOR CROATIA:
1.Sony Alpha 6000 Mirrorless Camera: I made the switch from my huge DSLR and I wouldn’t go back. It’s light, compact, and takes amazing photos!
2. Sony 10-18mm Wide Angle Zoom Lens: this wide angle lens is the key to landscape shots. I use this lens more than the original and am super happy with it. It’s not cheap, but super worth it if you want to get those special nature shots. Honestly, I would purchase the Sony alpha 6000 camera body only and save up for this lens to go with it.
3. E Bags Packing Cubes: the biggest life changer to keep me packing light! This is my biggest travel gear obsession and I have NO idea how I traveled without them before.
4. Anker Portable Charger: this helps me recharge my iPhone several times a day when i travel. It also has dual ports so you can also charge your camera or other electronics simultaneously. I couldn’t travel with it.
5. GoPro Hero 11 Black: I am a proud GoPro ambassador and obsessed with GoPro selfie pics if you didn’t notice! The Gopro cameras are the best for action and underwater shots, and of course for taking those selfies when you’re traveling solo. It’s super small, compact, and easy to travel with. Plus it’s so much fun to use! 🙂
Disclaimer: this post contains affiliate links, which means I receive a super small commission if you make a purchase using these links, at no extra cost to you. I only recommend products that I have used before on my own and that I truly love 🙂
Traveling to New Zealand had been a long time dream for me. However, the price of the airline ticket and the distance kept me away for so long.
That is until I found an error fair on Qantas for $216 round trip!!!
I never in a million years thought that was even possible to get a ticket to somewhere that far away for so cheap! I had about 20 minutes to decide and book…and I never looked back!
Fast forward a few months later, where I spent 12 days in New Zealand over the past fall and it was one of my favourite trips to date!
I couldn’t decide between the North and South Islands, so I did a little of both! I rented a car and spent 8 days total on the North Island and I would highly recommend doing the self drive so you can get more off the beaten path (and save time).
I stayed in Airbnbs the whole time on New Zealand’s North Island and it averaged about $32 a night, so not bad at all!
I rented an automatic car for 5 of the 8 days on the island and it costed $232 (including the extra insurance and drop off at a different airport). It’s definitely cheaper if you know how to drive stick shift!
I used RentalCars.comto book my car rental (which is what I use for ALL my car rentals. The prices seem to be the lowest and their customer service has been great. I have been using them for YEARS and I have no complaints!)
Disclaimer: Btw, the above link is an affiliate link, meaning I may get a very small commission if you book using my link, at no extra cost to you. It helps keeps this site up and running, so thank you!)♥
Unique Things to Do on New Zealand’s North Island
1. Step Into the Magical Land of Hobbiton
Ok I have a confession, I have never seen Lord of the Rings OR The Hobbit. Yet, I still wanted to visit this place because it looked like something out of this world.
And boy was I right! Hobbiton was everything I imagined and more. Walking around all the miniature houses and taking selfies in front of the colorful round doors made me feel like a kid again.
This little village is the actual movie set of the famous movies and can only be visited with a tour, so make sure you book tickets in advance! I absolutely loved Hobbiton, and I can imagine fans of the movie would DIE over it!
Hobbiton is a must see in New Zealand, whether you’ve seen the movies or not!
2. Visit the Colorful Wai-O-Tapu Thermal Wonderland
This area is one of the most volcanically active areas of the world. I had no idea until I visited!
You know how after you’ve been to more than one thermal area, they all kinda look the same after a while? Well, not this one! I was surprised that I enjoyed this so much and spent a few hours here exploring the area.
There are a few different paths you can take to walk around the whole park, so give yourself a few hours to do so. The colors of the hot springs were like nothing I had ever seen and they were very picturesque (albeit extremely smelly).
It’s a bit pricey to enter, at $32.50 NZD (about $23) a ticket, but honestly well worth it!
3. Hike to the Gorgeous Cathedral Cove (Coromandel Peninsula)
A few years back, on a Contiki trip to Thailand, I met an adorable little Kiwi (New Zealander) girl. I asked her the ONE place I can’t miss if I ever come to New Zealand and she mentioned Cathedral Cove. She was SPOT ON!!! (Thanks Rachel).
To get to Cathedral Cove, it requires an easy 45 minute hike from the car park. There are 2 beaches on either side of the cove, both worthy of yourtime. Ironically, this beach reminded me a bit of Thailand!
Tip: There are a few detours you can make on the way back that are way worth it, namely Stringray Bay. The pastel green water framed against limestone cliffs and lush greenery is breathtaking. It’s also pretty secluded so it’s a great place to get away from the crowds.
4. Go Wine Tasting on Waiheke Island
A 40-minute ferry ride from Auckland will bring you to a quiet little island called Waiheke. So what does Waiheke have to offer? A beautiful island with cliff-hanging epic views and several beautiful wineries. Need I say more? I was in absolute heaven.
There is a bus system that connects to most of the wineries, but you can also walk to some of them from the port. I decided to take the nice little path up to the first winery and I was afforded with great panoramic views of the cliffside and water.
Wine tastings cost around $10 for 3-5 tastings, not bad at all.
My favorite winery on Waiheke island was Mudbrick, so make sure to hit this one up while you’re there. It had such a cute ambiance and the views over the island were spectacular. You could ever see the Auckland skyline from there!
5. Explore the Mystical Waitomo Glow Worm Caves
I’m not going to lie, the glow worm caves was one of my top reasons for wanting to visit the North Island of New Zealand. Where else can you see something as cool as this? This is definitely one of the most unique things to do on New Zealand’s North Island.
I took a tour of the glow worm caves that lasted about 45 minutes. They took us to the caves and explained a little about the lifecycle of the glow worms and why they glow, which was very interesting.
The glowworms emit a bright bluish green color from their tails to attract insects, and to fend off other animals from eating them.
The glowworm has a lifecycle of only 11 months and only lives a few days as an adult fly. The term “life is short” takes on a whole new meaning for the glow worm.
We then boarded a small boat and our guide stood at the front and navigated us through the caves pulling on these seemingly invisible ropes attached to the walls. It was super dark in there and a little spooky, until you see the glowworms. It looked like a starry sky lit up in bright blue from underneath and it was a very peaceful experience. It kinda felt like we were in a virtual reality world, it was a really special experience.
Tip: you CANNOT take pictures inside the cave because it may startle the glowworms (also, they turn off their lights when they see light).
6. Escape to the Bay of Islands
The Bay of Islands is about 3-4 hours from Auckland by car and consists of 140 subtropical islands off the coast.
As I was short on time, I only got to visit the cute little seaside town of Paihia, as well as took a boat to Russell. Russell was New Zealand’s first capital, it’s first sea port, as well as it’s first permanent European settlement. It serves an important part in New Zealand’s history and definitely worth a visit.
There are some cute seaside cafes, beautiful beaches, and a few lookout points you can walk up to for a panoramic view of the nearby islands.
A big attraction in the Bay of Islands is swimming with dolphins in the wild. You basically take a boat out and search for dolphins and jump in with them! Since I did this in Zanzibar, I skipped out on this but I would highly recommend doing something like this because it was a wild and unforgettable experience in Zanzibar!
♥New Zealand, You Have My Heart♥
Overall, I loved all the gorgeous beaches and unique attractions in the North Island of New Zealand. I think 9 out of 10 people would recommend the South Island over the North, but I had a fabulous time and saw so many fantastic things. Don’t skip over the North Island because it has so much to offer! Although, I would recommend not spending much time in Auckland, because honestly there was nothing special about it and there are so many other awesome places to see on the island.
New Zealand blew me away and has now become one of my top 3 favorite countries! New Zealand is quiet and peaceful and has so much to offer in terms of nature, adrenaline activities, beautiful beaches, and epic views. There are so many unique things to do on New Zealand’s North Island, and I only just scratched the surface!
Have you been to the North Island of New Zealand? What were the highlights for you?
PIN for later!♥
Disclaimer: I was a guest of waitomo.com during my glow worms tour. However, my opinions are my own and I am in no way obligated to write a positive review. I would never sell out like that! It was such a unique experience and I highly recommend it.
Visiting the Galapagos is a dream for most and I honestly didn’t think I would ever make it there as it is known to be extremely expensive. Due to it’s remote and isolated nature of the Galapagos, as well as its endemic animal species which aren’t found anywhere else in the world, it’s clear why this is such a sought after destination.
Visiting the Galapagos is a once-in-a-lifetime trip and one that people usually plan for years in advance. But I decided to go on a whim and got my plane tickets less than 3 weeks before. Because that’s how I roll.
In all honesty, I wanted to see if I could challenge myself to do this destination for under $1000, without a cruise, just on my own. And when I found out I could use miles to fly there, I was sold.
The entire trip ended up costing me $994 total, true story (I even surprised myself). But I was determined to prove that it CAN be affordable.
So here’s how I did it…
Galapagos On a Budget
Plane Tickets
I used airline miles for this trip and I thought it was a great deal for the amount of miles it required. It required 40,000 miles roundtrip (using Mileage Plus/Star Alliance) from Washington Dulles, to Baltra Island, Galapagos. The regular ticket price is around $750 and up. I picked multi destination and flew into Baltra island and out of San Cristobal island. This worked out well since I didn’t have to waste time(and money) backtracking back to Baltra.
Total cost: 40k miles + $88.16 in taxes
Visas/National Park Fees
The Galapagos is one of the most protected areas on earth. 97% of the islands are protected to be exact. In order to enter, you must pay a few mandatory National Park fees and for a tourist card. There is no way around these fees so make sure to bring enough cash to cover them.
One of only 1,200 penguins on the Galapagos
Fees I paid to enter the Galapagos:
$20 for a tourist card (upon departure in Guayaquil or Quito)-they don’t tell you this and I got all the way to the gate without it. I had to run back to the check in area to get one real quick and go all the way through security. The only reason I didn’t miss my flight is because it ended up being delayed. Make sure you get your visa card BEFORE boarding your flight to the Galapagos.
$100 National Park fees upon entrance to the Galapagos
$10 to enter Isabela island ($5 for locals)
Total: $130
Galapagos on a Budget | Accommodation
I always thought accommodation on the Galapagos would cost a fortune. But it’s the complete opposite. You can do it super cheap if you want. I saw hostels for $15/night. They also have some super fancy eco resorts that are very pricy as well. But overall, it was very affordable to stay on the islands.
I went on the cheap (ish) side and paid an average of $30 a night, including a mixture of hotels, a private room in a hostel, and an Airbnb. The standards are not as high as one might be used to, but overall it wasn’t a problem. The only problem I had was the presence of little tiny bugs (smaller than ants) that were in almost every place I stayed. I think they just have a problem with bugs being a tropical climate.
Oh and the wifi….the wifi. Wifi on the Galapagos was officially the worst wifi I had ever experienced. It hardly every worked in my room (although the hotels claimed wifi in all rooms) expect for Iguana Hotel on Isabela island. And when it did work, it was so slow you couldn’t even open anything if more than a few people were on the network. I couldn’t open any videos at all while I was there. It was kinda nice to disconnect, but at some points I really needed wifi to look stuff up so it was an annoyance for sure.
Where To stay in the Galapagos:
Puerto Villamil, Isabela island
Hotel Iguana($40/night).
This was the cleanest and best place I stayed in the Galapagos. It was also the only place I didn’t see many bugs and the wifi actually worked (slowly) in my room. It was the most expensive accommodation on my trip, but well worth it. Check rates for Hotel Iguana on booking.com here.
Puerto Ayora, Santa Cruz
Hostal Vista al Mar($30/night)
I got a private room here right near the port and good dining options. However, it wasn’t as clean as I would have liked, it had NO air conditioner (only a fan), the wifi was the worst I had experienced, and there were many bugs. I wouldn’t recommend this place honestly.
Hotel España($30/night)
A cute little hotel with a chill lobby filled with hammocks. When I alerted them of the many bugs in my room, they sprayed it while I was out and it got rid of the problem. The staff was super nice and helpful! Check rates on booking.com here. And if you’re new to booking.com, use my $20 off coupon here.
Puerto Baquerizo Moreno, San Cristobal
Airbnb San Cristobal($18/night)
I rented a room in a huge house and was very large and spacious. It had 3 double beds and could have slept 6. It was an 8 minute walk from the main port in a quiet neighoborhood. The host gave me snorkel gear to wear to the beach, which was nice. Oh, and it was a 5 minute walk to the airpot! The only problem was the huge black beetle bugs I found the first night. When I arrived, all the windows were open so I’m sure thats where they came from. I kept all the windows closed and only saw one more the next day. You can view the listing here.
Total $206
Galapagos on a Budget | Tours
Tours in the Galapagos are highly regulated and not every tour company will operate every day. The reason is they limit the amount of people that can visit each island to a small number per day. This prevents damage to the environment from mass tourism. I wish more places would adopt this method because you can really see how clean and well preserved the environment is over there.
Tours in the Galapagos are not cheap and this is where you will spend a majority of your budget. BUT, the key is to book LAST MINUTE on arrival. DO NOT book tours online, as they are up to 3 times as much! I was quotes as much as $325 for a tour that I eventually went on for $160, by booking last minute.
It can be a little nerve wrecking getting there without any booked tours, especially ones you really want to do. But you will save a shit ton doing it this way. Don’t forget to bargain down about 20% of the asking price as well. They are more negotiable last minute.
Note: they were fully booked for my tour to Bartoleme when I inquired the day before. Apparently tho is one of the most popular tours and not every company will operate daily. I really wanted to do this tour, so I had to move my schedule around and change 2 hotel dates (which both hotels surprisingly let me do free of charge!).
Recommended Tours To Do in The Galapagos:
Bartoleme Island (day trip from Santa Cruz Island)
→(10-hour tour including pickup from hotel, breakfast, and lunch)
This tour takes you to the infamous Pinnacle Rock lookout and to snorkel on a nearby beach on Santiago island called Sullivan Bay. It requires light hiking up to the summit for the viewpoint, but it isn’t hard at all.
Regular tour price in-person: $180-$200 (and up to $325 online in advance!)
Price I received last-minute: $160 (I found one company that offered me as low as $150, but the day didn’t work out)
Los Tuneles (day trip from Isabela Island)
→(5-6 hour tour including lunch. Usually leaves twice a day at 7:30am and 11:30am)
This tour takes you to some great snorkelling spots where we saw sharks, turtles, and sea horses. It also takes you to the otherworldly Los Tuneles, underwater tunnels formed from volcanic lava. It’s like no other landscape you will ever see! We also saw blue-footed boobies here as this is a popular nesting site for this species.
Regular tour price in-person: $120
Price I received last-minute: $100
I went with the Pahoe Hoe tour company and I was really impressed! Our guide Juan Carlos was super friendly and showed us all the cool animals, including a sea horse! I would have never seen it on my own. He even went down into the caves to find sharks for us to see! Lunch was yummy chicken and yellow rice in an individual tupperware jar.
Kicker Rock (day trip from San Cristobal Island)
→(6 hours and leaves at 9am)
This tour takes you to the iconic Kicker Rock, a popular spot for viewing sea turtles, hammerhead sharks, white tip sharks, manta rays, and sea lions. We saw ALL these and it was incredible! From the second I jumped into the water and looked down, I saw 2 white tip sharks! If you only do one tour in the Galapagos, do the Kicker Rock. It was hands-down my favorite tour and a day I will never forget.
Regular tour price in-person: $100-$120
Price I received last-minute: $90
I went with Scuba Eden company and I highly recommended them! They have awesome/upbeat tour guides and very small group sizes. We only had 6 people in our group! They also take GoPro footage of you and give you the footage for free if you want it!
Total spent on tours: $350
Galapagos on a Budget | Rentals
For the days I didn’t do an organized tour, I rented a bike one day on Isabela island and snorkel gear on Santa Cruz.
Galapagos “traffic”
Snorkel rental: $8/day in Puerto Ayora
Bike rental: $15/day Isabela island
total: $23
Galapagos on a Budget | Transport
Ground transport on the islands is very cheap (although you can walk to lots of places as well). There are taxis readily available and I paid $1-$2 for each ride.
On Isabela and Santa Cruz, the boats can’t dock and you will need to take a water taxi to the boats. Each ride costs $.50-$1.
A word about ferries…
The so-called ferries are actually little speed boats they pile a bunch of people into. It wasn’t the most comfortable situation, especially when the boats are full. The sea can get choppy so make sure to take some Dramamine and sit at the back of the boat to avoid sea sickness.
Ferries between the islands cost $30 one-way. You can only travel to Santa Cruz, Isabela, and San Cristobal by ferry (the only 3 inhabited islands on the Galapagos). All other island require a day trip or cruise to get to.
Note: there is no ferry between Isabela and San Cristobal. If you want to travel between these islands, you must go back to Santa Cruz first and then buy another ticket. So essentially, it would cost $60 to go from Isabela to San Cristobal and vice versa.
Buy tickets as soon as you can because they can fill up, especially in the peak season.
What I spent on transportation in the Galapagos:
Taxis: $10
Water taxis: $4
Ferries: $90
Total: $104
Galapagos on a Budget | Food
How much I spent on food:
Dinners: $52
Grocery store snacks/lunch/bottled waters: $37
Coffee: $3.50
Total: $92.75
How I did it so cheap:
I brought 2 boxes of protein/granola bars from home which I ate for my breakfasts. I went to the local markets for lunch foods (I never sat down for lunch once, mostly due to no time…but I usually don’t eat a big lunch anyways because it makes me tired and lethargic).
I also inadvertently cut back on 2 of my usual (expensive) habits: coffee and wine. It was so hot and humid that I couldn’t drink much coffee and I was too dehydrated and hot to drink any alcohol. Being hot saved me a lot of money!
There was also one day when my awesome tour guide bought me dinner right after the tour at a local stand that only costed $2 for a fried plantain stuffed with salsa and tuna (sounds like an odd combo, but it was actually really good!)
Through my research, most online sources said that food will be your biggest expense in the Galapagos. Well, that might be true if you go to the super touristy places on the waterfront. I walked past menus where the average prices were $18-25 per dish. Oh hell no, that’s absurd!
Out of all my expenses, I spent the LEAST on food. And honestly, it’s one of the cheapest places I’ve ever eaten dinner.
The key to eating cheap in the Galapagos is to eat where the locals go. The 2 words you’re going to want to learn are ALMUERZOS and MERIENDAS.
Almuerzos (what it’s called at lunch time)
Meriendas-(what it’s called at dinner time)
This is a pre-set type of menu that the locals indulge in. It usually consists of soup, fresh juice, rice and main dish of seafood, beef, etc. One place even served dessert with it! And the greatest part is that you can have dinner or lunch for $4-$7. True story.
Where to Eat in The Galapagos:
Kiosco Voluntad de Dios (Santa Cruz): cheap eats from $4.50. I decided to order something off the more “expensive menu” and tried an awesome shrimp with coconut sauce dish (it was $9.50 and well worth it). It’s also a cool spot where you eat at big community tables.
I met some really cool Austrian traveler’s this way. They offered me a bite of fresh fish they had ordered, and it was one of the best fresh fish I ever tried! It was so meaty and huge so definitely try the fish here if you want to splurge on a great meal.
Encanto de la Pepa (Isabela island): it’s on the main strip but super cheap and had a cute little vibe. They offered a $7 set menu consisting of soup, papaya juice, choice of one main (fish, beef, calamari,etc) and one side (rice, salad, fries), plus banana cake. I ordered the calamari in coconut sauce and it was delicious.
Lucky’s (San Cristobal): the cheapest dinner I had in the Galapagos for $4. Included is juice, chicken and veggie soup, chicken or beef and rice, and salad. I couldn’t believe I had all that for dinner for only $4! Ecuador for the win!
I never travel without travel insurance anymore, it’s just silly. Shit happens when you least expect it. You especially want to be covered when you’re visiting more report places like small islands. If something happens and you need to be air-lifted to the nearest hospital on the mainland, this would cost a fortune!
My go to travel insurance that I have been using for the past 4 years is World Nomads. I have made 3 claims and have been reimbursed without any hassle. I highly recommend them.
Other Things to Note About The Galapagos
Ecuador uses the dollar
Ecuador uses the same outlets and voltage as the U.S., meaning no need for a convertor/adaptor
They charge an absurd amount of interest in credit card purchases so try to pay cash
There are ATMs on Santa Cruz and San Cristobal but none on Isabela island (try to bring cash because sometimes the machines are empty)
Wifi is virtually non-existent so expect to be “disconnected” during your time there. Some hotels have wifi but in my experience it never worked in the room and only in the lobby. If more than a few people were on at the same time or didn’t work. When it did work it was slower than dial up internet and I couldn’t watch any video of any type, couldn’t view Snapchat, etc. It was ok for sending WhatsApp messages
It’s hot AF (the islands are located right around the equator after all) so re-apply sunscreen every few hours. I got burnt bad and I re-applied about 5 times a day
Bring bug spray or repellent bracelets (I got eaten alive)
Don’t feed or touch the animals…just don’t (please practice responsible tourism)
They charge 22% credit card fees to book tours! Wtf
Liked it? PIN it for later♥
Have you been to the Galapagos? Were you able to do it on a reasonable budget? If you can add any budget tips, please do!
PS: This post contains affiliate links, which means I may earn a small commission if you book using my link, at NO extra cost to you. It’s what helps this site remain add free (ads annoy the crap out of me!). Thanks ♥
This website uses cookies to improve your experience. We'll assume you're ok with this, but you can opt-out if you wish.AcceptRejectRead More
Privacy & Cookies Policy
Privacy Overview
This website uses cookies to improve your experience while you navigate through the website. Out of these, the cookies that are categorized as necessary are stored on your browser as they are essential for the working of basic functionalities of the website. We also use third-party cookies that help us analyze and understand how you use this website. These cookies will be stored in your browser only with your consent. You also have the option to opt-out of these cookies. But opting out of some of these cookies may affect your browsing experience.
Necessary cookies are absolutely essential for the website to function properly. This category only includes cookies that ensures basic functionalities and security features of the website. These cookies do not store any personal information.
Any cookies that may not be particularly necessary for the website to function and is used specifically to collect user personal data via analytics, ads, other embedded contents are termed as non-necessary cookies. It is mandatory to procure user consent prior to running these cookies on your website.