So you finally decided to take the leap and venture over to The Lost City of Petra, Jordan. Yay! It’s pretty safe to say you will not be disappointed. I recently visited Petra and it was one of my favorite places I have seen on my travels. Ever. Blown away is an understatement.
There are a few things I wish I knew before visiting Petra and which I think may be helpful in planning your trip. So I have put together this wee little blogpost with some practical tips for visiting Petra.
Practical Tips for Visiting Petra
The Visa Situation
First things first: to get into Jordan as a US citizen, you must purchase a visa on arrival. The cost is 40 JD ($56). You can purchase the visa right at the passport check counter. They do accept credit card or Jordanian dinars (JD).
1JD = ~1.41 $USD (ouch).
How to Get to Petra
Take the JETT bus from Amman to Petra for 10 JD one-way. The journey takes about 3 hours and 30 minutes including a 20minute rest stop. The bus is clean and comfortable.
There is no online purchase system as of yet so you either need to call them within a week of your journey or show up early and try to get a ticket the day of. During peak season, it’s likely to sell out. There is only one bus a day.
The bus from Amman to Petra is at 6:30am and the bus from Petra to Amman is at 5pm. The bus leaves from Abdali Bus Station in Amman. The JETT office opens at 6am so make sure you are first in line if you are buying the morning of. (I would recommend buying a day or 2 before if you happen to be in Amman already).
Note: the online “booking system” does not reserve you a seat. They sent me an email saying I needed to call them within a week of the journey to confirm. I was traveling and couldn’t call so my seat was not reserved. I had to show up at 5:50am before they opened and hoped they weren’t sold out. It wasn’t peak season so I got lucky and got a seat.
Buying Tickets to Petra
Ticket Prices to Petra:
1 day non-accommodated visitor: 90 JD (i.e. if you come as a day trip without accommodations in Petra)
1-day ticket: 50 JD (with proof of overnight stay)
2-day ticket: 55 JD
3-day ticket: 60 JD
I have a feeling they are discouraging day trips and want you to stay longer based on those prices. What do you think?
The Royal Tombs of Petra
You will need to bring your passport with you to purchase tickets at the visitors center. However, they did not ask for my passport for Petra by Night. They do accept credit cards, but not so much for Petra by Night. They sell the tickets right at the entrance, so you need to bring cash. (I’m honestly not sure if the visitor’s center is open at this time of night. So ya, cash is king).
How Long Do You Need in Petra?
I recommend at LEAST 2 days in Petra. At least! I was there 2 days (+Petra by Night) and it wasn’t enough. There is a lot of walking and hiking up hills so you gotta break it up and pace yourself.
Rome wasn’t conquered in a day. Don’t try to conquer Petra in a day. The main trail alone from the entrance to the Monastery is 8km! That’s 5 freaking miles.
Take a look at this map below. You will see the entry on the bottom right and the Monastery on the top left. Do you see how far away they are? Freakin far!
It takes about 1.5-2 hours to reach the Monastery from the entrance. That’s 3-4 hours just to do the main trail so keep that in mind. That doesn’t even account for all the millions of photos you are going to stop for.
Get there bright and early when it opens at 6am. You will have the Treasury to yourself for the first 10-15 minutes.
I recommend breaking up the main trail into 2 days. The first day explore the Treasury, Royal Tombs, Great Temple, and at least one of the 2 hikes to the top of the Treasury or the High Sacrifice. Then on day 2 take the long route to the Monastery, and all the other sites you missed on the main trail on the first day, plus the other hike.
I’m sure you’ve seen the many awesome photos of Petra by Night. Some say it’s overrated, but I disagree. It was incredible and the highlight of my trip! There is something special about being there at night with just the lanterns lighting your path. It was magical, that’s the best way to explain it.
Petra by Night is only 3 days a week (Monday, Wednesday, & Thursday) and I made sure I planned my trip around that because I did not want to miss it. It starts at 8:30pm but keep in mind it takes about 30 minutes to walk to the Treasury from the entrance! The cost is 12 JD ($17).
Safety in Petra
The world isn’t a safe place these days, but we shouldn’t stay at home because of it. Unfortunately, there is a negative stigma tide to Middle Eastern countries, one very hard to shake.Yes, it borders Syria and Saudi Arabia. But Jordan is generally a safe place, minus a few areas here and there.
I was in Amman at night, rode the bus to Petra myself, and walked around the streets by myself. I went to Petra alone as a female and I felt completely 100% safe.
I never once felt uncomfortable, like I was in dangerous, or harassed by men. In fact, it is one of the few countries in the world where I never got catcalled. Not once! The Jordanian people were some of the kindest, most hospital people I have ever met and I felt super welcome and safe in their country.
Riding Horses/Donkeys/Mules in Petra
You may get exhausted from all the hiking and walking you will be doing in Petra and need a little lift. In fact, you will get hassled 20+ times a day for a “taxi” ride on a donkey/mule. They can be persistent so learn to politely, but firmly decline if you’re not interested.
If you do decide to take a ride, make sure to negotiate the price beforehand or they will for sure overcharge you. A horse ride from the entrance to the Siq is included in the ticket price. However, they do indeed expect a tip.
How to Dress in Petra
Make sure to dress like you’re going hiking all day, because well, whether you like it or not, you will be doing a LOT of hiking. Especially if you want the best views. Absolutely no flip-flops.
If you must get that shot in a cute dress, bring a change of clothesor wear them underneath. There are 3 bathrooms throughout where you can change. Or if you hike first thing in the morning, you can change on the mountaintop because no one is there!
I would recommend dressing in layers as it’s freezing in the mornings and evenings and scorching hot in the day. You are in the desert after all.
I would avoid wearing black as it picks up ALL the dust. I learned the hard way.
Note: while it is a super touristy area of Jordan and the dress code is not as strict, you still want to respect the Jordanian culture. (I.e. don’t dress like hoochie).
What to Bring With You to Petra
Bring small bills to buy water, coffee, snacks. I brought a 50 JD bill and not one person had change so I had to buy an expensive necklace to break change. The necklace sure is pretty though.
Bring sunscreen and lots of water. Also, bring some snacks as you’re going to be there all day and food is not cheap inside. There is also limited options.
Bring hand sanitizer as your hands will get super dusty throughout the day. You’re gonna be hiking in sand, dirt so if you’re a clean freak like me, don’t forget it!
Where to Eat/Drink/Snack inside Petra
There are 2 restaurants inside Petra. One is a fancier buffet that charges 17 JD (~$24) and another right across from it that looks like a rundown shack. This “shack” also serve a buffet which was actually pretty good for only 10 JD ($14). I ate at the shack and I was satisfied.
There are also many little cafes with coffee/tea and packaged snacks along the way. I stopped at so many because they had a nice views and I needed a break from walking in the heat. My favorite was the one right smack in front of the Monastery. They even accepted credit cards! (with a minimum 5JD purchase). Tip: order the coffee with cardamon, so yum!
Where to Stay in Petra
Technically there are no hotels in Petra. The town called Wadi Musa is where you will be staying, located right next to Petra.
For a budget hotel under $50, stay at Rocky Mountain Hotel. The hotel is located on top of a hill in Wadi Musa, a 5 minute taxi ride from the Petra entrance or a 30 minute walk down a very steep hill. The view at the top of the restaurant is worth it alone. The sunsets there are epic and the buffet food was actually very good. To check out current prices and pictures, check here.
View from the cafe at the top of the Rocky Mountain Hotel
The Sun will Make the Sites Look Different at Different times of Day
Wait, what? Depending on where the sun is in the sky, the red rock will appear a different color. When the sun is shining directly onto the rock, it turns a deep red color. In the shade it’s noticeably lighter so it’s a good idea to come back to certain sites and photograph them at different times of the day.
As you will see in the photo below, this is the difference of the colors of the Treasury at 6am (left) and 4pm (right). A HUGE difference, right?
I was told the sunlight at the Monastery is best around 1pm.
A Word on Travel Insurance
Make sure to get travel insurance in case something happens. You’re pretty much out in nowhere so getting to the hospital may cost you a fortune if you are uninsured. Most US plans will not cover you overseas so make sure to check in advance.
My go to travel insurance that I have been using for the past 4 years is World Nomads. I have made 3 claims and have been reimbursed without any hassle. I highly recommend them. This is an affiliate link, btw :).
♥For more inspiring travel photos, make sure to find me on Instagram @CrazyTravelista.
If you enjoyed this post, please PIN it for later! ♥
‘The rose-red city half as old as time’, the words used to describe the ancient city of Petra by poet John William Burgon.
Petra comes from the Greek word for rock. Quite fitting for an entire city carved into the red sandstone cliffs. Petra has a fascinating and mysterious history and is on many bucketlists rightfully so.
Petra is also known as the “Lost City” as it was abandoned for centuries after a devastating earthquake. It was rediscovered by a Swiss explorer named Johann Ludwig Burckhardt in 1812.
Petra was named a UNESCO World Heritage Site in 1985 and is known as one of the 7 New Wonders of the World.
Today, it is estimated that less than 2% of the sites are excavated in Petra, yet you could spend several days discovering all the remains and hiking trails of the monumental city.
I recently spent a few days in Jordan and was determined to find the most epic views in Petra, and I think I found most of them! I honestly wish I had one more day as I just scratched the surface of this amazing place.
Below I have highlighted the most epic views in Petra, as well as how to find them (some are kinda hidden so hopefully this guide will help you find them easily).
The Most Epic Views in Petra
Beyond the High Sacrifice
The high sacrifice is a holy place that was used for animal sacrifices and is located on the summit of the Attuf Ridge high above the Royal Tombs and main trail. The peak rests at around 550+ feet. From here, you can see most of Petra, excluding the Monastery and Treasury.
You will look right down to the royal tombs across from you. There is a little shack with coffee/tea and trinkets at the top and it’s hard to resist sitting at the very edge of the cliff sipping coffee with the epic view.
How long it takes to reach the top:
About 40-ish minutes, depending on your fitness level. I have read articles that says 1 hour but only if you go at a snail’s pace.
How to Get There:
Look for the sign that says: High Sacrifice (Jabal Almadbah)
About 5 minutes after the Treasury, it will be on the left side. When you see the shop called “Why Not Shop” , look for the steps on the left. You’ll see a brown sign. If you see the amphitheater, you’ve gone too far.
Looking down onto the Treasury
This might be the most epic view you can get in Petra and takes a steep hike to get to with many stairs. The walk takes about 45+ minutes to get to the top. I would definitely go first thing in the morning to beat the heat and the crowds. I went around 6:45am, at the top around 7:30am and absolutely no one was there. It was awesome to have the place to myself.
A post shared by 🌍World Traveler/Blogger✈️ (@crazytravelista) on
Trail Name: Al-Khubtha Trail
How to Get There:
About 5-7 minutes past the Treasury, you will pass the Street of Facades and public bathrooms on the right. Right after the bathrooms, you should see some little steps and a brown sign saying Al-Khubtha Trail. Take the steps up and you should pass the Royal Tombs on the right side.
You will then reach the bigger/steeper steps. Follow that up and you will see a few more signs saying saying “Come and Sit and Enjoy The Spectacular View of the Treasury From Above”.
View from the Bedouin tent thingy
There is a sign at the top pointing with an arrow to the rocks saying “Best View” where you will get a side view of the Treasury. But in my opinion, the best view is actually from the Bedouin type tent thingy about 2 minutes past this. You can see the Treasury straight down from there!
The Monastery and Petra Mountains in the Distance
The Monastery is arguably the most epic site in all of Petra, bigger and more badass than the Treasury. It takes a strenuous 45 minute hike to the top. But the best views aren’t from there. The best views are from above.
How to Get There:
Walk past the Monastery and cafe and you’ll see a hill. Climb up the hill and on the left you’ll see a sign that says Do “Not Miss This Spectacular View”, another one that says “View Wadi Araba Water Spring”, and “Grand Canyon View, Best in Jordan”.
Climb to the first platform and that’s where you will get the best view. You can go higher to a little cafe, but the views aren’t as good as from here in my opinion. You get the Monastery from the distance as well as the vast Petra landscape framing it.
Cafe with the “Best View in Jordan”
One of the best views over Petra where you can relax and sip on some very yummy tea is at a cafe located 10 minutes past the Monastery.The cafe is decorated Bedouinstyle with the colorful floor pillows and tables. Have a mint tea and enjoy the views. There is a cute and super friendly kitty that lives there too! A bonus if you ask me.
How to get there:
If you come down from the Monastery view and keep waking up the hill, you will see signs that says “Grand Canyon View, Best in Jordan”(btw, if you haven’t yet noticed from this article, there are tons of signs in Petra that will claim the “best view”, that’s for you to decide!). Walk to the top to the cafe for a panoramic view of the mountains.
Petra By Night
This is a definite a MUST if you’re visiting Petra. It only occurs 3 nights a week (Monday, Wednesday, & Thursday) so make sure to plan accordingly. This was the highlight of my Petra trip and the only way I can describe it is MAGICAL.
The Siq opens right up to the Treasury at the end and that first sneak peak through the narrow gorge is EPIC. It brought me to tears seeing the Treasury and all the candlelights surrounding it. What a great introduction to Pera!
A post shared by 🌍World Traveler/Blogger✈️ (@crazytravelista) on
How to Get There:
You really can’t miss it as it’s on the main trail. After you get your tickets at the visitor’s center, proceed to the walk through the Siq. It takes about 30 minutes from the entrance to get the the Treasury, but half the excitement is walking through the narrow path illuminated by candlelights.
Inside the Caves of Petra
I must admit I have never seen photos of the caves of Petra, as they are overshadowed by the Treasury and Monastery. The caves are made of swirly marble patterns and were so beautiful. They also provided a cool escape from the heat!
A post shared by 🌍World Traveler/Blogger✈️ (@crazytravelista) on
How to Get There:
Walk past the Street of Facades and they will be on your right before the Royal Tombs (if you see the Amphitheatre, you went too far). You can climb up into them and it gives you a nice alternate view of Petra that’s pretty damn impressive.
Walking through the Siq
The Siq is the gateway to the city of Petra and is a long narrow gorge with twists and turns that ends with a dramatic opening right smack in front of The Treasury.
The Siq is around 1.2km long and is anywhere between 3 and 12 meters wide. The cliffs are as high as almost 600 feet in some parts and the walk alone through the Siq is filled with many photo ops.
How to Get There:
You have to go through the Siq to enter Petra so you literally can’t miss it!
Travel Insurance for Jordan
My favorite travel insurance that I have been using for the past 4 years is World Nomads. I have made 3 claims so far and have been fully reimbursed for all 3 without any hassle. I HIGHLY recommend them.
Here is my more detailed review of World Nomads if you’re interesting in their coverage.
Have you Been to Petra? Do You Have Any Other EPIC Viewpoints you Would Recommend? Please Share Below!
If you’ve enjoyed this article, please PIN it for later 🙂
If you haven’t already, find me on Instagram @crazytravelista for lots more beautiful travel photos. ♥
Honestly, I never had any desire to go to Finland before, let alone to the very north in Lapland. But as usual, I was enticed by some awesome snowy pics of this beautiful country and I knew I had to experience it for myself. Plus, I really wanted to see Santa! Can you blame me?
I had no idea there were so many awesome and unique things to do in Lapland, Finland. I was overwhelmed by all the choices as I was deciding which ones to choose! My wish list included seeing the northern lights, doing an animal safari (aka sleigh rides), and something super traditional and completely out of my comfort zone (you’ll see).
So if you’re heading that way and need help deciding, let me highlight all the kick-ass things to do in Lapland, Finland below:
Most Unique Things to Do in Lapland, Finland
Go On a Photo Expedition
Take an all day photo expedition that includes some trekking through the nature and photographing some epic views over the land. This is a must do for photography lovers. No professional experience is needed! They basically take you to all the best photo spots in a winter wonderland and help you take some awesome photos. It was really better than I expected.
I wrote a separate post on this so I won’t get into too much detail here. But honestly, this was one of my favorite things I did in Finland! You can read about my tour in more detail here.
Santa Claus Village
If you’re in Rovaniemi you kinda have to go see Santa! Ok honestly, the village won’t wow you or anything but it’s one of those things that’s cool to say you did. Where else can you visit the city Santa is from?
In Santa’s Village, you can send a postcard postmarked from Santa’s Village and get an official stamp on your passport. They also offer shorter reindeer and husky rides. Although it’s more commercial here, it’s still an option of you don’t want to fork out a huge lump of cash for the longer animal safaris.
Cross the Arctic Circle
While at Santa’s Village you can actually cross the arctic circle! How cool is that? This is one of the few places in the world where you can actually stand with one foot on each sides of the arctic circle. If you want, you can even get an official certificate proving you actually did it!
Reindeer Safari
I couldn’t go to Lapland and NOT ride a reindeer! I mean, how many other places can you do that? Not many. The ride was very slow and kinda “kiddie” so definitely something for small children to enjoy, but still kinda cool to do as an adult.
The ride itself is about 25-30 minutes through the snowy forest. It’s a great opportunity for photos. We then visited the reindeer farm and got to see all the cared for reindeer, even some cute baby ones! To get warm, we huddled by the fire and roasted sausages and sipped on berry juice.
It was a nice and quick tour and the company was great, but honestly for the price I don’t think it was worth it. I say this because they off reindeer rides at Santa’s Village for a small fraction of the price. Unless you really love reindeers and want to spend a little extra time with them, I would do the ride at Santa’s Village instead!
(Disclaimer: I received a small media discount for this tour. While I greatly appreciate this, I need to be completely honest with my readers and tell it like it is).
Snowmobile to the Northern Lights
I’ts always a smart idea to book a northern lights tour that also combines another activity, just in case you don’t get to see them. Seeing the northern lights is never guaranteed and they are very unpredictable.
The perfect example of this is the Snowmobile Safari/Northern lights tour I did with Wild Nordic. The snowmobiling really got my adrenaline pumping riding out to a frozen lake to chase the lights. The ride was a bit bumpy with all the ice, so you probably shouldn’t do this is you have any spine issues or recent injuries.
A post shared by 🌍World Traveler/Blogger✈️ (@crazytravelista) on
After about 45 minutes of zipping through the snow, we ended up on a frozen lake far from the city lights. Our awesome guide Raivis made a small fire and cooked us Finnish sausages and poured us the most amazing hot berry juice.
Unfortunately the conditions didn’t allow us to see the lights; however, bonding with the fellow travelers around the open fire is something I’ll never forget!
The snowmobiling experience was so fun we didn’t even care about seeing the lights (I had seen them a few days earlier in Tromsø so I was content). It was an awesome tour and something you shouldn’t miss!
Sauna/Ice Dip
This might have been the most crazy thing I did in Finland. However, it’s something very popular with the locals, mostly for the health benefits. Going from extreme hot to cold is good for your circulation and makes you feel refreshed (although caution is advised in those with a history of heart issues).
The setting at Immelkartano was absolutely perfect. It’s a small family run company (which you know I love) which operates 2 sauna houses set on a beautiful snowy frozen lake.
Set up my tripod and caught the Northern Lights faintly in the distance. This was not visible with the naked eye so an added bonus!
I was told by the attendant that going in the frozen lake up to your next cleanses you of your sins from the neck down. All sinners welcome 🙂
The ice dip was super invigorating to say the least! You start by heating up in a traditional Finnish smoke sauna in a private setting and then jump into an ice hole. You end the dip by drinking a shot of straight up Finnish vodka (trust me, you’ll need it!).
View the Northern Lights from Levi
Levi is an adorable little ski town that I had the pleasure of staying in for 2 days while in Lapland. Although I didn’t get to see the northern lights on my snowmobile safari, I was fortunate enough to catch them in the back of a restaurant I was walking to in Levi. I happened to have my tripod on me from before, so I ran behind the restaurant to catch this incredible display of Mother Nature. There is something special about seeing them when you’re least expecting them. It’s pure magic.
Visit a Snow Hotel
The Snow Village is located about a 30-40 minute drive from Levi but is worth the trip. I learned so much about ice hotels and the design and details blew me away. I didn’t know that they rebuild the ice hotel every year, and it never looks the same twice! I really wish I would have stayed one night. The place was amazing! We were able to go inside all the rooms and see what they were like. Every room has a different design with intricate carvings. The artwork is really incredible. There is also an ice bar, ice restaurant, and ice slide! It’s only for children, but I saw some adults breaking the rules (ahem, including me).
Every year, the hotel has a contest for the best designed room. Applicants submit their design online and the winner will have their room brought to life with their design! They even get to come stay in the hotel in their room! How cool?! If only I could draw past stick figures…
Husky Safari
One of the most popular activists in Lapland is to go on a husky ride safari. This activity is a lot faster and more exciting than a reindeer ride. The adrenaline kick plus the frigid air smacking you in the face will really wake you up!
You will also have time to meet all the huskies and play with them afterwards. I’m a cat person honestly, but these cuddly creatures are so hyper and loveable that I fell in love with them. I’m not going to lie though, in the beginning when they get them all hyped up to ride, they were a bit scary and aggressive!
Look at those gorgeous blue eyes!
It wouldn’t be a true Finish activity without ending the day inside a hut roasting sausages over an open fire. God I love Finland!
A post shared by 🌍World Traveler/Blogger✈️ (@crazytravelista) on
The company was called Tundra Huskies and it costs €75 for the tour. You get to visit husky farm and pet the dogs and then do a 25-30 minute ride. You can also visit some reindeer on the farm. The whole tour takes about 2-3 hours.
Other Awesome Things to Do in Lapland, Finland
Get a panorama view from a fell (a fell is basically an epic lookout point over the land).
Stay in a hotel with your own sauna (I’ll get to that in the next post).
Other cool things to do in Lapland that I didn’t get a chance to try:
Scenic flight to chase the northern lights
Iceberg float
Ice fishing
Stay in a glass igloo hotel (my dream)
*This post was in collaboration with Visit Levi & Wild Nordic; however, my opinions are my own and I had a kick-ass time in Lapland, as you can see!♥
If you enjoyed this post, please PIN it for later!
Have I Convinced You To Want to Visit Lapland? What Activities Would You Like to Do?
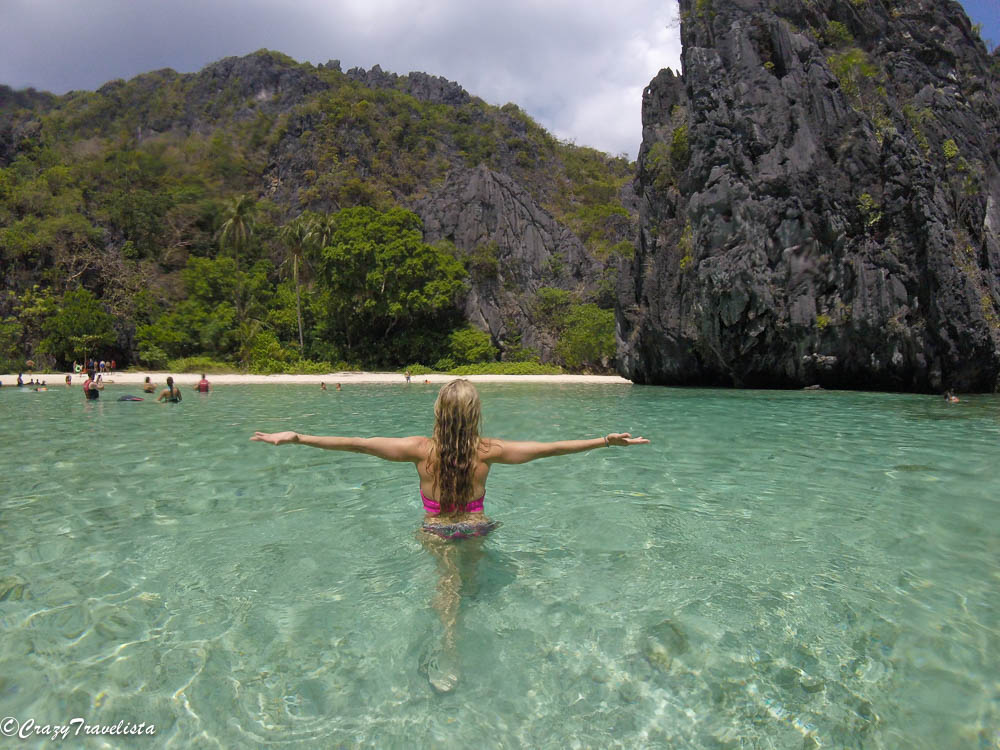
Palawan has been voted the most beautiful island in the world, and for good reason. With its plethora of crystal clear turquoise waters, stunning lagoons, and plunging cliff lines, its not hard to see why. Palawan is the epitome of the word paradise.
There’s a lot you can do and see on Palawan even with a limited timeframe. I spent a week in Palawan, split between El Nido and Coron and it was the perfect introduction to the Philippines.
To make it simple, it’s going to take a long time! There are no direct international flights to El Nido so you will have to fly to Manila first, and then either fly to Puerto Princesa and take a 6-8 hour van ride up to El Nido.
Or there is the more direct (and more expensive) option of flying nonstop to El Nido. I flew with Air Swift on a short flight from Manila and it cost me $130. To me the direct flight was worth it to get there quicker.
You’ll be greeted at El Nido airport with a serenade from the local Filipino women, a unique welcome to the Philippines! Air Swift passengers are also given free coffee, juice and snacks upon arrival.
To get to your accommodation, you’ll most likely have to take a tricycle, which reminds me of a mini tuk tuk. It costs 300 PHP to get to town (around $6) and takes around 15-20 minutes.
El Nido Tours
People flock to El Nido for the famous island hopping tours. There are 4 main tours leaving from El Nido: Tour A,B, C, and D. Creative, huh? They also offer combined tours if you’re super short on time (but some of the stops are cut out obviously).
Tour A & C are the most popular and most the pictures you’ve seen from El Nido are most likely from those tours. If you had to pick just one, hands down I would choose Tour A!
All the tours are a fixed price by the government so don’t bother trying to negotiate. There are dozens upon dozens of tour companies in town and they pretty much all offer the same tour with the same stops so no need to be extra picky on this one. I am one for good reviews so booking online beforehand wouldn’t be a bad option either.
Day 1: Nacpan Beach
Rent a motorbike for 300-500 PHP and drive 45 minutes North to Nacpan Beach. The last 20 minutes is super bumpy and rocky and it’s uncomfortable but not dangerous. There’s a little restaurant that serves fresh seafood and drinks on the beach.
Unfortunately, Twin Beach was closed due to a court case involving squatter activity until further notice so it’s impossible to get that infamous view of Twin Beach. This was the best I could do from the bottom of the hill. You can kinda see both beaches, but not so epically. Meh.
Sunset at Las Cabanas Beach
Take a tricycle to Las Cabanas. It will cost 150 PHP from town and takes less than 10 minutes.
Las Cabanas is a great place to relax and unwind from the day, and have a drink if you’d like. There are a few cafes right on the beach and it’s a very popular place to catch the sunset. Meremgmeg Beach Bar was really cool and had swings at the bar instead of seats.
Day 2: Tour A
Take Tour A, the post popular (and my favorite) of the tours. The tour will take you on 5 stops including: Small Lagoon, Big Lagoon, Simizu Beach (lunch stop), Secret Lagoon, and 7 Commandos Beach.
Cost: 1400 PHP (~$27)
I will highlight my favorite spots below:
Small Lagoon
You can’t swim in this gorgeous lagoon. The boat takes you in and you just sit back and enjoy turquoise waters like you have never seen before.
Big Lagoon
You can rent a kayak (Depending on availability) or snorkel and explore the big lagoon, which was so much fun!
Secret Lagoon
The Secret Lagoon was unreal in terms of beauty. We had to jump off the boat and swim here from a distance where we could explore the hidden lagoons and caves. This is exactly what I imagined the Philippines to be.
7 Commandos Beach
The last stop of the day is on this long white sand beach. They have a bar and souvenir shop, as well as comfort rooms (what they call restrooms in the Philippines). There is also a fun rope swing that you can play with!
Day 3: Tour C
I booked Tour C with Art Cafe. The buffet BBQ lunch they served was really good! The tour leaves at 9am and comes back around 5pm.
Cost: 1400 PHP plus 100 PHP to rent fins (snorkel masks are already included).
5 stops are included on this tour including: Hidden Beach, Secret Beach, Starfish Beach, Miniloc Shrine, and Helicopter Beach.
I found absolute paradise in Hidden Beach. I kinda wanted them to leave me there “accidentally”.
The Miniloc Shrine had the best viewpoint over the islands (cost is 100 PHP to go here). There are very pointy rocks at the top so please be careful.
This is guaranteed to be one of the most risky hikes you will ever do. Do NOT attempt to do this hike without a guide, it’s quite dangerous (and I don’t say this often).
You’ll be stepping on jagged, pointy, super sharp rocks and at some points you will be climbing up a 90 degree angle! It’s honestly more like rock climbing than a hike. Except that you will have NO harness or protective ear. But the 180 degree panoramic view at the top is worth all the fright and agony getting up there, trust me!
You can go in a group or hire a private guide. The whole trip takes about 2.5 to 3hrs. It costs 500 PHP for one person and can be as low as 300 PHP if you get a few people to go.
Tips for Hiking Mt. Taraw:
Take a sweat rag. I was dripping sweat and was all slippery. Not cool when my guide reached for my arm to pull me up in some places.
Start as early in the morning as possible to beat the heat.
I really wish I had brought gloves because the rocks I had to pull myself up on were super sharp.
Make sure to bring sturdy shoes (they won’t even let you hike without closed-toe shoes), water, and snacks.
Don’t bring many items with you. You do not want a big backpack on your back when you’re doing this climb. My guide actually didn’t let me carry a bag and put my stuff in his backpack.
Make sure to grab the rocks with your hands before moving with your feet.
On the way down go backwards, it’s easier and safer.
Rent a Kayak
Rent a kayak for 400 PHP and paddle over to Bikal Beach on Cadlao Island. There is a small and secluded crescent shaped beach which takes about 45 minutes to 1 hour to get to. You’ll most likely have the beach to yourself. Unless you go in the morning because I believe tour D makes its first stop here.
Wouldn’t you love to have a whole stunning beach to yourself?
Get a Massage
Get a massage to end your trip in El Nido. It costs about 500-600 PHP per hour for a full body massage and you can find these massage shops all over the city. I got a head and food massage to end my day and it was just perfect after all that hiking and kayaking I had done.
Best Way to Get between El Nido and Coron
There’s a newer fast boat option by Montenegro Lines that leaves daily from El Nido at 6am and from Coron at 12pm. The journey supposedly takes 3.5 hours (it took about 4 hours and 45 minutes) and is pretty comfortable in a clean and air conditioned boat. They play a movie on the flat screen during the trip. I booked my ticket online through Naturalis.
Make sure to arrive to the port 30 minutes early to check-in and pay your port fee (20 PHP) before you can board. You can pick your seat when you check in so if you’re prone to sea sickness, make sure to pick a seat in the back of the boat.
Cost: 1848 PHP + 20 PHP port fee (about $36 USD).
If you want to save a few dollars there is a slower ferry option on a freight ship that takes 7+ hours. I heard it’s extremely uncomfortable and the boats are older and less clean. Just google it if you want to make your decision easier. It’s literally less than a $10 difference so why put yourself through that hell? Take the fast boat!
Day 5-7: Coron, Palawan
Day 5: Ferry to Coron
There isn’t much to do in Coron town honestly. It was a stark contrast to the lively El Nido, so just take the afternoon to relax before the evening activities.
Head to Coffee Kong, for some good coffee. It’s a cute little coffee hangout and the only place I found with soy milk! They also serve breakfast and have really good Air Con.
Hike Mt. Tapyas before Sunset
You have to walk 700 steps to get to the top of Mt. Tapyas, but it’s well worth it. It will take you about 25-30 minutes to walk to the top. How it works is you hire a tricycle to take you there, they wait for you, and then they take you to Maquinit Springs (which is 20 minutes away). The entire ride only costs 300 PHP (~$5) and I was with my driver for about 4 hours.
iPhone pic from the top of Mt. Tapyas
End the Night at Maquinit Springs
Maquinit Springs is a huge natural saltwater hot spring surrounded by mangroves in the jungle. It’s a super unique setting and although it’s quite busy, it’s still very relaxing.
I must say these were the hottest hot springs I have ever experienced. Have you ever noticed that most hot springs are warm, but not very hot? Not this one! It’s super hot and exactly what your body needs after that hike up Mt. Tapyas.
Cost: 200 PHP for adults
Day 6: Island Escapade Tour
I booked with with JY Tours as it was recommended by my Airbnb host.
Cost: 1200 PHP (~$23).
Stops included: Malcapula Beach, CYC Beach, and Waling Waling Island.
Malcapula Beach
A heavenly white sand beach and crystal blue waters. It’s one of the prettiest beaches I saw in the Philippines.
Hiked up the little hill for this secret view.
CYC Beach
CYC is the only remaining public beach in Coron. Compared to all the other beauty I saw in the Philippines, this beach was pretty run down, crowded, and dirty. Our group was wondering why they even had this stop on the tour. No pictures here because there wasn’t much to see.
Waling Waling Island (aka “Mini Maldives”)
Locals refer to this beach as the mini Maldives due to the crystal waters. It was my favorite stop of the day!
During low tide, a sand bar appears and you can walk out onto it. It is breathtaking.
Completely unedited iPhone shot of the gorgeous Waling Waling island.
There was another stop on our itinerary but our guide chose to go here instead…which none of us were complaining about!
A post shared by 🌍World Traveler/Blogger✈️ (@crazytravelista) on
There are also many bright tropical fish around the area. Can you see the sunken ship? It would have been fun to scuba dive down inside of it!
WIFI Connection in the Philippines
Wifi connection is very poor in the Philippines, so staying connected was not the easiest. I used a combination of a local SIM and my Skyroam portable hotspot device to stay connected.
You can get a local SIM for 600 PHP ($12) for 4GB plus 1 free GB (5gb) with Global SIM at the airport kiosk. The plan lasts 30 days.
Accommodations in Palawan were more expensive than I imagined they would be in the Philippines. I spent about $30 per night. When I travel I usually spend on average $25 per night to rent a room (more if I rent out a whole apartment). But the value for the price in Palawan was not that good and the standards were a lot lower than I expected for that price.
That being said, go in knowing what to expect! I stayed in Airbnbs in both Coron and El Nido. While I cannot recommend the place I stayed in El Nido, the room I rented in Coron was very large, clean, and had good Air Con. The host is from California and was really laid back and helpful. It was in a convenient location and was pretty comfortable. You can check out the listing here.
If you’re new to Airbnb, you can use my $40 OFF Coupon. Or even if you are not, you can sign up with a different email and use the coupon as well! ♥
Travel Insurance for the Philippines
I would never travel without travel insurance anymore. I learned my lesson. Too many bad things can happen (and they have unfortunately). Travel insurance is especially important when traveling to islands, as you may need to be air-lifted to the mainland in the worst case scenario. Do you know how much air-lifting costs? Think at least 5 digits (I.e. Expensive AF!).
My favorite travel insurance that I have been using for the past 4 years is World Nomads. I have made 3 claims so far and have been fully reimbursed for all 3 without any hassle. I highly recommend them.
*This post contains affiliate links.
Have You Been to Palawan? Is there Anywhere Else you Would Recommend to Visit that I Missed?
If you enjoyed this Palawan 7 day itinerary, please PIN it for later! Simply hover over the photo to PIN. ♥
Victoria Falls is one of the Seven Natural Wonders of the World. It’s also rated as the biggest waterfall in the world (based on combined width of 5,604 ft and height of 354 ft.
It goes by the nickname “the Smoke that Thunders” and that nickname will prove itself once you have been graced by its presence. Trust me on this one.
My first glimpse of the falls came on my flight into Livingstone. From my tiny airplane window I gasped at the spewing mist bursting into the air, making its power known. I could see and feel the power of the falls from what seemed like miles away.
Victoria Falls is an incredible place and should be added to your Africa itinerary. However, it’s one of those places that you have to plan for in advance since there is a lot to think about. But it’s 100% worth it and will surely be a memorable experience.
There isn’t much practical info on the interwebs regarding visiting Victoria Falls, so I put together this little guide with the best tips for visiting Victoria Falls, Africa that will help you plan a smooth trip.
Best Tips for Visiting Victoria Falls
Where is Victoria Falls?
Victoria Falls is located on the border of Zimbabwe and Zambia. The tough choice is deciding which side you will want to stay. I stayed on both the Zimbabwe and Zambian sides and I personally preferred the Zimbabwe side much better.
Livingstone, Zambia is known as the backpackers town as accommodations are much cheaper and abundant. But I really didn’t enjoy it honestly. It was extremely dirty and didn’t havethat much to offer in my opinion. I would choose the Zimbabwe side in a heartbeat!
How to Get Visas for Victoria Falls
(Note: this information is based on US Passport holders only and I cannot comment on different nationality’s visa processes since I personally do not know. Please check the specific visa requirements of your country!).
For US citizens, visas are required to enter both Zimbabwe AND Zambia.
A single entry visa into Zambia costs $50 while a double entry visa costs $80 for US citizens. You can get a single and double entry visa on arrival, so no need for advanced planning. However, if you want a multiple entry visa, you must apply in advance at the appropriate embassy before your trip.
My Zambia visa obtained at the border
A single entry visa to get into Zimbabwe costs $30 while a double visa entry costs $45 for US citizens. This can also be obtained upon arrival.
There is also a “day tripper” visa for $20 that you can purchase if you just want to cross the border for the day (valid for 24 hours). However, in my experience, that process takes SO long at the border so I would definitely plan out how many times you plan on crossing the border and getting the appropriate visa based on that.
Note: getting the visa at the border can be a very LONG process. It took us a total of 4 HOURS once we landed in Livingstone to get our Zambia visa, cross the border to Zimbabwe, get our Zimbabwe visa and make it to our lodge in Zimbabwe. People will also try to butt in line in front of you so make sure to stand your ground and practice your RBF.
*Due to the above mentioned stress to get the visa, I would highly recommend that you stay in the country you are departing from the night before so you don’t have to deal with this on the day of your flight and potentially miss it!
Payment: Although sources will say you must pay in cash, we were given an option to pay in cash OR credit card. FYI: They do accept USD.
What Airport to Fly Into
You will have 2 choices of airports to fly into to reach Victoria Falls:
Livingston Airport (LVI) in Zambia or Victoria Falls (VFA) in Zimbabwe.
Victoria Falls airport is closer to the falls, however, flights tend to be more expensive coming into that airport. Therefore, most opt to fly to the further Livingstone Airport. However, I think you should make the decision based on what activities you want to do, where they are located (Zimbabwe or Zambia side), and where you want to stay. You also have to factor in crossing back and forth between the borders, which can get pricey in visa fees!
Transportation
There is no public transport to the falls from Livingstone airport. Your 2 options are a private transfer or taxi.
Taxis cannot cross the border so you will need one taxi to take you to the border, another that takes you from one side of the border to the other, and then a 3rd taxi at the other border that will bring you to your destination. Complicated, huh?
From our resort in Zimbabwe, we paid $10 to get to the border, $5 to get to the other side of the border, and then $20 to get to Livingstone. A private transfer set up by our lodge cost $24 per person and they stayed with us the whole way through, which was way more convenient than having to switch cars and drivers 3 times to cross the border!
Make sure you agree on a price beforehand, because they WILL try to rip you off. They tried that on us but we called them out, to which they then agreed on a fair price.
What Activities To Do in Victoria Falls
I thought that going to Victoria Falls just meant going and viewing the waterfalls. But little did I know that there was going to be so many adventure activities at the falls to choose from. From the numerous high-wire activities on the Zimbabwe side such as gorge swinging, zip-lining, bungee jumping, the superman swing, to the microlight and Devil’s pool activities to pick from on the Zambia side, you will not most certainly not be bored.
In 2.5 days there, we did so much, yet wish we had more time there to do more! The microlight flight was definitely the highlight of my time in Victoria Falls and I wasn’t expecting tears of joy. It left me speechless.
Read more about my top 4 MUST DO adventure activities in Victoria Falls here. Or just watch the video below:
Where to Stay in Victoria Falls
This should depend heavily on what activities you plan on doing. If you don’t plan on doing the microlight flight and/or Devil’s pool, there is no reason to stay in Zambia honestly. Stay in Zimbabwe and just get a double entry visa and you’re good to go!
We had a once-in-a-lifetime stay at Victoria Falls River Lodge and I cannot recommend it enough. It’s literally inside the Zambezi National Park, so there are wild animals all around you. It’s a bit scary but super thrilling and something you should experience once in your life. Read my detailed review here.
Viewing Victoria Falls
Most of Victoria Falls is located on the Zimbabwe side and this is where you can enter to view the falls.
Entrance is $30 so give yourself ample time to go to all the viewing points and take lots of pictures. You will see monkeys running around from time to time, so save time also for some monkey selfies! You know you want one.
If you’re short on time, go to viewing points 11-14 for the best views. You’re welcome ♥.
The mist is very strong so you will get wet (remember that Smoke that Thunders part?). Embrace nature’s shower.
Currency
Currency in Zimbabwe is the USD. Currency in Zambia is the Zambian Kwacha. Although, USD was accepted in Zambia as well.
Make sure you bring cash because credit cards are not widely accepted everywhere. We did pay all our tours with credit cards; however, some restaurants did not accept credit cards so just be prepared.
You’ll probably spend more money than you thought.
I was a little surprised at how expensive the prices were in and around Victoria Falls. It was more like Western prices and not something I would expect in Africa.
Here are some sample prices to expect in Victoria Falls:
$30 USD to enter Victoria Falls (go to Viewing point 11-14 for best views)
$90 gorge swing
$50 flying fox
$80 double entry visa for Zimbabwe
$30 single entry visa for Zambia
$$-$$$$ lodging (much more on the Zimbabwe side, but well worth it)
Victoria Falls is probably not the best budget-friendly place to visit for solo travellers. With transportation and lodging costs, its much more doable when you have another person to split it with. Even then, it was a pricier trip than I was used to. I’m not saying solo travellers should avoid Victoria Falls, just know what to expect!
If Victoria Falls is not already on your bucket list, hopefully you add it soon! It truly is worth it!
In the famous words of Ned Stark: WINTER IS COMING! So I thought this would be the perfect time to highlight some winter destinations, specifically Lapland, Finland. During my time in Lapland I was able to partake in my first photo expedition, and it was a blast!
Photographing the Stunning Arctic Landscapes of Lapland, Finland
What is a Photography Expedition?
As someone who loves photography, I have always wanted to do a photo expedition. But honestly, I didn’t really even know what that meant. Is it like an on-site photography class? Well, yes and no.
This was my first (and hopefully first of many) photo expeditions, and from my experience it was more like a fun venture out to a photography lover’s dream landscape, and they help you with taking the photos when it comes to settings, technique, position, etc.
You have to have a basic knowledge of photography I think. I consider myself super amateur, and when people start talking about aperture and shutter speed I get a little anxiety. But this trip was perfect and because of the small group size, we got personalized attention, which was key!
Most the photos I featured in this article were shot with my Sony Alpha6000 with my 10-18mm wide angle lens that I’m obsessed with. I also used my GoPro and iPhone for a few shots.
Note: battery life is severely decreased in freezing weather so make sure to bring some extra batteries along!
Beyond Arctic Photography Expeditions
Beyond Arctic is a tiny Finnish company ran by 2 awesome guys, both named Juho! They personally lead all the expeditions themselves and work their butts off!
With Beyond Arctic, no 2 expeditions are the same! That’s because they have several different areas around which they can visit and tailor make the tour based on the groups wishes (& also based on weather).
Juho photographing me photographing him 🙂
Their expeditions have a max of 8 people, so the group always stays small and intimate. I had 2 others on my tour and we really got to know each other and it was really nice not having to be herded around in a large group.
Beyond Arctic also offer Northern Lights photography tours, ice fishing, skiing, and wilderness snowshoe adventures. They also offer summer and autumn expeditions, where you can experience and photograph the midnight sun!
What Kind of Clothes/Equipment Do You Need to Go on this Expedition?
Honestly, you can basically show up naked and they will dress you from head to toe. But please, if you do, wear underwear! But really, even if you don’t have the proper winter gear, it’s no problem at all, they will provide everything you need. They gave us hats, ski gloves, overall ski suit, waterproof boots, and a backpack to store all our stuff.
Photographing the Stunning Arctic Landscapes of Lapland, Finland: Where We Visited
We drove for about 2 hours to Riisitunturi National Park. We began our trek through the park up hill for about 1 hour, through the snowy forest, stopping frequently to take pictures and take in the views. The trek is 4.5 km and requires a moderate level of physical fitness.
The views from the top of the fell were incredible. You get a stunning 360-degree view of the national park and the nearby lake which was frozen, adding to the dramatic arctic landscape.
GoPro shot of me fighting the arctic wind
If you’re dreaming of a winter wonderland (which I was) this will for sure satisfy your needs!
We stopped at this cute little cabin base camp where we started a small fire and began to grill some lunch. We were provided with some yummy sausages and a grilled cheese sandwich.
I alerted them ahead of time of my allergy and they even made mine with gluten free bread. Oh, and they even had a gluten free apple cake made for me for dessert! I’m so not used to getting such goodies (with my past luck, the tour “forgets” about my allergy and I end up starving half the time).
The trek back down was a lot easier and quicker and the lighting was a bit better. The sun was starting to fall so there wasn’t any more glare or brightness blinding you.
Sunset caught on my iPhone 6
It was very cold, but I felt bundled up enough. Overall, the trek wasn’t as bad as I thought, mainly because we kept stopping for photo ops.
After the tour, Beyond Arctic sent us some photos they took during the expedition, which was cool to see some candid shots. Here are a few Juho took below:
There’s me trying to get some good iPhone pics.
The view from the top of the fell where you can see the frozen lake.
Me looking satisfied (and bundled up) at the end of the tour. Can we do that again?♥
RECOMMENDED TRAVEL GEAR FOR LAPLAND:
1.Sony Alpha 6000 Mirrorless Camera: I made the switch from my huge DSLR and I wouldn’t go back. It’s light, compact, and takes amazing photos!
2. Sony 10-18mm Wide Angle Zoom Lens: this wide angle lens is the key to landscape shots. I use this lens more than the original and am super happy with it. It’s not cheap, but super worth it if you want to get those special nature shots. Honestly, I would purchase the Sony alpha 6000 camera body only and save up for this lens to go with it.
3. E Bags Packing Cubes: the biggest life changer to keep me packing light! This is my biggest travel gear obsession and I have NO idea how I traveled without them before.
4. Anker Portable Charger: this helps me recharge my iPhone several times a day when I travel. It also has dual ports so you can also charge your camera or other electronics simultaneously. I couldn’t travel without it.
5. GoPro Hero 11 Black: I am a proud GoPro ambassador and obsessed with GoPro selfie pics if you didn’t notice! The Gopro cameras are the best for action and underwater shots, and of course for taking those selfies when you’re traveling solo. It’s super small, compact, and easy to travel with. Plus it’s so much fun to use! 🙂
Tips: The one thing I will recommend if you do this tour is to bring sunglasses (wait, what, on a winter tour?). It’s actually really sunny and the wind at the top is no joke. My eyes were watering for like 30 minutes straight and I could barely see. Also, staring at the bleach white snow for hours on end can put a little strain on the eyes. Oh, and bring tissues. Your nose will be running.
If you enjoyed this, click photo to PIN for later♥
Disclaimer: I was a guest of Beyond Arctic; however, my opinions are my own and I am in no way obligated to write a positive review. This small company was awesome and I would highly recommend them to my family, friends, and fellow travellers. ♥
*this post contains affiliate links, which means I receive a super small commission if you make a purchase using these links, at no extra cost to you. I wouldn’t recommend anything I didn’t already use and love! ♥
This website uses cookies to improve your experience. We'll assume you're ok with this, but you can opt-out if you wish.AcceptRejectRead More
Privacy & Cookies Policy
Privacy Overview
This website uses cookies to improve your experience while you navigate through the website. Out of these, the cookies that are categorized as necessary are stored on your browser as they are essential for the working of basic functionalities of the website. We also use third-party cookies that help us analyze and understand how you use this website. These cookies will be stored in your browser only with your consent. You also have the option to opt-out of these cookies. But opting out of some of these cookies may affect your browsing experience.
Necessary cookies are absolutely essential for the website to function properly. This category only includes cookies that ensures basic functionalities and security features of the website. These cookies do not store any personal information.
Any cookies that may not be particularly necessary for the website to function and is used specifically to collect user personal data via analytics, ads, other embedded contents are termed as non-necessary cookies. It is mandatory to procure user consent prior to running these cookies on your website.


