Rhodes was a place that I only had mediocre expectations for and it blew them all out of the water! Rhodes was absolutely awesome and I’m kicking myself for not going sooner. Rhodes’ appeal lies in their spectacular turquoise beaches, beautifully preserved medieval towns, gorgeous mountains, awesome food, and more cats than I have ever seen anywhere! Basically, Rhodes was complete bliss! After spending a week there, I put together this blog post to highlight What to do in Rhodes, Greece so you don’t have to worry about panning your trip!
When to Visit Rhodes
Rhodes stays unbelievably warm even through the fall! I went in mid October and it was sunny and 75-78 degrees every day! The “season” in Rhodes ends October 31st (a little longer than most Greek islands). That means a lot of the day tours and ferries are still running daily.
This was a great time to visit because it was at the tail end of the season and the crowds had gone and the prices had dropped tremendously, yet everything was still open.
I would avoid July and August due to high crowds, prices, and intense heat.
Rhodes, Greece 5 day Itinerary
Day 1: Anthony Quinn bay, Lakido beach, Tsambiki beach, Kalithea springs.
Day 2: Symi day trip
Day 3: Lindos, St. Paul’s bay
Day 4: Kritinia, Monolithos, Prasonisi, Glystra
Day 5: Rhodes town
What to do in Rhodes, Greece
Day 1: Anthony Quinn bay, Lakido beach,Tsambiki, Kalithea Springs
Tsambiki beach: long sandy beach with many bars and restaurants. It’s framed by the mountains on each end. If you want a beach with a lot going on, this is the beach for you! In terms of beautiful beaches, the others I visited while on Rhodes were much more impressive.
Kalithea Springs: Gorgeous Italian architecture that’s a great place for weddings. There are sun beds and a little cafe on the water to just relax. It’s less than 15 minutes from Rhodes. While the hot springs are no longer in use, I still really enjoyed my time here.
There is a 3€ entrance fee, but i think it’s definitely worth it.
Anthony Quinn Bay: tied for prettiest beach on Rhodes island, this is an absolute must! As you can see below, Anthony Quinn Bay is a small coved bay that has the most beautiful clear blue/green waters. I can imagine this place being super popular in the summer, but it was very calm and unpopulated when I went. I LOVED this place.
There is a little cafe overlooking the bay with the best view that you must go and experience, not for the food but for the view!
Lakido Bay: a gorgeous bay right across the parking lot from Anthony Quinn Bay. If you have time, definitely stop here for a bit also.
Day 2: Day Trip To Symi Island
Symi is a short 50 minute catamaran ride away (or 1.5 hours by ferry) and definitely the one day trip you should take when visiting Rhodes.
I read online that you could take a taxi boat to the beaches, which was my plan when I arrived. But I soon realized that the taxi is more like a bus in that it has a schedule so you can’t just randomly arrive and get a taxi boat (which is what I thought). The taxi boats cost about €10-12 each way.
There was only one taxi boat that leaves in the morning, hits up all the popular beaches, and then returns at around 4 or 5pm, but it wouldn’t give me much time to see the beautiful port of Symi or walk up to Chorio so I decided to pass and hope to get a taxi at Pedi Bay.
What to Do in Symi
Walk up the 400+ steps to Chorio
Chorio is the main town that sits perched up on top of a hill overlooking the gorgeous marina and surroundings. From Chorio you can walk another 20 minutes to Pedi Bay, and then to 2 other beaches from there.
Stop at Olive Tree Cafe for a healthy brekkie/brunch of Greek yogurt, honey, and fresh fruits. The setting is super cute as well with a view of the town below.
Visit the Beautiful Beaches
The 2 beaches I was able to visit were Agia Marina and Agios Nikolaos.
Agia Marinahas gorgeous turquoise waters and a little island with a monastery you can visit.
Agia Nikolaos has is a small pebbled beach with a few beach shacks selling food and drinks but it’s pretty secluded.
How I got to these beaches:
I missed the morning taxi but I got really lucky and met these amazing locals who offered to take me for free! They first took me to Agia Marina just for pictures and then dropped me off at Agia Nikolaos. They even picked me up later to bring me back! The Greek hospitality is unmatched. So you could try your luck in Pedi Bay or make sure to get on the morning taxi boats when you arrive in Symi harbor.
Walk: from Pedi Bay you can walk 30 minutes to Agia Nikolaos or about 50 or so minutes to Agia Marina. To be honest, the path to Agia Marina looked extremely rocky and like there wasn’t a distinct path. Good sturdy hiking shoes would be required.
Some Symi day tours take you to Panormitis Monastery on the south side of the island. However, I decided to skip this because they leave you there for about 1.5 hours which is so long. I decided to go to the beaches instead of the monastery because you won’t really have time for both.
The other beach I didn’t have time for but was on my shortlist is Nanou beach (I heard random goats come on the beach and try to steal your food here so beware).
If you don’t care to go to the beaches the day tours offer plenty of time to see the monastery and then around 3 hours in Symi to explore (which is plenty).
Visit Nos Beach Near the Port
There is a beach called Nos beach in Symi and is only a 7-8 minute walk from the harbor (where the ferry drops you off). It’s gorgeous and there are many cute cafes along the water in that area.
There are also many cute little boutique shops with unique things to buy in Symi.
They are also famous for Symi shrimp, but I didn’t have time to sit down to try them.
Play with the cute little kitties swarming the island
How to Get to Symi Island
The catamaran from Rhodes to Sými took 50 minutes and costs 30€ round trip withDodecanese pride. I bought the tickets the day before online and then picked up the tickets at the little booth in front of the boats. Make sure to arrive early to get your paper tickets and find your boat!
Tip: They had some day tours they were selling at Mandraki port that were as cheap as 15€, however, they all had a stop at Panormitis Monastery, which like I mentioned above, I didn’t have that much interest in visiting.
St Paul’s Bay: this is the other prettiest beach I saw in Rhodes and you cant beat the view of the Lindos Acropolis in the backdrop.
As a bonus, the summer crowds had long gone and it was pretty empty when I went. I could have spent all day relaxing here lounging and sipping drinks.
Lindos Acropolis– while the 12 € entrance fee is pretty steep compared to most ancient ruin sites I’ve been to, you can get the best aerial view of St. Paul’s Bay and Lindos Beach on each side. You can also see the beautiful white Lindos town below (although I flew my drone there and had the same view honestly).
It takes about 20 minutes to walk uphill from St. Paul’s Bay to the entrance of the acropolis. There is free parking right next to St. Paul’s bay.
There is one restaurant at St. Paul’s Bay that’s pricey but you can’t beat the views! There are also hanging day beds and lounge chairs available to relax all day.
On your way up to the acropolis, stop at Lindian Apollo bar for a nice rooftop view of the acropolis. And make sure to order a cappuccino freddo! Yum.
Day 4: Kritinia, Monolithos, Prasonisi, Glystra
Day 4 will bring you to the west and south of Rhodes Island, the less busy part of the island.
Stop in Kritinia castle (free entrance) for amazing views over the sea. Also stop by the little cafe at the bottom of the castle. It’s super cozy and cute. They also do free wine, honey, and oil tastings.
Kritinia is 1 hour from Rhodes by car.
Leave Kritinia and drive 35 minute to Monolithos Castle. It’s a beautiful windy drive through the mountains, so take your time and enjoy the scenery.
Monolithos castle (free entrance) is perched upon a steep hill overlooking the coastline and it is stunning!
There are many unique openings in the ruins in which you can take some cool pictures (see below).
Prasonisi is at the very tip of the south of Rhodes island. It is very unique in that it is where the Mediterranean Sea and Aegean see meet and makes up a double beach in the summer (a peninsula). In the winter when the waters rise, Prasonisi becomes an island.
Prasonisi is a also very popular spot for wind surfing due to the winds.
Definitely stop at Glystra beach on the way back, which has golden sands and turquoise waters. It’s a little coved beach off the coastal road. There is a little beach shack for drinks
Glystra Beach from above
Day 5: Rhodes Town
There are SO many things to see in Rhodes town so if you only have a day, get an early start!
Inside the old city walls of Rhodes
In case you don’t know, Rhodes is surrounded by a walled city, with many grand entrances to this Medieval town. You will also notice many Turkish mosques throughout the city that are interesting to see and beautiful to photograph.
Palace of the Knights
What not to miss in Rhodes town:
Palace of the knights/Grandmaster’s Palace (6€ entrance)
Knight street
Walk the ancient city walls (2€ entrance)
Discover all the epic entrances to to the walled city
Church of the Virgin of the Burgh (pictured below)
Mondraki port
Windmills of Rhodes (there is a kitty sanctuary near the windmills, an added bonus!)
Windmills of Rhodes
Shopping! The street shopping was pretty good inside the city walls.
Acropolis of Rhodes has amazing view of the coastline just across the street (free entrance)
Elli beach is only 6-7 minute walk from the old town and a nice way to cool off during the day
Ronda Rhodes is a swanky beachside cafe on Elli beach with amazing decor and view. It’s pricey but well worth the view!
Ronda at Elli Beach
Mama Sofia Rhodes has awesome food! The dolmades were the best I ever had and also the lamb kleftiko was bomb.com (i.e. good AF). This was the best restaurant I found in all of Rhodes.
How to Get Around Rhodes Island
Rent a car and ATV from Zeus cars. The owner is super chill and nice and very helpful. The prices are pretty good. A 50cc ATV was 25€ per day and an automatic car (on the spot) was 30€ per day. They won’t rent you a scooter without a motorcycle license but you can rent a 50cc ATV with a regular US license. An international license is not required.
How to Get to Rhodes
Rhodes is one of the furthest Greek islands in the east, near the coastline of Turkey.
Fly
The direct flight was 50 minutes from Athens and cost $75 2 months in advance or $90 the night before.
Ferry
The ferry from Athens takes 11-24 hours (depending on the company) so you might as well fly. The water tends to be choppy on Greek ferries so being on that thing for 11+ hours sounds like hell to me. Just fly.
Where to Stay in Rhodes
7 Palms Hotel
My plan was to take a bunch of day trips from Rhodes town so I stayed in the new town (which was a 20 minute walk from the old city). This location provided a better starting point for all my day trips.
The hotel had the best host who was super positive, energetic, and helpful! She gave me good restaurant recommendations and helped me add some secret spots to my itinerary that I would have never known about.
I stayed in a studio apartment at the hotel, which had a little stove and refrigerator. It also had an outdoor pool (seasonal). The hotel was spacious, comfy, quiet, and I highly recommend it! They also provide free bikes which came in handy.
I booked this place for $267 for an entire week on booking.com. You can view the listing here. It got a review score of 9.2! And if you’re new to Booking.com, you can use my $20 OFF coupon here (I will get $20 off too, so it’s a win-win, thank you!)
Rhodes Tours
If you don’t really want to lift a finger and have everything planned out for you, I would recommend the tour company Get Your Guide. I usually like to do thing on my own, but when I do a tour, I usually choose this company and have been pretty satisfied. You can check the Rhodes Tours below.
MY TOP RECOMMENDATIONS FOR TRAVEL GEAR
1.Sony Alpha 6000 Mirrorless Camera: I made the switch from my huge DSLR and I wouldn’t go back. It’s light, compact, and takes amazing photos!
2. Sony 10-18mm Wide Angle Zoom Lens: this wide angle lens is the key to landscape shots. I use this lens more than the original and am super happy with it. It’s not cheap, but super worth it if you want to get those special nature shots. Honestly, I would purchase the Sony alpha 6000 camera body only and save up for this lens to go with it.
3. E Bags Packing Cubes: the biggest life changer to keep me packing light! This is my biggest travel gear obsession and I have NO idea how I traveled without them before.
4. Anker Portable Charger: this helps me recharge my iPhone several times a day when I travel. It also has dual ports so you can also charge your camera or other electronics simultaneously. I couldn’t travel without it.
5. GoPro Hero 11 Black: I am a proud GoPro ambassador and obsessed with GoPro selfie pics if you didn’t notice! The Gopro cameras are the best for action and underwater shots, and of course for taking those selfies when you’re traveling solo. It’s super small, compact, and easy to travel with. Plus it’s so much fun to use! 🙂
Travel Insurance for Greek Islands
I would never travel without travel insurance anymore. I learned my lesson. Too many bad things can happen (and they have unfortunately). Travel insurance is especially important when traveling to islands, as you may need to be air-lifted to the mainland in the worst case scenario. Do you know how much air-lifting costs? Think at least 5 digits (I.e. Expensive AF!).
My favorite travel insurance that I have been using for the past 4 years is World Nomads. I have made 3 claims so far and have been fully reimbursed for all 3 without any hassle. I highly recommend them.
If you’ve enjoyed this post, please PIN it (just hover over the photo)♥
Disclaimer: this post contains affiliate links, which means I receive a super small commission if you make a purchase using these links, at no extra cost to you. I only recommend products that I have used before on my own and that I truly love 🙂
The Faroe Islands are a self-governing region of Denmark located in the North Atlantic Ocean halfway between Iceland and Norway. They are not part of the European Union and aren’t technically their own independent country. It’s complicated.
There are 18 islands that make up the Faroe Islands archipelago. Most islands can easily be reached by sea tunnels. The islands are pretty small and you can easily navigate a few islands a day in a short time period. The farthest drive took me 1.5 hours and that was basically from south to north. In 5 days (more like 4.5 days), I visited 6 islands in the Faroes with only a little more than one tank of gas.
Fun Fact: the human population of the Faroe Islands is around 50,000 and the sheep population is around 70,000.
How to Get To the Faroe Islands
The main airport in the Faroe islands is called Vágar Airport (airport code FAE)
The easiest way to get to Vagar Airport is to fly from Copenhagen (CPH) or Reykjavik (KEF). From Copenhagen it’s a 2 hour fight and from Reykjavik it’s about a 1 hour flight.
Atlantic Airways and SAS fly direct to the Faroe Islands but flights are limited and do not operate every day so make sure to check when booking.
I flew there with SAS and flew back with Atlantic Airways and the round trip cost me about $280. This was close to peak season in June.
I booked my tickets with Skyscanner, which is my all-time favorite airline booking site!
Summer Daylight Time (Midnight Sun)
When I was there in June it got dark at about midnight and the sun came up around 3:30am so you essentially have 20+ hours of daylight to explore. Although I was often exhausted from hiking that I didn’t stay out after 9. Go figure.
P.S: make sure your accommodations has black-out curtains/blinds if you want to sleep good!
How to Get Around the Faroe Islands
Rent a Car
Apparently there is a well connected bus system around the islands, but they don’t go to all the famous places so you really need a car to see all the awesome off-the-beaten path places I visited.
Renting a car is super expensive, but is the best way to explore the islands. I paid $485 for 5 days for a manual car plus $75 for liability insurance.
Total car price I paid: $560 with insurance (this is for a manual car). If you need an automatic car, expect to pay a few hundred more.
The good news is gas is pretty cheap! I only spent a total of $57 USD in 5 days driving around the islands.
*NOTE: Rent a car ASAP if you plan on going to the Faroe Islands. The prices are only going to go up because car rentals are limited on the islands. I booked in January for early June and still had ridiculous prices. Also, automatic cars are hard to come by so if you need one, plan way ahead!
Helicopter
Yes, you heard that right. You can ball out and fly to certain places in a helicopter for very cheap! The helicopters are subsidized by the government so they are very affordable. The catch is that you can only book a ticket for one-way, not round trip. For example, you can fly from Tórshavn to Mykines for 215 DKK (about $33). Not bad, huh?
*The only reason i didn’t try the helicopter option is because I heard the weather is very fickle (which turned out to be so true) so I was worried about it getting cancelled.
To book helicopter tickets in the Faroe Islands, click here.
Driving in the Faroe Islands
Driving in the Faroe Islands can be a challenge and extra caution should be taken to follow the speed limit and rules.
One of the safer one-way roads with guard rails (most of them don’t have any)
Many of the smaller towns required a drive on a one-lane mountain road with no guard rails. There are turn off points on these one lane roads that you should turn into when you see a car coming. Whoever is closest to these turn off points should pull into them and let the other car pass. It was scary on some windy mountain roads because you couldn’t see around the curves at some point. Just go slow and be ready to slow down on a whim and you will be fine.
Oh, and there are one-way tunnels as well (they have turn off points inside also) but they tend to be very dark so you might want to use your high beams!
How to Stay Connected in the Faroe Islands
Get a SIM card at the airport info center. The package is for 2 GB and costs 97 krone ($15). You can top up online for 50 Krone for an additional 2 gb, which I ended up doing since I burn through data. The network worked really good and I got great service in all parts of the Faroes, even on the hikes. You will definitely need to have data to use google maps to navigate.
P.S: your Faroe Islands SIM card will NOT work in Denmark (and vice versa). Remember that self-governing part? For this reason, my Skyroam did not work in the Faroe Islands.
Currency in the Faroe Islands
Faroese króna is the official currency of the Faroe Islands, but the Danish krone is also accepted. However, credit cards were accepted everywhere in the Faroe Islands, even on the ferries. So you can get by without any cash at all if you really wanted to.
Sea Tunnels
There are 2 sea tunnels that require a 100 króna ($14) payment to use. The price is for a return trip so you’ll only have to pay once. One of these sea tunnels is between Vágar and Streymoy and the other is between Borðoy and Eysturoy.
You can make a payment after the tunnel at a pay station. Or check your rental car details because mine had that cost included. When I picked up my car they told me not to pay the sea tunnel fee since it was included. I rented with Avis.
Faroe Islands 5 Day Itinerary
Day 1: Mùlafossur Waterfall, & Sørvágsvatn
Day 2: Day trip to Mykines
Day 3: Tórshavn, Tjornuvik, Fossa Waterfall, & Saksun
Day 4: Day trip to Kalsoy island
Day 5: Gjógv, Slættaratindur hike, & Kvívík
Tip: Stay on Vagar island for the first 2 days of your trip (I stayed in a city called Miðvágur which was a great location). The first day go to the famous waterfall and hike. And then the second day head to Mykines to see the puffins! Then make your way to Kvívík for 3 nights and use it as a base to explore. I have included my Airbnb info near the end of this article.
Day 1 (Mùlafossur Waterfall, Sørvágsvatn)
Mùlafossur Waterfall
Mùlafossur Waterfalls the most iconic spot on the Faroe Islands. You can now drive right up to it and walk a few minutes to the viewing point. There is only a small place to park a few cars but I saw some cars parked along the street. I would recommend going here the day you arrive since it’s so close to the airport.
There were only 3-4 people at this spot and I was really surprised since it is the most popular attraction in the Faroe Islands. Goes to show that the Faroe Islands haven’t been spoiled by mass tourism yet.
Hike to Sørvágsvatn
If you want to see one of the coolest optical illusions you will ever see, make sure not to miss this hike! The hike takes less than 2 hours round trip including taking photos. Bring food and have a little picnic on the top with amazing views if you can!
It’s a super easy hike. To get there from the airport, you will pass the pizza place called Smiðjanand take your first right. Then take the first major right after that until you get to a tiny parking lot. You will see others starting the hike there as well.
Day 2 (Mykines day trip)
The ferry costs 120 krone ($19) round trip and takes 45 minutes. Make sure to get tickets in advance as there are limited seats. Also, go early in the trip in case it gets cancelled. I heard it gets cancelled often due to the sporadic weather. The puffin season is in the summer months only so try to make it over there between late May and early September.
Hike to the lighthouse to see the puffins on the way. The majority of them are right before the bridge connecting the islands. The hike takes about 3 (ish) hours round trip including plenty of time for pictures.
There is not much else to do in the little town. There is a church and 2 cafes…and that’s about it. Bring snacks for lunch. You must pay a fee of 100 krone ($15) to hike on the island. You can do it online and show them a receipt. Or they will stop you somewhere along the trail and let you connect to a hotspot to pay it online.
On your way home, stop at Smidjan restaurant in Vagar for pizza (yes, they even have GF pizzas!)
Day 3 (Tórshavn , Tjornuvik, Fossa Waterfall,Saksun)
Saksun
Saksun is a beautiful little village between the mountains with cascading waterfalls running down the cliffs and surrounded by greenery everywhere. There is a picturesque church with a gorgeous lake backdrop that you shouldn’t miss.
You can also walk up to one of the waterfalls and take pictures close up. There is a one-lane road to get there so make sure you drive slow and look ahead so you can turn into one of the many turn offs and wait for the car to pass. Saksun is a quintessential Faroese village with green grass roofs and some horses & sheep.
Tjørnuvík
Tjørnuvík is agorgeous seaside town set on a black sand beach hugged by the mountains.
You can do a little hike up the backside to get an incredible view of the town and surrounding islands. There is a winding one-lane road that’s a bit scary to get to it but it’s worth it!
Stop at Fossa waterfall on the way to Tjornuvik. It’s right off the road so you can’t miss it. There is a tiny parking spot for a few cars. Fossa waterfall is the tallest waterfall in the Faroe Islands.
Tórshavn
Tórshavn is Europe’s smallest capital city and is worth a stop. It has a colorful little harbor with cute cafes and shops. Go to Paname cafe for soy milk cappuccino and a quaint and cozy interior. It’s connected to a book shop with cute little unique souvenirs.
Visit Tinganes-home to one of the oldest parliament meeting places in the world and is home to the Faroese government. It’s a gorgeous part of town so make sure to check it out.
Day 4 (Kalsoy)
Hike to Kallur Lighthouse in Kalsoy
Take the car ferry from Klaksvík to Kalsoy, which takes only 20 minutes. The cost is 160 krone ($25) round trip with a car. When you arrive, drive to Trøllanes and do the Kallur lighthouse hike. It’s an easy hike taking about 40 minutes one way.
Look for this red door for the entrance to the hike.
There is only one road on the island so just get off the ferry and go straight. It takes about 20 minutes to get to Trøllanes from the ferry port. Park in the little parking lot and turn left to start the hike. You will see the red door pictured above.
Arrive to the ferry 40 minutes or more early during summer as there is limited space for cars. On the way back I got there 35 minutes early and had to wait for the next ferry almost 2 hours later because it was already full. Fail.
The best views of the lighthouse and the surrounding landscape are seen by walking across a little steep pathway with plunging cliffs to both sides. At fist I said hell no, but then I saw a few brave guys doing it and it didn’t seem as bad. It’s actually wider than it looks once you get to the path. If you’re afraid of heights, definitely don’t do this.
Stop to see the seal lady statue in Mikladalur Town on the way back if you have time. There is a pretty waterfall leading to the ocean which is more interesting than the actual statue in my opinion.
There is nothing else to do on Kalsoy and no restaurants (that I saw), so bring food and water. There is a tiny kiosk selling snacks in Trøllanes if you really need something. You just ring the bell and the lady comes out.
Day 5 (Gjógv, Slættaratindur hike, Kvívík)
Gjógv
A city with a huge gorge running through it, hence the name Gjógv. There are several hikes you can do around the area so give yourself some time. It started storming hard so I didn’t hike here unfortunately. The road leading to Gjógv is winding and steep and only one lane without guard rails so drive carefully. There was so much fog when I went back I had never been so scared driving before. I couldn’t see 20 feet in front of me. The Faroese fog is NO joke .
Close to Gjógv is the starting point of the hike to Slættaratindur, the highest peak in the Faroe Islands. It is said that on a clear day you can see all the way to Iceland, but I’m kinda doubting that myth.
The “easy” route only takes 45 minutes and it’s considered an easy hike. When I got to the beginning of the hike it was storming so bad with winds at almost 40 mph. It was so foggy I couldn’t see anything so I quickly aborted that hike unfortunately. I was so bummed! But you can’t really compete with Mother Nature.
Visit the Town of Kvívík
Kvívík is where my Airbnb was located and an adorable little seaside town. They actually unearthed some former Viking remains so if you’re a fan of Viking history, it’s worth a stopover. I could actually see the site from my Airbnb window!
View from my Airbnb in Kvivik
My Airbnb in Kvívík had the most amazing views of the town and water. The host was amazing and served breakfast in the dining room with panoramic views of the town. It was breathtaking. She also rents 2 other rooms out on Airbnb so keep that in mind if you don’t want to be social or share a bathroom. You can check the listing here. And for new Airbnb users, you can use my $40 OFF coupon for your first trip!
Also, here is the Airbnb I stayed in the town of Miðvágur on Vagar Islands here. The room was tiny but its all I needed traveling solo. It was a super convenient location and the host family was so nice!
Getting Alcohol in the Faroe Islands
Did you know that there was basically alcohol prohibition in the Faroe Islands until 1992?! To this day the government highly restricts alcohol and it can only be bought from government run shops called Rúsdrekkasøla. There are only 9 of them in the whole Faroe Islands and they have extremely limited hours. Most are open from 1-5:30pm and one I saw was only open from 4-6pm! So if you happen to see one, make sure to stock up because you may not get another chance. The wine was pretty reasonably priced at about $12-15 a bottle.
What to Wear in the Faroe Islands
The weather is extremely sporadic in the Faroe Islands and changes very quickly. It reminded me of Iceland in that sense, but not as drastic. I went in the beginning of June, their “summer” and the average temperature was 50 Fahrenheit!
It also rains over 210 days a year there so you definitely want to be prepared for that!
What to Pack for the Faroe Islands
Rain jacket ( I recently got this one and love it)
Waterproof hiking boots (My Ahnu boots are awesome and definitely waterproof!)
Wool socks (Darn Tough are expensive but the best wool socks on the market)
Fleece hoodie ( I travel with this North Face hoodie on all trips. It’s so soft & comfy)
Hat
Light gloves
Waterproof camera bag
GoPro Hero 6 Black– it was raining so hard at some points I couldn’t even take out my fancy camera so I resorted to only carrying my GoPro and iPhone 8 for pictures.
Finding restaurants outside of Tórshavn and other major cities like Klaksvík was tough! Most the villages I visited didn’t even have a restaurant or convenience store so make sure to bring snacks and pack lunches for hikes as you may go all day without a restaurant.
Gas stations strangely serve all kinds of food such as chicken skewers, salads, sandwiches, hot dogs, and fresh fruit. So if you can’t find food, a gas station is always your backup choice!
Bonus supermarket is an affordable supermarket with many options. I picked up a bunch of things there to pack for lunch and it only cost me $35 for the whole trip.
Most, if not all, supermarkets and most restaurants outside of Tórshavn are closed on Sundays so be prepared for that.
You can drink the tap water so reuseyour water bottle and fill up so you don’t have to spend money on water.
Travel Insurance for the Faroe Islands
I NEVER go on a trip without travel insurance. Never. Too many bad things can happen (and they have unfortunately). Shit happens when you least expect it. Travel insurance is especially important when traveling to secluded islands, as you may need to be air-lifted to the mainland in the worst case scenario. Do you know how much air-lifting costs? Think at least 5 digits (i.e. Expensive AF!).
My favorite travel insurance that I have been using for the past 4 years is World Nomads. I have made 3 claims so far and have been fully reimbursed for all 3 without any hassle. I HIGHLY recommend them.
Are you curious to visit the Faroe Islands? Let me know if you have any questions below!
♥If you’ve enjoyed this post, please PIN it (hover over pic below)♥
Disclaimer: this post contains affiliate links, which means I receive a super small commission if you make a purchase using these links, at no extra cost to you. This helps keep my site ad free (I hate ads!). I only recommend products that I have used before on my own and that I truly love 🙂
I recently spent 6 wonderful days in Peru exploring Cusco, Machu Picchu, and the Sacred Valley. I was on limited time so I wanted to see as many places as I could in a short amount of time. I didn’t get much sleep, but boy did I experience some awesome sites! You can sleep when you’re dead, right?
Sacred Valley 6 Day Itinerary
Day 1: Arrive to Cusco, relax and acclimate
Day 2: Taxi Tour to the Sacred Valley with drop off in Ollantaytambo
Day 3: Morning train from Ollantaytambo to Machu Picchu, limited afternoon ticket to Machu Picchu
Day 4: Hike Machu Picchu Mountain, take late afternoon train back to Cusco
Day 5: Cusco all day
Day 6: Rainbow Mountain all day tour
Sacred Valley 6 Day Itinerary: Day 1
Cusco
What to Do in Cusco
Saqsayhauman (aka “Sexy Human”)– a 30-minute walk from town with cool ruins and the best view over Cusco.
Plaza de Armas-the beautiful main square lined with restaurants and shops. It’s a good place to people watch, shop, sip coffee, and eat.
San Pedro Market-a large local market with cheap goods and food. It’s about a 10 minute walk from Plaza de Armas.
Chocolate Museo-for chocolate lovers, there is a free tour and chocolate tasting. You will not only taste chocolates, but everything chocolate flavoured, including fruit jams and liqueurs.
San Blas Neighborhood– the hipster area of Cusco that has cute artisan shops and great views over the city.
Where to Get Coffee with Soy Milk in Cusco (Because…lactose intolerance)
Finding coffee with soy milk in foreign lands can be quite tricky, but I found 2 great places in Cusco.
Punchay Cafe– in the San Blas area is a cute little cafe with soy milk options.
Cappuccino cafe-a cafe overlooking the main square with awesome views and soy milk options (pictured above).
Where to Eat Healthy Food in Cusco
As you may have heard me say before, I am allergic to gluten and extremely lactose intolerant. Therefore, most my food choices involve healthy/organic restaurants that aren’t the cheapest places to eat. But hey, being healthy ain’t cheap! The following are my favourite healthy restaurants in Cusco:
Organika-a tiny restaurant with awesome farm to table food and great juices. I tried the caesar salad and substituted the caesar dressing with passionfruit dressing and it was incredible! I am not a salad girl at all, but this one impressed me with the robust flavours.
Nuna Raymi-a large and cozy restaurant with organic food with fresh herbs and veggies/fruit. They have all the herbs and veggies displayed so you can see what you’re eating. I tried the gluten free version of Loma Soltado with Alpaca that was amazingly tender and juicy. Allergens are labelled on the menu.
Per.uk-a small restaurant near the main square that had the most amazing trout ceviche I have ever tasted. Allergens are labeled on the menu.
Greens Organic-an organic restaurant right off the main square that has awesome feta avo salad and juices. Allergens are listed on the menu.
Chia-gluten free/vegan/vegetarian new restaurant with yummy green curry.
Cafe de Museo–great breakfast and coffee with balcony seating outside. It’s also a nice cozy atmosphere inside.
Uchu-upscale steakhouse that I splurged on my last night and it didn’t disappoint. You can cook your own meat on a slab and they had the best side salad I’ve ever tasted. The wine was top quality as well.
Where to Stay in Cusco
I rented a room in an Airbnb for just $16/night. It had an amazing view over Cusco and an awesome host. Breakfast was also included. The room was basic and the hot water only lasted about a minute, but hey for the price, location, and awesome host it was super worth it. You can check the listing here. And if you are new to Airbnb, you can use my $40 OFF couponhere. (it will also give me a coupon as well, yay).
The first photo is the view from the Airbnb and the second is the cute little street the Airbnb is on.
Sacred Valley 6 Day Itinerary: Day 2
Sacred Valley
I decided to explore the Sacred Valley on the way to Machu Picchu. Through my excessive research I found the taxi company called Taxidatum, which had great reviews for professionalism and safety. I ended up using them 3 times in Peru and they were very professional, punctual, and drove slowly/safely.
The company offers Sacred Valley day tours as well as a final drop off in Ollantaytambo. I did the Sacred Valley tour which stopped in Chincheros, Maras, and Moray. The cost for the entire car was $65 so you can split between passengers. I did it solo and had my own private car, which ended up being cheaper than the train and so worth it. I could go at my own pace and stay as long or little in each place as I pleased. I highly recommend doing this to see some of the awesome sites along the way to Machu Picchu. My favourite stop was Maras, with the endless salt pans set in between the gorgeous Andes mountains.
Make sure to get the touristico bolistico ticket for 130 Soles. It allows entry into Ollantaytambo, Moray, Maras, Chincheros, Saqsayhuaman and a bunch more ruins and museums around Cusco. You can buy the ticket at any of the included sites (I bought mine when I entered Chincheros).
The salt mines of Maras used by the Incas in ancient times are still in use today.
Similar in appearance of a Greek amphitheatre, the concentric circular depressions of Moray remains a mystery. However, because of the vast temperature difference from top to bottom, it is believed they were used to cultivate certain crops and the area at the bottom was used as an agricultural research station.
Ollantaytambo is a common starting point to the Inca trail, this beautiful little city deserves at least a half day to explore. My taxi tour ended in Ollantaytambo and I had a half day to roam around, walk up the ruins, and relax before my morning train to Machu Picchu. From the top of the Ollantaytambo ruins, you can see the whole city and stunning landscape completely surrounded by the Andes mountains. I absolutely loved this city.
Sacred Valley 6 Day Itinerary: Day 3
Machu Picchu Tickets: Things to Know
As you may have heard, new regulations went into place on July 1st this year which is restricting tourists to either a morning ticket or afternoon ticket. Before you could just go any time of day and stay all day…not anymore.
Despite what you will hear, there aren’t 2 time frames, but actually there are 3. The morning, afternoon, and the limited “Horario Vespertino 13:00 horas”.
Machu Picchu Tickets
Morning ticket + hike allows entrance from 6am-12pm. Cost: 200 Soles ($62)
Afternoon ticket + hike allows entrance from 12pm to 5:30pm. Cost: 200 Soles ($62)
Horario Vespertino allows entrance from 1pm to 5:30pm Cost: 120 Soles ($37)
Machu Picchu entrance without any hike costs 152 Soles ($47)
The limited half day ticket starts at 1pm instead of 12pm. It’s cheaper than the half day and I got this one for my first afternoon there. The next day I got the morning ticket with the hike to Machu Picchu Mountain.
I spent a total of $99 for my 2 tickets to Machu Picchu. It’s not cheap, but I’m so glad I went 2 days. The first day I went in the afternoon at a relaxed pace taking photos and walking around the ruins. The second day I did the hike and after that I was so exhausted I didn’t stay much longer. The afternoon trip plus the morning hike was perfect.
You need to purchase your tickets as far in advance as possible because the number of people per day has been limited, especially for the mountain hikes. They only allow 800 hikers per day for Machu Picchu Mountain. For Huayna Picchu Mountain, the daily limit is only 400 hikers per day. It was actually sold out when I checked 2 months before so make sure to plan way in advance.
There are 2 different time slots for the hikes, and you must pick one when buying your ticket.
Machu Picchu Mountain time slots
1st time slot: 7-8am
2nd time slot: 9-10am
Huayna Picchu Mountain time slots
1st time slot: 7-8am
2nd time slot: 10-11am
To buy tickets, you will have to go The Ministry of Culture Website which is quite confusing. The site is annoying and takes forever to load and sometimes crashes, but just be persistent and try again. They only take Visa card for payment so don’t try to pay with MasterCard or Amex or you will wonder why it’s not working. I found a great step-by-step guide by Thrifty Nomads that will walk you through the confusing process, which is what I used. You can check their article here.
Visiting Machu Picchu
Take the Vista Dome or Expedition train from Ollantaytambo to Machu Picchu. I booked my tickets on Peru Rail. When you get to Peru, you must take your confirmation to a Peru Rail office and get the actual tickets. They are a little slow with everything so give yourself an extra 30 minutes to get the tickets from them.
The view from the Vista Dome Train
You can only bring one small carry-on bag on the train as there is no overhead storage. If you want to bring anything else, you will need to email them 48 hours in advance and if they still have availability they will tell you yes. Still, no huge suitcases will be allowed due to space.
Once in Aguas Calientes, get a round-trip bus ticket for $24 to Machu Picchu and get up there by 1pm. By 3:30-4pm it was virtually empty. I almost had one of the top tourist sites in the world all to myself. I would definitely recommend going in the afternoon when there is less people. The only thing is you can only hike the 2 mountains during the morning time. This is exactly why going for 2 days is key!
Hike Machu Picchu Mountain in the morning. Allow yourself 4 full hours to complete the hike roundtrip. Take lots of water. Because of the altitude, the hike is intense and you will need to stop a lot to catch your breathe.
I caught the Expedition train back at 3:20pm and arrived in Poroy station at 7:10pm. There is no train station in Cusco and the station used is called Poroy, a 20 minute taxi ride outside of Cusco.
Sacred Valley 6 Day Itinerary: Day 5
Cusco
Whatever activities you didn’t get to on day 1, finish up today. Tomorrow will be a very strenuous day so make sure to take it easy.
Sacred Valley 6 Day Itinerary: Day 6
Day Trip to Rainbow Mountain
Pickup is at 3:30 or 4:30 in the AM so make sure you get enough rest. You will drive 3 hours total, with a stop for breakfast, before getting to the entrance. Once there, you will have an option to rent a horse, which I highly recommend unless you have amazing cardiovascular endurance. Rainbow Mountain sits at an altitude of over 17,000 feet, so for most of us that don’t live at high altitudes, this will be the most challenging hike you will ever do. Pace yourself, go as slow as you need, rest when your body tells you, and drink lots of water.
Even with the horse, you will have to hike the last 200 meters which is at an extremely steep incline. I thought I was going to die and had to keep stopping every 10 steps to catch my breathe. My heart felt like it was going to explode in my chest. The altitude is no joke so make sure to listen to your body.
Even through all that extreme exhaustion and fatigue, the views at the top are SO worth it. It’s such an incredible natural phenomenon to see. There will be many tour groups there so it’s a little tough to get photos without a million people in them. But I managed to find a perfect spot. At the top of the mountain, turn left and walk down a little bit and the perfect spot will be on the left. It’s a little farther away from view than you see in photos, but I much preferred it to get some photos without people in them.
I paid $30 and booked online with Haku company via findlocaltrips.com. They were selling the tours in the city for 70 pesos (about $21), but I wanted to read reviews on the company as I have heard many stories of companies in both Peru and Bolivia having a problem with the drivers being drunk. There has also been many accidents with tourists which have resulted in death so I was not going to take that chance. I am willing to pay more for my safety and piece of mind. Please do your research before booking with a company that involves any kind of transport in Peru and Bolivia.
Travel Insurance for Peru
I never go on a trip anymore without travel insurance. Never. Too many bad things can happen (and they have unfortunately). Shit happens when you least expect it.
After crossing into Bolivia, my cellphone was stolen. Traveling without your cell is the worst! I’m so glad I had insurance because when I got back I filed the claim with no hassles and got fully reimbursed for my phone + the expensive case that it was in. Thank God!
My favorite travel insurance that I have been using for the past 4 years is World Nomads. I have made 3 total claims so far and have been fully reimbursed for all 3. I highly recommend them.
*this post contains affiliate links.
If you enjoyed this article, please PIN it for later ♥
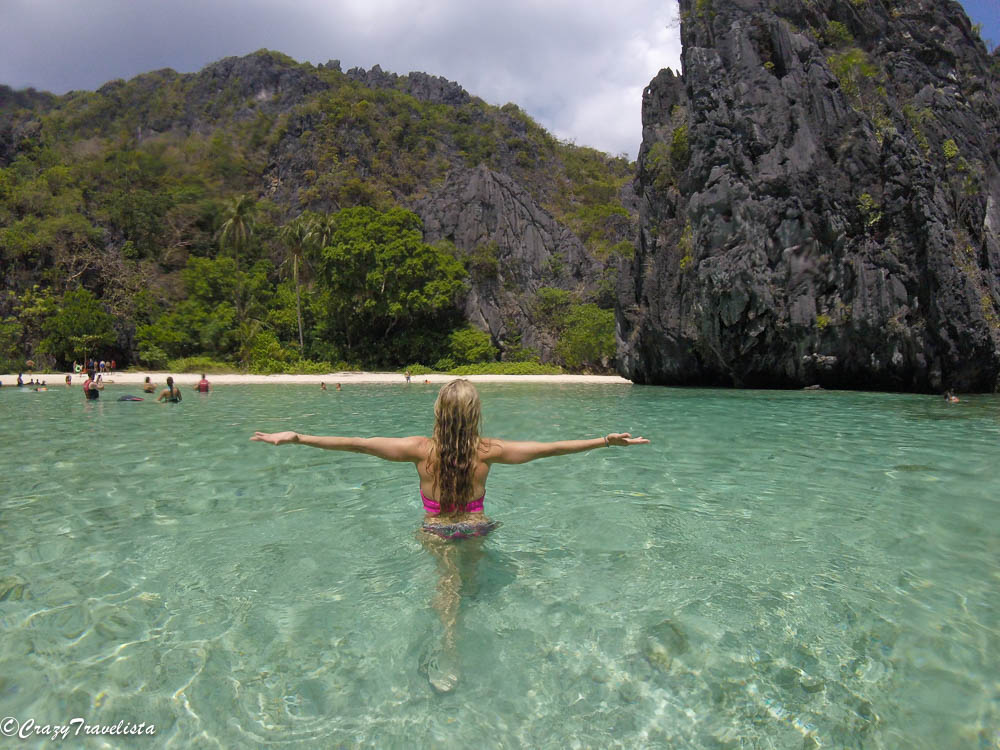
Palawan has been voted the most beautiful island in the world, and for good reason. With its plethora of crystal clear turquoise waters, stunning lagoons, and plunging cliff lines, its not hard to see why. Palawan is the epitome of the word paradise.
There’s a lot you can do and see on Palawan even with a limited timeframe. I spent a week in Palawan, split between El Nido and Coron and it was the perfect introduction to the Philippines.
To make it simple, it’s going to take a long time! There are no direct international flights to El Nido so you will have to fly to Manila first, and then either fly to Puerto Princesa and take a 6-8 hour van ride up to El Nido.
Or there is the more direct (and more expensive) option of flying nonstop to El Nido. I flew with Air Swift on a short flight from Manila and it cost me $130. To me the direct flight was worth it to get there quicker.
You’ll be greeted at El Nido airport with a serenade from the local Filipino women, a unique welcome to the Philippines! Air Swift passengers are also given free coffee, juice and snacks upon arrival.
To get to your accommodation, you’ll most likely have to take a tricycle, which reminds me of a mini tuk tuk. It costs 300 PHP to get to town (around $6) and takes around 15-20 minutes.
El Nido Tours
People flock to El Nido for the famous island hopping tours. There are 4 main tours leaving from El Nido: Tour A,B, C, and D. Creative, huh? They also offer combined tours if you’re super short on time (but some of the stops are cut out obviously).
Tour A & C are the most popular and most the pictures you’ve seen from El Nido are most likely from those tours. If you had to pick just one, hands down I would choose Tour A!
All the tours are a fixed price by the government so don’t bother trying to negotiate. There are dozens upon dozens of tour companies in town and they pretty much all offer the same tour with the same stops so no need to be extra picky on this one. I am one for good reviews so booking online beforehand wouldn’t be a bad option either.
Day 1: Nacpan Beach
Rent a motorbike for 300-500 PHP and drive 45 minutes North to Nacpan Beach. The last 20 minutes is super bumpy and rocky and it’s uncomfortable but not dangerous. There’s a little restaurant that serves fresh seafood and drinks on the beach.
Unfortunately, Twin Beach was closed due to a court case involving squatter activity until further notice so it’s impossible to get that infamous view of Twin Beach. This was the best I could do from the bottom of the hill. You can kinda see both beaches, but not so epically. Meh.
Sunset at Las Cabanas Beach
Take a tricycle to Las Cabanas. It will cost 150 PHP from town and takes less than 10 minutes.
Las Cabanas is a great place to relax and unwind from the day, and have a drink if you’d like. There are a few cafes right on the beach and it’s a very popular place to catch the sunset. Meremgmeg Beach Bar was really cool and had swings at the bar instead of seats.
Day 2: Tour A
Take Tour A, the post popular (and my favorite) of the tours. The tour will take you on 5 stops including: Small Lagoon, Big Lagoon, Simizu Beach (lunch stop), Secret Lagoon, and 7 Commandos Beach.
Cost: 1400 PHP (~$27)
I will highlight my favorite spots below:
Small Lagoon
You can’t swim in this gorgeous lagoon. The boat takes you in and you just sit back and enjoy turquoise waters like you have never seen before.
Big Lagoon
You can rent a kayak (Depending on availability) or snorkel and explore the big lagoon, which was so much fun!
Secret Lagoon
The Secret Lagoon was unreal in terms of beauty. We had to jump off the boat and swim here from a distance where we could explore the hidden lagoons and caves. This is exactly what I imagined the Philippines to be.
7 Commandos Beach
The last stop of the day is on this long white sand beach. They have a bar and souvenir shop, as well as comfort rooms (what they call restrooms in the Philippines). There is also a fun rope swing that you can play with!
Day 3: Tour C
I booked Tour C with Art Cafe. The buffet BBQ lunch they served was really good! The tour leaves at 9am and comes back around 5pm.
Cost: 1400 PHP plus 100 PHP to rent fins (snorkel masks are already included).
5 stops are included on this tour including: Hidden Beach, Secret Beach, Starfish Beach, Miniloc Shrine, and Helicopter Beach.
I found absolute paradise in Hidden Beach. I kinda wanted them to leave me there “accidentally”.
The Miniloc Shrine had the best viewpoint over the islands (cost is 100 PHP to go here). There are very pointy rocks at the top so please be careful.
This is guaranteed to be one of the most risky hikes you will ever do. Do NOT attempt to do this hike without a guide, it’s quite dangerous (and I don’t say this often).
You’ll be stepping on jagged, pointy, super sharp rocks and at some points you will be climbing up a 90 degree angle! It’s honestly more like rock climbing than a hike. Except that you will have NO harness or protective ear. But the 180 degree panoramic view at the top is worth all the fright and agony getting up there, trust me!
You can go in a group or hire a private guide. The whole trip takes about 2.5 to 3hrs. It costs 500 PHP for one person and can be as low as 300 PHP if you get a few people to go.
Tips for Hiking Mt. Taraw:
Take a sweat rag. I was dripping sweat and was all slippery. Not cool when my guide reached for my arm to pull me up in some places.
Start as early in the morning as possible to beat the heat.
I really wish I had brought gloves because the rocks I had to pull myself up on were super sharp.
Make sure to bring sturdy shoes (they won’t even let you hike without closed-toe shoes), water, and snacks.
Don’t bring many items with you. You do not want a big backpack on your back when you’re doing this climb. My guide actually didn’t let me carry a bag and put my stuff in his backpack.
Make sure to grab the rocks with your hands before moving with your feet.
On the way down go backwards, it’s easier and safer.
Rent a Kayak
Rent a kayak for 400 PHP and paddle over to Bikal Beach on Cadlao Island. There is a small and secluded crescent shaped beach which takes about 45 minutes to 1 hour to get to. You’ll most likely have the beach to yourself. Unless you go in the morning because I believe tour D makes its first stop here.
Wouldn’t you love to have a whole stunning beach to yourself?
Get a Massage
Get a massage to end your trip in El Nido. It costs about 500-600 PHP per hour for a full body massage and you can find these massage shops all over the city. I got a head and food massage to end my day and it was just perfect after all that hiking and kayaking I had done.
Best Way to Get between El Nido and Coron
There’s a newer fast boat option by Montenegro Lines that leaves daily from El Nido at 6am and from Coron at 12pm. The journey supposedly takes 3.5 hours (it took about 4 hours and 45 minutes) and is pretty comfortable in a clean and air conditioned boat. They play a movie on the flat screen during the trip. I booked my ticket online through Naturalis.
Make sure to arrive to the port 30 minutes early to check-in and pay your port fee (20 PHP) before you can board. You can pick your seat when you check in so if you’re prone to sea sickness, make sure to pick a seat in the back of the boat.
Cost: 1848 PHP + 20 PHP port fee (about $36 USD).
If you want to save a few dollars there is a slower ferry option on a freight ship that takes 7+ hours. I heard it’s extremely uncomfortable and the boats are older and less clean. Just google it if you want to make your decision easier. It’s literally less than a $10 difference so why put yourself through that hell? Take the fast boat!
Day 5-7: Coron, Palawan
Day 5: Ferry to Coron
There isn’t much to do in Coron town honestly. It was a stark contrast to the lively El Nido, so just take the afternoon to relax before the evening activities.
Head to Coffee Kong, for some good coffee. It’s a cute little coffee hangout and the only place I found with soy milk! They also serve breakfast and have really good Air Con.
Hike Mt. Tapyas before Sunset
You have to walk 700 steps to get to the top of Mt. Tapyas, but it’s well worth it. It will take you about 25-30 minutes to walk to the top. How it works is you hire a tricycle to take you there, they wait for you, and then they take you to Maquinit Springs (which is 20 minutes away). The entire ride only costs 300 PHP (~$5) and I was with my driver for about 4 hours.
iPhone pic from the top of Mt. Tapyas
End the Night at Maquinit Springs
Maquinit Springs is a huge natural saltwater hot spring surrounded by mangroves in the jungle. It’s a super unique setting and although it’s quite busy, it’s still very relaxing.
I must say these were the hottest hot springs I have ever experienced. Have you ever noticed that most hot springs are warm, but not very hot? Not this one! It’s super hot and exactly what your body needs after that hike up Mt. Tapyas.
Cost: 200 PHP for adults
Day 6: Island Escapade Tour
I booked with with JY Tours as it was recommended by my Airbnb host.
Cost: 1200 PHP (~$23).
Stops included: Malcapula Beach, CYC Beach, and Waling Waling Island.
Malcapula Beach
A heavenly white sand beach and crystal blue waters. It’s one of the prettiest beaches I saw in the Philippines.
Hiked up the little hill for this secret view.
CYC Beach
CYC is the only remaining public beach in Coron. Compared to all the other beauty I saw in the Philippines, this beach was pretty run down, crowded, and dirty. Our group was wondering why they even had this stop on the tour. No pictures here because there wasn’t much to see.
Waling Waling Island (aka “Mini Maldives”)
Locals refer to this beach as the mini Maldives due to the crystal waters. It was my favorite stop of the day!
During low tide, a sand bar appears and you can walk out onto it. It is breathtaking.
Completely unedited iPhone shot of the gorgeous Waling Waling island.
There was another stop on our itinerary but our guide chose to go here instead…which none of us were complaining about!
A post shared by 🌍World Traveler/Blogger✈️ (@crazytravelista) on
There are also many bright tropical fish around the area. Can you see the sunken ship? It would have been fun to scuba dive down inside of it!
WIFI Connection in the Philippines
Wifi connection is very poor in the Philippines, so staying connected was not the easiest. I used a combination of a local SIM and my Skyroam portable hotspot device to stay connected.
You can get a local SIM for 600 PHP ($12) for 4GB plus 1 free GB (5gb) with Global SIM at the airport kiosk. The plan lasts 30 days.
Accommodations in Palawan were more expensive than I imagined they would be in the Philippines. I spent about $30 per night. When I travel I usually spend on average $25 per night to rent a room (more if I rent out a whole apartment). But the value for the price in Palawan was not that good and the standards were a lot lower than I expected for that price.
That being said, go in knowing what to expect! I stayed in Airbnbs in both Coron and El Nido. While I cannot recommend the place I stayed in El Nido, the room I rented in Coron was very large, clean, and had good Air Con. The host is from California and was really laid back and helpful. It was in a convenient location and was pretty comfortable. You can check out the listing here.
If you’re new to Airbnb, you can use my $40 OFF Coupon. Or even if you are not, you can sign up with a different email and use the coupon as well! ♥
Travel Insurance for the Philippines
I would never travel without travel insurance anymore. I learned my lesson. Too many bad things can happen (and they have unfortunately). Travel insurance is especially important when traveling to islands, as you may need to be air-lifted to the mainland in the worst case scenario. Do you know how much air-lifting costs? Think at least 5 digits (I.e. Expensive AF!).
My favorite travel insurance that I have been using for the past 4 years is World Nomads. I have made 3 claims so far and have been fully reimbursed for all 3 without any hassle. I highly recommend them.
*This post contains affiliate links.
Have You Been to Palawan? Is there Anywhere Else you Would Recommend to Visit that I Missed?
If you enjoyed this Palawan 7 day itinerary, please PIN it for later! Simply hover over the photo to PIN. ♥
The Nusas consist of 3 gorgeous islands off the coast of Bali, Nusa Lembongan, Nusa Ceningan, and Nusa Penida.
All 3 islands have something special to offer so if you have time, I highly recommend checking out all three!
I based myself in Lembongan for 3 days and was able to visit all 3 islands during my time there.
You can see Ceningan in a half day as it is the smallest of the three. It is accessed by a bright yellow bridge from Lembongan.
Penida is the largest and most rugged of the 3. It is completely devoid of mass tourism and has so many awesome things to see!
*I want to especially thank Jackie from @getlostwithjackie for introducing me to Lembongan and Christina from @jetsetchristina for introducing me to Penida. These girls’ amazing Instagram photos really enticed/inspired me to visit these places that I had never heard of before! ♥
If you’re short on time and want to see all 3 islands in 3 days it’s totally doable.
This was my 3 day itinerary in the Nusa Islands (see below for all the details on each place):
Day 1:Nusa Lembongan (Mushroom Bay, Dream Beach, Devil’s Tear, The Deck)
Day 2: Nusa Penida full day
Day 3: Nusa Lembongan private tour to Manta Point + half day in Nusa Ceningan
What to Do on the Nusa Islands
Nusa Lembongan
What to Do and See in Nusa Lembongan
Dream beach– beautiful beach where Dream Beach Huts overlooks. The waves are huge and you can’t really swim in it as it’s dangerous. You can pay a small fee to use their pool and facilities if you want to spend the day there.
A post shared by 🌍World Traveler/Blogger✈️ (@crazytravelista) on
Devil’s Tear-a 5-10 minute walk from dream beach (to the right if you’re looking at the water) will bring you to Devil’s Tear. Watch as the waves crash into the crescent shaped rocks leaving a huge cloud of mist behind. It’s a petty cool site! Be careful as the waves come up on the rocks so don’t try to be that person to get the perfect selfie on the edge.
Mushroom Bay-a gorgeous blue/green bay with cute little restaurants and some water activities nearby.
The Deck-a cute little spot overlooking Nusa Lembongan Beach and probably the best place to view the sunset on the island. It’s a bit more expensive than other places and serves a bunch of Western food. I didn’t even care as the view was well worth it. They have sunset sessions with a live DJ in the evenings as well, so it’ a great place to mingle.
Swim with Manta Rays-one of the main attractions of the Nusas is swimming with Manta Rays! You can take a group tour that will take you to Manta Point and a few other snorkelling spots. Or you can do what I did and get a private tour and make up your own schedule with the stops of your choice.
This obviously isn’t the cheapest option, but I liked the idea of a tailored tour! I negotiated a rate of 400k for 3 stops (about $30 USD), including swimming with manta rays, and snorkelling in Crystal Bay and Secret Beach. It was also great because I started early and was back by 11am, which gave me enough time to eat lunch and then head to Ceningan for the rest of the day to explore.
Note: you aren’t guaranteed to see manta rays, but I got lucky and saw a huge one! My captain told me to jump in, and honestly I was scared sh*tless when I saw the huge shadow of the creature on the surface. The only bad part about being alone on a tour. Another boat showed up and I waited until they jumped in to go in (I’m such a chicken). It swam within a foot of me! I scrambled to turn on my GoPro but it had already passed so i don’t have the best pictures to show for it. Manta rays are massive! Yet so angelic and graceful. It was such a once-in-a-lifetime experience to be up close and personal with these amazing creatures! Don’t miss out on this!
Nusa Penida
Nusa Penida was my favorite of the 3 islands as it was the most rugged and untouched. I only saw a handful of tourists the entire day. To explore, you need to take a tour or rent a scooter and do it on your own (which is what I did).
What to Do and See in Nusa Penida
Atuh Beach–This beach took a steep hike to get down, but was totally worth it. It’s absolutely breathtaking! The plunging cliffs are freakishly tall and provides a beautiful setting. It takes about an hour drive from the port of Penida, then about a 10-15 minute hike down onto super steep steps/rocks.
There are a few little shacks serving drinks and fried rice or noodles. It’s pretty secluded and a great place to relax.
There is no parking fee.
Kelingking T-Rex (aka the money shot)–This is probably the most popular beach in Penida and it’s shaped like a T-Rex! You can walk down the vey steep steps/rocks down to the beach, bit it may take you awhile. You must go very slow as it is very steep! I made it 1/3 way down and didn’t have time to go all the way as it took way longer than I imagined!
Parking is 5k (~$0.30).
A post shared by 🌍World Traveler/Blogger✈️ (@crazytravelista) on
Angel’s Billabong (Gambar Untuk)–anatural infinity pool of blue and green hues that plunges into the ocean. You can swim in it, but be careful when the tide is high as the huge waves will come crashing down and could take you out to sea.
It’s about a 5-10 minute walk from Broken Beach (on the right). You’ll see the signs.
Broken beach (Pasih Uug)-the ride down to this place is the worst road conditions I’ve ever experienced on a motorbike. It’s extremely rocky and bumpy with many potholes so just go very slow! The epic view over the top of Broken Beach is spectacular. And the color of the water is stunning! Parking is 5k.
How to Get to Nusa Penida
By public ferry from Lembongan (near the yellow bridge).
The ferry goes at 7am. Be there at 6:30am to assure a spot. Costs for tourists is 50k (~$3.76).
To get back, you may need to hire a private transfer that costs 200k (~$15).
If you can find more people, you can split the cost. I had to wait about 10-15 minutes and 3 other people joined so it was only 50k each, the same as the public ferry!
It takes less than 15 minutes for the crossing.
There are also ferries from Bali(Sanur) that go to Penida.
The public boat will drop you in the port of Toyapakeh in Penida.
How to get around Nusa Penida
Rent a motorbike for around 50k (~$3.76). The vendors will start at 80k but make sure to negotiate. You can also rent a car, but I enjoyed the adventure on a motorbike.
Note: the roads are VERY bumpy and unfinished with many potholes, especially going to Broken Beach and Angel’s Billabong. If you feel confident on a motorbike and have good balance, you should be fine! However, if you’ve never driven a motorbike before (or on the left side), this isn’t a good place to start! And remember, they drive on the LEFT side in Indonesia!
Nusa Ceningan
Nusa Ceningan is the smallest of the Nusas, but it thoroughly surprised me with its sheer beauty!
What to Do and See in Nusa Ceningan
Blue Lagoon-a natural cliffside lagoon with super vibrant turquoise waters that will leave you in awe.
A post shared by 🌍World Traveler/Blogger✈️ (@crazytravelista) on
Secret Beach– a secluded beach overlooked by Villa Travally Resort. There were only a few people there and it was a great place to relax. You must buy something to stay.
Mahana point for cliff jumping- there is a place to go cliff jumping a few minutes from the Blue Lagoon(although they charge 25k per jump!)
Last Stop Bar and Cafe-cutest little spot on the water with bean bags and a super chill vibe. They also have a great selection of fruit drinks. You can go right in the water from the steps and cool off. I loved this place!
Ceningan cliffs-a restaurant/viewpoint overlooking Penida island. There are swings overlooking the viewpoint. It’s a little bumpy to get there, so if you don’t have time, it wouldn’t kill you to skip it.
Where to Stay in Nusa Lembongan
D’mas Huts-this family run place was absolutely fantastic. It’s composed of only 5 private huts and has a spectacular view over Nusa Ceningan and the gorgeous blue water in between. Oh, and it was only $18 per night!
The owner Nyoman was the best host and catered to just about anything I needed. He always had a smile on his face and really made my stay more enjoyable.
They also have a nice restaurant which serves a big varieties of foods at a super reasonable price. Plus the views over the pool and landscape below are fantastic! The food was super delicious as well!
I got a special deal on hotels.com and paid only $18/night. It was half off, but even at full price it’s super affordable. The value for money is incomparable and I cannot recommend this place enough! And no, it was NOT sponsored in any way!
They also have onsite scooter renewals for 50k/day. D’mas Huts was such a great find!
Have you Been to the Nusa Islands? Which one was Your Favorite?
Click photo to PIN for later♥
MY TOP 5 RECOMMENDED TRAVEL GEAR FOR BALI:
1.Sony Alpha 6000 Mirrorless Camera: I made the switch from my huge DSLR and I wouldn’t go back. It’s light, compact, and takes amazing photos!
2. Sony 10-18mm Wide Angle Zoom Lens: this wide angle lens is the key to landscape shots. I use this lens more than the original and am super happy with it. It’s not cheap, but super worth it if you want to get those special nature shots. Honestly, I would purchase the Sony alpha 6000 camera body only and save up for this lens to go with it.
3. E Bags Packing Cubes: the biggest life changer to keep me packing light! This is my biggest travel gear obsession and I have NO idea how I traveled without them before.
4. LifeProof NUUD Waterproof Case (iPhone 6): this helps protect my phone from water, sand, dirt, and the numerous drops that incur while I travel. I love it!
5. GoPro Hero 5 Black: I am a proud GoPro ambassador and obsessed with GoPro selfie pics if you didn’t notice! The Gopro cameras are the best for action and underwater shots, and of course for taking those selfies when you’re traveling solo. It’s super small, compact, and easy to travel with. Plus it’s so much fun to use! 🙂
Disclaimer: this post contains affiliate links, which means I receive a super small commission if you make a purchase using these links, at no extra cost to you. I only recommend products that I have used before on my own and that I truly love 🙂
Istria is one of the lesser known regions in Croatia, and very underrated in my opinion. Istria is a wine lover’s paradise as it is a prime wine harvesting region in Croatian. Also specific to the Istrian region is the coveted (and super expensive) truffle. Not to mention the food in Istria is known as some of the best in Europe. Go see for yourself!
Go truffle hunting, wine tasting, admire the medieval hilltop villages, or have a culinary field day with all the amazing food that comes from this region. Istria is incredible and it’s surprising that it hasn’t gotten too touristy…yet.
If you’re planning on exploring the Istria region of Croatia, a car is actually the only way you can do it. Public transport does not go to most of these hilltop towns so your options are limited.
Istria is very small and you can easily explore the best spots in one day.
I have highlighted the perfect 1-day road trip in Istria below:
Istria, Croatia 1-day Road Trip
First Route: Rovinj to Hum
Journey time: 1 hour 15 minutes
Parking cost: 10 kuna
HUM
Hum has been coined the “smallest town in the world” and has recently been recognized officially by the Guinness Book of World Records. The town has a population of 17….SEVENTEEN!
Does it get any more fairytale than this?
Walking through this town will literally take you about 5-10 minutes, it’s that small. What we saw in this town included a few residences, a tractor trailor, a cute little shed, a little farmhouse, a field with some crops, a single restaurant with great views of the countryside, and a handful of visitors.
As you can tell by the description, there is not much to see; however, I would recommend a stop here as it is very quaint and unique in its own sense. Also, if just for the mere fact that you can say you’ve been to the smallest town in the world…officially.
(Note: when we were there it was not yet “official”)
2nd Route: Hum to Motovun
Journey time: 40 minutes
Parking cost: 20 kuna
MOTOVUN
Motovun is a medieval hilltop town that rivals the top towns in Tuscany in terms of sheer beauty. Situated on the top of a hill and overlooking the plush Istrian countryside, make sure to grab a glass of the local wine in a cute little restaurant overlooking the land.
Istria is famous for truffle hunting and you will not have a problem findings specialty shops with free truffle tastings. I honestly do not like truffles (they make me gag) so I passed on this. But if it’s you’re forte, make sure to grab a few small bottles for the perfect souvenir to bring back.
Make sure to set aside some time to get lost in the streets and have a mini photo shoot. The town is gorgeous and you’re going to want to take it all in. It wasn’t overcrowded in the least bit and that made it extra enjoyable!
3rd Route: Motovun to Grožnjan
Journey time: 25 minutes
Parking cost: free street parking
GROŽNJAN
I think I may have found my new home
Grožnjan might be my favourite town on our Istrian road trip. Also located on a hilltop, it was a lot smaller and quaint than the other towns and had a more local feel.
How cute are these blue shutters?
You could sense the artistic vibe as soon as you entered Grožnjan and it was nice strolling through all the quirky art shops. I wish we would have had more time here, as it was unexpectedly pleasant.
UMAG
Our next and last stop (kinda) was the city of Umag. As we arrived into the city and attempted to find parking, we weren’t too impressed. The city was more run down and didn’t have much character from what we could see (but hey, we could have been totally wrong and it could have been awesome). We just didn’t get a good vibe from it and made a quick executive decision to head to Novigrad for our final sunset stop. It turned out to be a great choice!
4th Route: Umag to Novigrad
Journey time: 15 minutes
Parking cost: free
NOVIGRAD
In our brief venture in Novigrad, we strolled the main street covered in colourful umbrellas and had an impromptu photo shoot. It was such a lovely street we couldn’t resist.
We then quickly rushed to the waterfront for the sunset and found the cutest little spot called Pepe Bar. There were cushions placed on the rocks and served as the perfect spot to view the sunset.
It was more on the pricy side but the view and ambiance surely made up for it. Try the mojito if you go, it was really delicious!
CareBear and I enjoying the sunset in Novigrad
Last Route: Novigrad to Rovinj
Journey time: 1 hour
Parking cost: free
Where to Base Yourself in Istria
Rovinj without a doubt is the ideal location to base yourself for your Istrian road trip. You can reach all the above-mentioned locations in one hour and 15 minutes max. Also, ROVINJ IS INCREDIBLE and probably my favourite city in Croatia. For reasons why you should visit Rovinj, check out my post What to do in Rovinj: The Ultimate Guide to Croatia’s Most Underrated City
Where to Rent a Car in Istria
About a 10 minute stroll south along the water in Rovinj, you will find a little car rental agency called Vetura. We didn’t make advanced reservations and it wasn’t a problem at all. We reserved the car the afternoon before and it costed 450 kuna (about $69/day) for an automatic last minute rental. It was way more expensive than if you book in advance, so we learned our lesson.
My first time renting a car outside of the USA. I look calm enough, huh?
We were pleased with the company and the owner was very relaxed about return times. I would definitely use them again.
To come along on our fun road trip, check out this video that my travel partner Carebear Abroad made of our awesome day! Hint: it may involve getting our car stuck in the middle of nowhere.
Have you been to Istria? What was you favorite hilltop town?
This website uses cookies to improve your experience. We'll assume you're ok with this, but you can opt-out if you wish.AcceptRejectRead More
Privacy & Cookies Policy
Privacy Overview
This website uses cookies to improve your experience while you navigate through the website. Out of these, the cookies that are categorized as necessary are stored on your browser as they are essential for the working of basic functionalities of the website. We also use third-party cookies that help us analyze and understand how you use this website. These cookies will be stored in your browser only with your consent. You also have the option to opt-out of these cookies. But opting out of some of these cookies may affect your browsing experience.
Necessary cookies are absolutely essential for the website to function properly. This category only includes cookies that ensures basic functionalities and security features of the website. These cookies do not store any personal information.
Any cookies that may not be particularly necessary for the website to function and is used specifically to collect user personal data via analytics, ads, other embedded contents are termed as non-necessary cookies. It is mandatory to procure user consent prior to running these cookies on your website.


