Naxos is the largest island of the Cyclades island group. Naxos has the most unique landscape in the Cyclades and reminded me more of the Ionian islands due to the vast green landscapes. In case you aren’t aware, most the Cyclades have the characteristic dry landscape devoid of much greenery (although they make up for it in other ways!). In other words, Naxos has the best of both worlds in that it is very green with lush landscapes, yet it retains the traditional Cyclades architecture you will see in the traditional Greek villages.
Naxos blew me away and I think it’s one of the most underrated Greek islands for sure. So what is Naxos famous for and why is it worth visiting? Well, first off, Naxos has the best beaches in the Cyclades (along with Milos).Other impressive things to see in Naxos include the quaint hilltop villages, the hike to Mt. Zeus,ancient monasteries, archeological sites, marble villages, cool Byzantine churches, and one of the most beautiful main towns in all the Greek islands, Chora. Oh, and Naxos is also famous for potatoes so make sure to order some Naxos potatoes when you go, they are pretty good!
Naxos 4 Day Itinerary
Day 1: Chora town + Naxos port
Day 2: Alyko Peninsula + best beaches in Naxos
Day 3: Hike Mt. Zeus, Monastery of Fotodotis, Apiranthos town, & Rotonda restaurant
Day 4: Melanes, Panagia Drosiani, Chalkio, & Filoti
Bonus Day 5: East Coast beaches
Best Beaches in Naxos: Hawaii, Alyko, Glyfada , Agia Anna, Mikri Vigla, Plaka, and Agios Prokopios.
Day 1: Chora (Naxos town)
Naxos Portara
As soon as you approach Naxos by ferry, you will notice the huge marble doorway called Portara. Portara is the symbol of Naxos town and is the only remaining part of an unfinished temple dedicated to Apollo.
Naxos Portara, the only structure left from Apollo’s temple
View of Naxos town from Prtara
The Portara (or “large door”) was said to be too heavy to move, so it has remained there for over 2,500 years. It is also an awesome place to watch the sunset, although it does get quite crowded up there as it seems the entire town flocks here during this time.
Old Town Naxos
Old town Naxos has to be one of the prettiest old towns in all of Greece, with stiff competition all around! The typical white washed buildings with small alleyways and boutique shops is very typical of Cyclade architecture, but there is something just so special about Naxos Old Town that makes it stand out from the rest.
Get lost in the maze-like streets and go shopping at the cutest little boutique shops. There are also many traditional tavernas inside the old town as well.
Kastro (Naxos Castle)
At the top of the old town is the Kastro, the 13th century Venetian Castle of Naxos. It’s more like remnants of a castle with an archeological museum, medieval architecture, old mansions, a Catholic Cathedral, and the Tower of Glezos, the only tower still remaining of the original twelve.
Views from my walk back from the top of Kastro
Medieval architecture all around
Naxos Port
Naxos has a nice seaside port lined with cafes with a very relaxing vibe. This is also another great place to watch the sunset if you’ve already gone up to Portara.
Naxos Restaurants
I rarely recommend specific restaurants in Greece because most the food is super fresh and consistently good just about anywhere you go. But here are 2 places in Naxos town that were memorable so I thought I would mention them:
Kozi– restaurant on the water with a great view of the Apollo arch (pictured below). They have true Greek meze plates at a great price. Try the stuffed grape leaves. Yum!
Meze 2 -restaurant in Naxos port with tasty food. Try the lamb in lemon sauce.
Day 2: Alyko (aka Aliko) Peninsula and Best Beaches in Naxos
You can park and then walk to Aliko nature reserve and take paths to different beaches. It’s a sandy peninsula with trees and bushes separating the beaches. It’s also home to cedar and juniper forests. Aliki is such a pretty area and you could spend a whole day there exploring. The beaches are not organized and are rugged with no facilities (except out houses on Alyko beach).
Glyfada beach
Glyfada has an epic entrance through sand dunes, trees, and bushes. It’s a very wild beach with gorgeous clear blue water and red rocks on the far end. You can park at Faros and walk down. I was the only person there when I went.
Hawaii Beach
Hawaii is the most beautiful beach on Naxos that you can reach by walking on paths with bushes. It opens up to a cliff where you look down onto the beach. Find a spot on the rocks to climb down, there are no actual steps. Hawaii has soft sand with completely crystal waters. This was my favorite beach of all the Naxos beaches. If you only go to one beach in Naxos, go to Hawaii beach!
Alyko Beach
Alyko is a rugged sandy beach with a little traditional chapel framing it. This beach lies next to a cedar tree forest, offering a very peaceful environment away from crowds.
Agia Anna
Agia Anna is a cute little beach with a little fishing dock. It has sun beds and many cafes along the beach. This is one of the closest beaches to Naxos town and can be easily reachable by bus in about 20 minutes from the port.
Tip: at Palatia cafe (pictured above) you can use their free sun beds if you buy something. I ordered only a Greek coffee and was able to use their sun beds all day.
Agia Anna was my favorite beach that was close to the city center. It was smaller than the others and more chill. And the little pier and fishing boats were really pretty in the calm bay.
Plaka
Plaka is one of the largest Naxos beaches with sun beds and restaurants lining the beach. Although it is one of the busiest Naxos beaches, it is vastly stretched out and there are many spots you can go to avoid crowds. Tip: Go to Yazoo restaurant for a nice beachy vibe and good food.
Mikri Vigla-two beaches separated by a sandy hill. One side of the beach is very windy and famous for kitesurfing and wind sports. The other side of the beach is more calm with a long stretch of sand and rich blue waters.
Agios Prokopios-a well organized thick sand beach located 3.5 miles from Naxos town. It is one of them most popular Naxos beaches a has some of the clearest waters on the island.
Pyrgaki beach-soft sand beach with some sun beds. It’s skippable in my opinion.
Day 3: Hike Mt. Zeus, Monastery of Fotodotis, Apiranthos, & Rotonda restaurant
Mt Zeus Hike
Mount Zeus is the highest peak in the Cyclades island group. It is graded as a difficult hike but I would say it’s more like the high end of a moderate hike.
The hike takes about 1 hour 10 minutes to the top. The last 30 minutes is up some loose rocks so just be careful and wear proper shoes. (i.e. sneakers, not converse). It’s mostly uncovered so make sure to wear sunscreen and go early in the morning to avoid the heat.
Tip: Start the hike at a tiny church called Agia Marina. There are only a few parking spaces here so that’s another reason to get here early to get one of those parking spots.
Monastery of Fotodotis
Right across from Agia Marina church (on your hike to Mt Zeus), there is a tiny dirt road that leads to this beautiful monastery. Drive about 7 minutes up the dirt road to reach the monastery. There are 2 gates you have to open and then close behind you to keep the wildlife in (and out).
NOTE: I would ONLY drive up the road on an ATV or 4WD SUV because the road was very rough with lots of big potholes. A small car would probably get stuck and/or get a flat tire.
Apiranthos
Apiranthos is a small mountainous village famous for marble. Most the alleys, streets, and steps are made of beautiful marble and it’s very unique to see. The city is set high on a hill overlooking the countryside. It was my favorite small hilltop town in Naxos.
Rotonda Restaurant
The view alone is worth visiting this restaurant. It’s on the way to Apiranthos town so it’s nice to make a quick stop here and get a coffee and snack. It’s overpriced as you would expect, but you’re going for the view and experience.
Day 4: Melanes, Panagia Drosiani, Halki, and Filoti
Melanes
Make your first quick stop of the day in Melanes for coffee with a beautiful view in this tiny little town.
Drive past Kinidaros and marvel at the huge marble quarries protruding from the mountains.
Panagia Drosiani
The “Virgin Mary” Drosiani is a gorgeous Byzantine church set inside the Greek hillside that dates back to the 6th century. The inside walls are decorated with ancient frescoes and paintings. Panagia Drosiani is one of the oldest churches in all of Greece.
Chalkio (Halki)
Chalkio (Aka Halki) is a traditional little town located in the center of Naxos island, nestled between the mountains. Halki is the former capital of the island of Naxos.
Halki is a cute town with little jewelry and embroidery shops. You can walk 10 minutes to the church of St. George Diasoritis, a gorgeous and secluded Byzantine church dating back to the 11th century (pictured below).
Filoti
On your last stop of the day, stop at Filoti, a traditional town located at the foot of Mt. Zas in the center of the island. Filoti is not only the largest village on the island of Naxos, but in all of the Cyclades.
Filoti, Greece
Bonus-Day 5: East Coast Beaches
Panermos
Panermos was the only beach I saw in Naxos with palm trees. It is a small beach with a mix of sand and pebbles. There is an acropolis of Panermos above the beach that you can visit. There is also a little beach shack serving drinks and food. It’s windy and the water is a little rough, but there weren’t many people there so it’s nice and secluded.
Psili Ammos Beach– a very secluded beach that was hard to find. I drove all around on dirt roads and couldn’t get to it. Hence, I don’t have any photos of it unfortunately.
*There were a few random beaches I stopped at while driving so I’m not sure of the names (below). It’s always nice to find some unnamed beaches!
Note: Most of the best beaches in Naxos are on the West Coast so I would only visit the East Coast if you have lots of time on the island as there are many better beaches elsewhere.
Where to Stay in Naxos
I stayed in this cute little studio (Margo studios) a few minutes walk to the center, in a very quiet area. It had a free parking lot right out front, which was so helpful! I paid $30 per night and it was great value for the money. There was free coffee and tea every morning, and free beach towels. The staff was also so nice and helpful.
There was a cool rooftop area with hammocks where you could chill and watch the sunset. I needed to do laundry during my stay and they had full-service laundry service that they picked up in the morning and it was all folded and ready in the evening (for a very reasonable price).
Margo studios has a 4.9 review rating on booking.com, and I can totally see why. I highly recommend this place.
How to Get Around Naxos
Rent an ATV, Scooter, and/or Car
I usually like renting ATVs on the Greek islands because it’s so much fun and makes it so easy to explore the many beaches and villages. You can also easily park almost anywhere. However, Naxos is a lot larger than most Cyclades islands and the distances between places is a lot greater. Plus, it is very mountainous with many windy roads. So in this case, I did a combination of ATV and car rental. Take the ATV to explore the beaches closer to the Chora, such as Plaka, Agia Anna, etc. And then take the car to explore the center of the island and smaller villages.
I used Fun Car & Rides to rent a 300cc ATV and also an automatic car for 25 Euros a day on the spot. The office is right in the port. You need an international drivers permit (IDP) to rent any vehicle in Greece and they have recently become more strict about enforcing it. You can easily get an IDP at AAA offices in the USA for $20 and it lasts one year.
*a 300cc is the most powerful ATV I’ve ever rented and goes extremely fast so be careful and always wear a helmet!
Tip: the only time I don’t pre-book a vehicle is on the Greek islands because you can often get a better deal right on the spot. You can negotiate a better deal and usually get it for cheaper if you rent it for more days and/or if you pay in cash.
Travel Insurance for Greek Islands
I would never travel without travel insurance anymore. I learned my lesson. Too many bad things can happen (and they have unfortunately). Travel insurance is especially important when traveling to islands, as you may need to be air-lifted to the mainland in the worst case scenario. Do you know how much air-lifting costs? Think at least 5 digits (I.e. Expensive AF!).
My favorite travel insurance that I have been using for the past 4 years is World Nomads. I have made 3 claims so far and have been fully reimbursed for all 3 without any hassle. I highly recommend them.
MY TOP 5 RECOMMENDED TRAVEL GEAR FOR GREECE:
1.Sony Alpha 6000 Mirrorless Camera: I made the switch from my huge DSLR and I wouldn’t go back. It’s light, compact, and takes amazing photos!
2. Sony 10-18mm Wide Angle Zoom Lens: this wide angle lens is the key to landscape shots. I use this lens more than the original and am super happy with it. It’s not cheap, but super worth it if you want to get those special nature shots. Honestly, I would purchase the Sony alpha 6000 camera body only and save up for this lens to go with it.
3. E Bags Packing Cubes: the biggest life changer to keep me packing light! This is my biggest travel gear obsession and I have NO idea how I traveled without them before.
4. Anker Portable Charger: this helps me recharge my iPhone several times a day when I travel. It also has dual ports so you can charge your camera or other electronics simultaneously. I couldn’t travel without it.
5. GoPro Hero 11 Black: I am a proud GoPro ambassador and obsessed with GoPro selfie pics if you didn’t notice! The Gopro cameras are the best for action and underwater shots, and of course for taking those selfies when you’re traveling solo. It’s super small, compact, and easy to travel with. Plus it’s so much fun to use! 🙂
Disclaimer: this post contains affiliate links, which means I receive a super small commission if you make a purchase using these links, at no extra cost to you. I only recommend products that I have used before on my own and that I truly love 🙂
If you enjoyed this article, you can PIN it! (Just hover over the PIN below)♥
Kefalonia (aka Cephalonia) is the largest island in the Ionian Sea, west of mainland Greece. The Ionian islands are characterized by lush green landscapes, dramatic limestone cliffsides, and rugged beaches. The Ionian islands are the most mountainous of all the Greek islands, so if you love nature, you will be in heaven.
Kefalonia is particularly famous for Melissani Cave and Myrtos Beach. Yet, the island has so much more to offer, including picturesque fishing villages, Ainos National Park (the only national park on a Greek island), 2 impressive castles/fortresses, gorgeous turquoise waters, and stunning beaches that can only be reached either by foot or a narrow windy road filled with several exciting hairpin turns.
How to Get Around Kefalonia
While I almost always recommend renting an ATV to explore the Greek islands, this island is a little different than the other Greek islands and is too big really to explore with an ATV. Furthermore, there are many high cliffs and windy roads with no rails that could be dangerous on an ATV.
With that being said, I would recommend renting an ATV for just one day to explore the beaches of Argostili and then switching to a small rental car to explore the rest of the island. Or you could walk to the beaches from town, but this will take you 20-40 minutes. I did this and wished I had rented an ATV for the day as walking in the heat is not my idea of a good time.
Pro Tip: Most companies in Greece now require an IDP (international driving permit) which you can get easily the same day at AAA offices in the USA. They last for one year and cost $20.
Things to do in Kefalonia: A 5-Day Itinerary
Day 1: Argostoli town and beaches
Day 2: Myrtos Beach, Assos Village, & Fiskardo
Day 3: Melissani Cave & Antisamos Beach
Day 4: Fteri beach & Petani Beach
Day 5: Ainos National Park, St. George Castle, & Gentilini Winery
**The best Kefalonia beaches: Myrtos, Fteri, and Antisamos**
Argostoli
Argostoli is the capital city of Kefalonia and also the perfect place to base yourself to explore this island. It is in the most ideal location to visit all the best places in Kefalonia. There are also many beautiful beaches around the city that you could walk to. You have the option of staying right in town or in Lassi, near all the beaches.
Argostoli Town-set on a harbor with many restaurants and shops. There is also a famous sea bridge called the De Bosset Bridge that was built over the bay. It is actually the largest stone bridge built over the sea in the world and is almost at 690 meters long. You can walk to the other side of the bay in about 20 ish minutes.
Lassi-the part of Argostoli near all the beaches. This is a more relaxed area if you’re looking to lounge in the sun all day. However, it’s farther from the center with all the restaurants and shops so it’s a trade off.
The 3 main Argostoli beaches I would recommend are Makris Gialos, Kalamia, and Gradakia.
Makris Gialos beach-this is most popular beach in Argostoli. It has many beach beds you can rent for €12, as well as water sports and facilities. Costa costa beach club has drinks and food. It’s a very busy beach with parking on an incline on an unpaved path (so best to come with an ATV as opposed to a car). This is the beach to visit if you want more action.
Kalamia beach-a 30 min walk from the center of Argostoli. It’s a small beach with a little beach bar. It has beautiful rock formations and little arches you can go under. The sunbed set is €7 to rent (2 chairs and an umbrella). It’s a rocky beach but the little part by the arches is sandy and relaxing. This was definitely my favorite beach in Argostoli.
Kalamia Beach in Argostoli
Gradakia beach-a 15 Min walk from Kalamia, this sandy beach has a beach bar, sun beds, showers, changing rooms, and I even saw signs for a pharmacie. There are some really pretty coves along the way where you can swim. However, they aren’t as calm and have some waves.
Day 2: Myrtos Beach, Assos Village, and Fiskardo
Myrtos Beach
Hands-down the prettiest beach on Kefalonia and a top contender for the prettiest beach in all of Greece. I honestly have never seen anything like it. The beach is unique as you view it from above, it has mesmerizing bright blue and aqua swirls that change shape and colors throughout the day.
The beach is surrounded by towering dramatic cliffs and lined with pristine white pebbles on the bottom, creating a stark contrast between the turquoise waters.
This is honestly one of the prettiest beaches I have ever seen in my life (only behind the view from Shipwreck beach in Zakynthos). When I drove to the viewpoint and saw it from above, I got goosebumps and I was literally in doubt that a place like this so beautiful exists. What is really unique about this beach is that the swirly patterns change throughout the day so it will look different at different times of the day!
Myrtos beach from the first viewpoint
The second viewpoint onto Myrtos Beach
Mesmerized by the aqua swirls of Myrtos
Getting down to the beach will consist of a zigzag narrow road with several switchbacks all the way to the bottom. There are some blind spots, so make sure to go slow and honk around the corners. But the real highlight of this beach is from the panoramic viewpoint from above!
If you’re into lesser known Greek islands to visit, check out my guides on Amorgos, Milos and Rhodes, 2 of the best Greek islands to visit!
Assos Village
Assos is an adorable tiny and colorful fishing village connected by an isthmus to a green mountain range that boasts a magnificent Venetian Fortress that looks back at the village. Assos village is said to have only 100 residents.
As with most of the awesome places in Kefalonia, access to the village is by a narrow road with hairpin turns lined by cypress trees. There are a few breathtaking views from the drive down that you will want to stop and snap pictures of, so take your time.
View of Assos village from the walk up to the Assos Fortress.
Assos is such a relaxing little place to spend the afternoon. There are little coves to swim with crystal clear calm waters. You can also sit at one of the tavernas on the water and admire the views of the bay and the Fortress across the way. And if you have the time, make sure to go up to the Assos Fortress.
The Assos Fortress was built by the Venetians in the 16th century to protect the city from pirate raids and the Turks. The fortress measures 44,000 square feet, one of the largest in all of Greece.
The walkway up to the fortress is lined with Cyprus and pine trees and has great views as you climb to the top. It will take about 30-40 minutes to get the top. Unfortunately when I got to the top, the fortress was closed. I forgot to check the opening times (still kicking myself). But regardless, the walk was very peaceful and the surrounding panoramic views from the top were stunning and well worth the stroll.
Fiskardo
Fiskardo is another picturesque fishing located at the northernmost tip of Kefalonia. It’s a pretty port town with colorful storefronts with blooming flowers cascading from them. And as you may have assumed, there are also many fish tavernas lining the port filled with customers people watching.
You’ll also see a bunch of fancy yachts parked in the harbor and it feels a bit more upscale than other parts of the island, although very “chill” at the same time. Overall, I loved this town and wish I had more time to spend here.
Tip: Go to Theodora’s Cafe top floor for drinks and awesome views (pictured below).
Day 3: Melissani Cave & Antisamos Beach
Antisamos Beach
Near the town of Sami you will find one of the best Kefalonia Beaches called Antisamos. There is a beautiful drive down to this beach by (you guessed it) hairpin turns. The shallow waters have a bright aqua color and then it starkly changes to deep blu as it gets deeper.
Antisamos beach offers free sun beds and some water sports. It is a pebbled beach with a few beach bars.
Antisamos is absolutely gorgeous and you could spend a whole afternoon here. Below are a few drone shots I took on my visit.
Antisamos from above
Working the drone on Antisamos Beach
Looks at the contrasting colors of the water!
Melissani Cave
Melissani Cave is one of the main reasons why people come to this island, along with Myrtos beach. This unique cave formation was was said to be formed from an earthquake causing the ceiling to cave in and form an opening to the sky.
There are 2 parts to the Melissani Cave. The first one is this lake with the circular opening to the sky and the other part is a dark cave with a low ceiling consisting of stalagmites. It does get quite cold in there so make sure to bring something long sleeved.
The water inside the cave is a mix of freshwater and sea water and is about 20-30 meters in depth. Melissani Cave was not discovered until 1951.
Tip: Go during midday so the sun is high in the sky and shines over it. This will highlight the vibrant blue/green waters. The entrance fee is €7.
Note: It was actually really hard to get a good photo (being solo) in the cave because there are lots of other boats and they take you in and out so fast. There were too many people in the boat to take a good selfie and the guy rowing the boat was not the best photographer. If you are not alone, it’s probably much easier to get good shots, just be prepared to take them of each other quickly.
Day 4: Fteri Beach & Petania Beach
Fteri Beach
Wow, I can’t say enough about Fteri Beach on Kefalonia island. I had never heard of it or seen any pictures of it before I came to the island and I was shocked at how this place isn’t more popular. Maybe because it’s a little tricky to get to.
View from the rock pile at Fteri beach
How to Get to Fteri Beach
I put Fteri beach into google maps but it wasn’t that clear. It basically takes you to the gravel road where you begin the hike. But NOTE that when you have about 4 minutes left on your google map directions, you will see the sign for Fteri beach on the left with a tiny place to park about 4-5 cars. If you keep following the google maps you will miss the entrance to the hike. You should see the sign when you’re about 3 minutes into the gravel road.
Getting to Fteri beach takes a one hour hike down through the wooded forest and down some rocks. Proper shoes are required for this hike so don’t try to do it in flip flops. I would also recommend pants because I got all scratched up from the bushes.
I’m not going to lie, the path is not that clear and it will take some time to find the way, but don’t let that scare you away. It was definitely an adventure!
Tip: Make sure to looks for the GREEN spray paint on the rocks because about 10 minutes into the hike it gets confusing.
Drone shot of the cove you can swim to from the main beach in Fteri
Fteri beach was the second prettiest beach in Kefalonia and from the bottom had the prettiest water. Cascading shades of turquoise, deep blues, and crystal clear waters will blow your mind. Here are some more dramatic drone shots below.
The beach is surrounded by green nature and the limestone cliffs. There are not many people there, although you can get there by boat also so you may see some of the people coming from boats. This beach is a MUST in Kefalonia.
Overt the rocks in Fteri Beach
Even with the clouds, the water is so pretty!
View from the rock pile at Fteri beach
It was quite cloudy most the day when I visited, but when the clouds dispersed and the sun peaked through, it highlighted the waters so vibrantly, it was magical.
Petani Beach
A gorgeous beach located on the Paliki Peninsula surrounded by huge limestone cliffs. There are 2 taverns on the bottom, as well as some sun beds. Petani beach has white sand and gravel adding layers to the shoreline. The waves can get kinda rough during inclement weather so take caution. The views going down to this beach are spectacular along the windy road.
Day 5: Mt Ainos National Park, St. George Castle, and Gentilini Winery
Mt Ainos
Ainos National Park is the only national park on a Greek island. I was so excited to hear this and it made me want to visit Kefalonia even more since I love hiking.
Hike the Mt Ainos Summit
This is basically my ideal type of hike because you can drive almost all the way up and then it’s only a 20-30 minute hike to the summit. I read a bunch of reviews that said the road conditions were treacherous going up here, but they are outdated so don’t let that scare you. Although the road was windy and there are some blind hairpin turns, the road conditions were pretty good all the way to the top with nicely paved, smooth roads.
Tip: park at the bottom of the towers and there is a little gravel road to the left. Walk down that path for about 10-15 minutes until you see a plaque with info on the left. Right after that you will see a little path on the right going up a hill. Take that and walk in the woods for about 10-15 minutes on makeshift steps.
The delightful path up to the summit of Mt. Ainos
The top is more of a rock scramble so make sure you have sneakers or closed toed shoes for this hike. If it’s foggy, wait a bit and you will get a full 360 degree view of the island. If it’s a clear day, you can even see Zakynthos and Ithaca nearby as well!
The pathway to the summit has spectacular views as well.
Views from the Mt Ainos summit
Wait for the clouds to pass to be rewarded with this view!
St George Castle
The Venetian Castle of St. Gorge is more like ruins than a castle, but definitely still worth the visit. It is located at the top of the hill with 360 views over the island. It’s free entrance and has some great photo opportunities. However, it is closed on Tuesdays.
Eat lunch at Il Borgo at the base of the castle with amazing views and good food. Get the octopus in vinegar, it’s amazing!
Gentilini Winery and Vineyards
If you’re a wine lover, you must come here! It’s just a few minutes from the airport and about 6-7 minutes from Argostoli so its super convenient. You could really go here any day because it’s so close to town. Another option is to go on your way to the airport on your way out of Kefalonia.
The wine tastings offer 3 wines for €5, 5 wines for €7, or 7 wines for €10. How cheap is that? You could never find prices like this in the U.S.!
You can also add a tour for €5. They give you a board with cheese, bread, olive oil, and tomato doused with herbs. They also have gluten free bread, so I was in heaven because that almost never happens!!
If you have more time on Kefalonia, head to the Paliki Peninsula
If you have more time in Kefalonia, I would recommend spending time on the Paliki Peninsula, where they have several beautiful beaches and some wineries. Xi beach is specifically known for brown sand and clay cliffs. The mud from the cliffs is supposed to make a therapeutic mud mask for your skin. I just drove by here and wasn’t able to get out and stay due to time, but it was a unique place to explore.
How to get to the Paliki pensula: You can drive the long way or you can take a ferry Ferry from Argostoli to Lixouri . The cost is €4 (cash only) for a car and yourself. The journey takes 20 mins and goes every 30 minutes.
Platia Ammos Beach-I tried to go to this beach as it was listed as one of the best Kefalonia beaches, but I couldn’t get to it and later read that the stairs going down to this beach were damaged from an earthquake and it has been closed to the public. I also read that it may be possible to reach this beach by a private boat, but I’m not entirely sure.
How to get to Kefalonia
Fly
Due to its location in the Ionian Sea, you’re most likely going to be flying in an out of Kefalonia, as opposed to taking a ferry. There aren’t many direct international flights into Kefalonia, so you’re most likely going to have to fly into Athens, and then take another flight to Kefalonia.
I actually got lucky and got a direct flight from Edinburgh to Kefalonia Airport (airport code EFL) that took 4 hours and costed about $150. As I was continuing onto other Greek islands in the Cyclades islands, I had to fly back to Athens, and then fly to Paros from there. Fly from Athens with Olympic Air or Aegean Airlines.
During high season, make sure to get your flight months in advance to snag some cheaper flights. I use Skyscanner for about 95% of all my flights I book. They almost always have the cheapest flights compared to other search engines in my experience.
Ferry
I would NOT recommend taking a ferry to Kefalonia because honestly there aren’t many good options. You possibly could fly into Patras, and then take a ferry from Killini. But you would have to figure out how to get from Patras to Killini, which is about a 1.5 hour drive.
You could also fly into Zakynthos and then take a ferry from there, which is not a bad option if the flight into Zakynthos is cheap. I WOULD recommend you to do this option and stay in Zakynthos for 4-5 days as it is spectacular! One of my favorite Greek islands.
Travel Insurance for Greek Islands
I would never travel without travel insurance anymore. I learned my lesson. Too many bad things can happen (and they have unfortunately). Travel insurance is especially important when traveling to islands, as you may need to be air-lifted to the mainland in the worst case scenario. Do you know how much air-lifting costs? Think at least 5 digits (I.e. Expensive AF!).
My favorite travel insurance that I have been using for the past 4 years is World Nomads. I have made 4 claims so far and have been fully reimbursed for all 4 without any hassle. I highly recommend them. They also have some of the best medical coverage out of ANY travel insurance. Period.
If you enjoyed this post, please PIN it for later! ♥
Disclaimer: this article contains affiliate links, which means I may receive a very tiny commission if you purchase something through these links (this is at no extra cost to you). 🙂
Scotland is one of my favorite places in Europe and I couldn’t wait for my second trip there this past fall. The country blew me away on my first trip and as a result of my obsession with the show Outlander, I had to go back and explore more!
This trip I focused mainly on the Scottish Highlands and the Isle of Skye, arguably the 2 most beautiful areas in Scotland. You could spend weeks in Scotland and not even get to all the highlights, but this 10 day Scotland road trip hits most of the best places to visit in Scotland.
I also stopped at several Outlander filming locations throughout the country and I will say that all but 2 of the locations I would still recommend even if you don’t watch the show. These locations are absolutely stunning, trust me!
Driving in Scotland
Unless you’re just visiting Edinburgh, a car is essential to explore the best places in Scotland. However, I would try to pick up your rental after you leave Edinburgh because parking can be a disaster in the city.
There are MANY one lane roads in Scotland that go both ways with several passing spots, especially if you’re traveling in the Highlands. Make sure to go slow and keep an eye out for oncoming vehicles.
Tip: when driving in the Scottish Highlands, trips take about 30% longer than Google maps says so make sure to keep that in mind.
A note on the Isle of Skye: Parking can be a struggle as most of the sites on the Isle of Skye only have a TINY parking lot for 10 or less cars. Arrive early to assure your spot, especially in peak season.
PS: There are no tolls in Scotland. YAY!
Where are the Scottish Highlands?
The Scottish highlands are a sparsely populated area in the Northwest of Scotland consisting of gorgeous vast landscapes, stunning mountain drives, mysterious castles, beautiful lochs, wildlife, rugged coastlines, and various small islands. In other words, the Scottish Highlands are a nature lover’s dream! A Scotland road trip would not be complete without visiting the Highlands. Period.
Scotland Weather
It’s very wet in Scotland, so don’t even think about going there without a rain jacket and waterproof boots. The good news is that all that rain makes for a very GREEN landscape.
The weather is also very fickle in Scotland, especially in the Highlands, so expect ALL 4 seasons in one afternoon. The weather can be absolutely crazy and unpredictable at any time. Think sunny and gorgeous with endless blue skies, and 5 minutes later it’s monsoon raining and hailing. I experienced that a few times on my trip, especially on the Isle of Skye. Just make sure you’re prepared with the proper gear and you should be fine.
Tip: no matter how sunny and blue it looks outside, always bring a rain jacket out with you. Always.
Scotland 10-Day Itinerary
Day 1-2: Edinburgh
Day 3 Optional: Outlander tour all day
Day 4: Drive from Edinburgh to Portree with stops at Drummond Gardens
Day 5-6: Isle of Skye
Day 7: Drive to Eilean Donan Castle, Glencoe and Glenfinnan Viaduct (Harry Potter train)
Day 8: Glencoe hiking
Day 9: Drive to Edinburgh and stop in Finnich Glen and mystery castle
Day 10: Hopetoun House & Midhope Castle
NOTE: without the Outlander tour, this Scotland itinerary would be 9 days total
Day 1-2: Explore Edinburgh
Edinburgh is one of the most underrated capital cities in Europe. If you didn’t know, now you know! It’s actually in my top 5 favorite capital cities in Europe! The old world medieval architecture of the Old Town is a highlight for me, but if modern is more your style, the New Town is worth exploring as well. I would give yourself at least 2-3 days to explore this unique capital.
The Edinburgh castle sits atop an extinct volcano in the middle of the city which can be viewed from what seems like miles away. The Royal Mile street connects the Edinburgh Castle to the magnificent Palace of Holyroodhouse, the official residence of Queen Elizabeth II in Scotland.
Outlander fans: the Palace of Holyroodhouse is where Bonnie Prince Charles stayed for a month back in 1745 in real life, but was not actually in the show. Apparently the book mentions it (I haven’t read it).
What to See in Edinburgh
Edinburgh Castle-magnificent views overlooking the city, although a steep entrance fee of £19.50.
Royal Mile-a mile long street that is lined with many cute shops, pubs, cafes, and small museums.
Palace of Holyroodhouse– official residence of Queen Elizabeth II in Scotland.
Dean Village– a picturesque village in a quiet part of town. You can walk along the Water of Leith Walkway in about 15 minutes from the city. It’s a pretty and peaceful walk along the waterfront.
The Real Mary King’s Close-discover an amazing underground world of the 1700’s, still well preserved to this day. The close is located under the big buildings on the Royal mile and it’s really like you’re stepping back in time going down there.
You can only go by guided tour and it costs £16.50 (100% worth it). The tour takes 1 hour and 15 minutes. Get tickets in advance because they do sell out almost every day. DON’T MISS IT! This was my absolute favorite attraction in Edinburgh. It’s truly unique and you won’t see anything like it anywhere else. PS: you can’t take photos down there.
Calton Hill–one of the best spots to view the sunset in the city. It’s a quick 10 minute walk from the center and offers a panoramic view over Edinburgh.
Hike Arthur’s Seat-a hike that gives you the BEST view over the city. It takes about 45 minutes from the bottom of the hill. Start the hike at Holyroodhouse. It’s a semi steep hike that’s beginner to moderate in intensity. You don’t need hiking boots but definitely need sneakers with good grip. At the top you’ll be climbing up rocks. You can view all of Edinburgh and the Craigs from the top (see photo below).
Waterstones Edinburgh-a bookstore that has an amazing view of Edinburgh Castle. Grab a coffee and enjoy the views.
If you’re gluten free (GF) and in Edinburgh, go to Smoov Gelato for awesome gluten free waffles. Also try Eteaket for GF scones and tea. Hula Juice Bar has GF açaí bowls and GF avocado toast.
Outlander fans: While walking the Royal Mile, stop by Bakehouse close, the scene of Jamie’s print shop. where Claire and Jamie reunited in season 3.
Day 3 Optional: Outlander Tour
I spent one day doing an Outlander filming site tour but if you’re not an Outlander fan, you can totally skip this day. But if you are a fan, I highly recommend this tour! What locations we visited on this tour:
Doune Castle-Castle Leoch in Outlander. It is also used as Winterfell in the pilot of Game of Thrones. The entrance fee is £9, but it’s more impressive from the outside than the inside.
Linlithgow Palace–the oldest palace in Scotland and also where those infamous almost-impossible-to-watch scenes from the season one finale took place, if you know what I mean. The entrance fee is £7.20. There are awesome view of the water from above and you can see the old cells on the bottom. It’s pretty cool even if you’re not an Outlander fan.
Blackness Castle-used as Fort William and Blackjack Randall’s headquarters. It is also on the water in a cute little town.
Midhope Castle-the real life Lallybroch! The entrance fee is £3.50. It is very busy and tour busses are only allowed to stay 20 minutes. However, I returned on a later date to go on my own and it was so worth it! (more on this at the end of this article).
Day 4: Drive to Portree & Stop in Dunalastair Castle & Kinloch Rannoch (optional)
Day 4 will be a long drive and take up half your day so make sure to start early. Drive from Edinburgh to Portree and stop at Dunalastair Castle.
Dunalastair Castle–a really cool abandoned castle out in nowhere. You have to drive down a gravel road to get to it but you’ll likely have it to yourself. It’s very spooky/eerie. It takes about 2 hours and 45 minutes from Edinburgh.
Dunalastair Castle all to myself
Kinda eerie
For Outlander fans (skip this one if you don’t watch the show!):
Kinloch Rannoch (aka Craigh Na Dun in Outlander): before you get too excited, there aren’t actually any stones like there are in the show. However, you can still visit the famous little hill where they set up the stone. I was totaling fangirling at this site and it’s so worth it if you watch the show, even without the actual stones.
Having my moment at Craigh Na Dun from the show Outlander
I went on a windy day and with the location on the little hill, it created this swirly sound and it freaked me out because it sounded very similar to the swishing/swirling sound they hear on Outlander before they go through the stones. No joke, it was unreal!
view from the top of Craigh Na Dun
Walking up the hill where the stones are in the show Outlander
**I would ONLY go here if you watch Outlander because it probably won’t seem too impressive to you otherwise. It is only about 10-15 minutes from Dunalastair Castle. It’s kinda tricky to find and I had to stop at the little inn in town to ask for directions. They had an Outlander map and it really helped!
The Isle of Skye is arguably the prettiest area of Scotland. The Isle of Skye is is an island connected to the mainland by bridge. It’s about 226 miles from Edinburgh to the Isle of Skye and will take about 5-6 hours by car if you drive direct. Everything on Isle of Skye is pretty close together so it makes it really convenient to explore, even without lots of time.
Portree
To explore the Isle of Skye, base yourself in Portree, a cute colorful seaside town in a central area. Portree is known for seafood so make sure to go to the harbor and try some mussels or smoked salmon.
Accommodations are limited so plan to book way in advance, especially during peak season. I rented a small room in an Airbnb that was a 5 minute walk to town. It was perfect because it had free parking right in front of the house. It was very basic but great if you’re on a budget. Portree accommodation is generally pretty expensive. You can view the Airbnb listing HERE. An if you’re new to Airbnb, here is a $55 coupon to use on your first trip!
Day 5: Hike Old Mann of Storr, Kilt Rock/Mealt falls, Duntulm Castle & Fairy Glenn
Old Mann of Storr hike
A quick 15 minute drive from Portree will get you to the parking lot for the Old Mann of Storr hike. There is a TINY parking lot for cars so get there early. There is also some paid street parking, but overall there aren’t many spots. Try to start the hike by 8:30am to avoid the crowds.
Old Man of Storr hike
Epic views over Isle of Skye
I would consider it an easy hike for any level of fitness. It takes about 45 minutes to get to the main area at the top and then you can hike around and explore more if you wish. If you want the iconic photo spot with the old Mann of Storr with the dramatic landscape in the back and the sea, go to the right when you get to the top and hike a little bit more to get that epic view.
If you look at the above pictures you will never guess that 10 minuted later it started monsoon raining and hailing and I had to run down the mountain as fast as I could. Typical Scotland weather!
Kilt Rock & Mealt Falls
Drive to Kilt Rock/Mealt falls (it’s only 15minutes from Old Man Storr). It’s just a viewpoint so it’s a quick stop to hop out of your car and walk a few feet to see the viewpoint.
Duntulm Castle
From Kilt Rock/Mealt falls, drive to Duntulm castle (remains of clan Macdonald). It’s less of a castle and more like ruins on a dramatic cliff overlooking the sea. It’s gorgeous and worth a walk down to the bottom for the best views!
Fairy Glenn
The Fairy Glenn was one of my favorite areas in Isle of Skye. It’s an outstanding hilly green landscape with a circular rock pattern formation. You can walk around and explore the area and hike up the little hills for spectacular views. It really is a unique place like I’ve never seen before.
Blair witch vibes
Fairy Glenn views
The drive to it is on a TINY one lane track and can be stressful but it is SO worth it. Avoid the middle of the day so there aren’t as many cars on the road.
Day 6: Dunvegan castle, Neisse Point Lighthouse, & Fairy Pools
Dunvegan Castle
Home to the MacLeod family for over 800 years, Dunvegan Castle is the oldest continuously inhabited castle in all of Scotland. Honestly the inside wasn’t that interesting to me, but there were pretty gardens and nice view if you walk around the castle and to the back. I would say it’s only worth it if you’re really into history or want a cool Instagram picture. The entrance fee is £14.
Dunvegan castle views
Neisse Point Lighthouse
The road here is very scary, I’m not going to lie. It’s a one lane road on a windy cliff road with no rails in most places. There is a tiny car park at the top and you can get out and takes pics from there. There is a well marked path if you want to go walk out to the lighthouse. It was WAY too windy and stormy when I arrived so I didn’t make it out there unfortunately. I couldn’t even take my camera or phone out to take a photo.
Fairy Pools
Unfortunately the weather was crazy that day with heavy rain and strong winds so I didn’t make it here. You will only get that crystal blue color of the water if the sun is shining on the pools so keep that in mind. I read that it is a 20 minute walk to the first pool.
Day 7: Drive to Eilean Donan Castle, Fort William, Old Inverlocky Castle, & Glenfinnan Viaduct
Eilean Donan Castle
Eilean Donan Castle is located right before you cross the bridge to the Isle of Skye so you can either stop on the way in or the way out. It it one of the most beautiful castles in Scotland and also one of the most recognizable. This castle is located at a point where 3 sea lochs meet, creating a spectacular landscape for this fairytale castle. When the weather is foggy, it looks extra eerie/etherial. It’s a smaller castle, but it’s my favorite one in Scotland!
Fort William
This is where you should base yourself to explore Glencoe. It’s affordable and not too far from everything that you will want to see.
Old Inverlocky Castle
Some cool ruins in Fort William that are worth a quick stop at. The entrance is free and you will probably only spend 5-10 minutes here.
Glenfinnan Viaduct
Glenfinnan Viaduct is the famous train from Harry Potter, and is worth a visit even if you’re not a fan (I am not and it was still awesome).
Tip: go past the visitor’s center parking for free parking. Instead of going to the “viewpoint”, walk under the viaduct and to the right and climb up the hill. This way you can get a picture without the crowds and it’s also a better view because you get the water and ALL the landscape in the background. Check HERE for the Jacobite train times so you can plan accordingly.
Day 8: Glencoe: Lost Valley hike, Glen Etive drive, & Glencoe Lochan
Lost Valley Hike
Park at the 3 sisters viewpoint parking and take the trail to the left. The hike is moderate and definitely requires good supportive and waterproof shoes. Most the hike is up slippery rocks, but it’s doable. The hike took me one hour each way and then time to explore at the top and take pics and eat a snack. Allow 3 hours total from start to finish including photos.
Lost Valley hike
Glen Etive drive
This is a 12 mile drive on a one way road with spectacular views. It is also where parts of James Bond Skyfall was shot. Go past Dalness estate about 6-7 minutes for the most spectacular views. Make sure to drive slow and look out for cars ahead to allow them to pass.
Glen Etive drive views
Glencoe Lochan
I ended the day at Glencoe Lochan and it was so relaxing and peaceful. There are 3 paths you can take. Take the yellow path and walk through the green moss covered forest and huge trees.
The beautiful Glencoe loch
Hiking paths at Glencoe lochan
The red path is flat and takes you right to the loch (lake). You can complete it in 30 minutes. Bring snacks for a little picnic by the loch.
Outlander fans: Glencoe Valley is where the opening credits for Outlander were filmed.
Day 9: Drive back to Edinburg and stop in Finnich Glen, mystery castle, & Drummond Gardens
Finnich Glen (The Devil’s Pulpit)
Finnich Glen is an impressive 100-foot gorge with red waters hidden inside a wooded area out in nowhere. You will see a narrow entrance with stairs and a rope to get down. It’s not for anyone who has mobility issues and can be very slippery. But getting down into the gorge is half the fun! You will get dirty, so don’t wear anything you wouldn’t mind getting messy.
How to find it (it’s really confusing, i’m not going to lie!): You will want to park at the intersection of A809. You walk to the left on road A809 for about 5 minutes. (You will see a pasture on your left). Pass a bridge where you will hear the water and then you will see a metal door on the left side. Walk past the door and you will find an opening in the fence. Go through this opening and walk left and follow the trail. There is a fence that should be on your right and the gorge will be on your left. Stay close to the fence because this is where you will see the steps to the entrance (if you start walking down by the water you will miss it). Walk about 4-5 minutes and you will see the opening to the steps on the left. The steps are really slippery and there is a rope for you to hold onto. Your hands will get all muddy from hanging onto the rope so bring some wet wipes!
Alas, the entrance to Finnich Glen!
Outlander fans: the red water at Finnich Glen was used in Outlander as the Liar’s Spring. Dougal made Claire drink from the spring to see if he could trust her (with a knife behind his back).
Buchanan Castle
Another secret abandoned castle about 8 minutes away from Finnich Glen. You’re not technically supposed to go inside but you can take photos of the outside.
Drummond Gardens
While you can’t technically visit the castle, you can still photograph it. However, you CAN visit the gardens. The garden is huge and you could spend an hour or so wandering around. It was also used as the Palace of Versailles in Outlander.
I am not lying when I say this is the most spectacular and gorgeous garden I have ever seen! The entrance fee is £6.
Day 10: Hopetoun House & Midhope Castle
Hopetoun House & Estate
Hopetoun House is another not-to-miss destination just outside of Edinburgh. It’s a grande mansion set on 6,500 green acres of land that was built back in 1699. Hopetoun House is Scotland’s largest stately home in the country and is the ancestral home of the Hope family for the past 300 years. Currently the Earl of Hopetoun and The 4th Marquess of Linlithgow live in this house.
What is really unique about this estate is that the front of the estate and the back of the estate were built by 2 different architectures who had completely different styles, which is blatantly apparent upon seeing it.
The entrance fee is £10.50 and it is opened from 10:30-5pm. Check the website for seasonal closures.
The Hopetoun House estate is featured over and over in the series Outlander. It is pretty impressive and very picturesque and grande. You can walk around the property and view it from all angles. Its a very peaceful place! There weren’t too many people there so it was a very nice experience. I would visit this place wether you watch the show or not! It’s worth it.
Outlander fans: Hopetoun House was used for MANY Outlander scenes. The most noteworthy are the Duke of Sandringham’s residence, the side streets used for Paris where Mary got attacked, the stables in season 3, and where Jamie taught little Willie to ride a horse.
Stables used in season 3 of Outlander
Exterior of Hopetoun House
Duke of Sandringham’s estate in Outlander
Duke of Sandringham’s estate in Outlander
Midhope castle (Lallybroch ️ in Outlander)
A 20 minute drive outside of Edinburgh and down a one lane road you’ll find Midhope castle, aka Lallybroch, in Outlander. It’s open from 9-5pm but often is closed due to events or filming. Check the website for closures.
Ps: everything online said you need to obtain a parking pass in order to visit Midhope Castle on your own but this it not true. I drove up right when it opened and the attendant let me in and I had the whole place to myself for a good 20 minutes! There is an attendant in a little booth that will collect the entrance fee of £3.50. They only accept cash so make sure you bring it!
Travel Insurance for Scotland
I would never travel without travel insurance anymore. I learned my lesson. Too many bad things can happen (and they have unfortunately). Travel insurance is especially important when traveling to islands, as you may need to be air-lifted to the mainland in the worst case scenario. Do you know how much air-lifting costs? Think at least 5 digits (I.e. Expensive AF!).
My favorite travel insurance that I have been using for the past 4 years is World Nomads. I have made 3 claims so far and have been fully reimbursed for all 3 without any hassle. I highly recommend them.
Disclaimer: this post contains affiliate links, which means I may receive a super small commission if you make a purchase using these links, at no extra cost to you. I only recommend products/services that I have used before on my own and that I truly love. This helps keep my site ad free (because I HATE ads when I’m trying to scroll through a blog post, don’t you?). 🙂
If you enjoyed this article, please PIN it for later ♥
If you’re into hiking and nature, there’s a good chance Patagonia is on your bucket list. It’s the ultimate nature lover’s dream. It had been my dream for years and I finally made it a reality with this epic Patagonia itinerary.
But I will be honest, planning a trip to Patagonia was the most complicated and stressful trip I have ever planned. There isn’t a lot of good info on Patagonia and I gave up planning 3 years in a row because it was too much work and extremely time consuming.
I wanted to see as much as possible in a little amount of time, so hopefully this Patagonia itinerary that I tried out will help you plan with a lot less stress.
Where is Patagonia
Patagonia is a sparsely populated region in southern south America that’s between Chile and Argentina. Patagonia contains many gorgeous National Parks, stunning lakes and glaciers, a vast desert, and of course the Andes Mountains.
Patagonia is HUGE so it depends on where exactly you’re going. But I would say the classic Patagonia trip would most definitely include Torres del Paine National Park, which is located in Chile.
There are 2 options for getting to Torres del Paine National Park. You can fly into Punta Arenas (farther away but many more flights) and then take a bus to Puerto Natales and then another one to the the National Park.
OR you can fly directly into Puerto Natales Airport (airport code PNT), which is what I did (from Santiago). There was a direct flight that took about 2 hours and 40 minutes on Sky Airline. The cost was only $38 with only a personal item. The carry on cost $32, so $70 total to get from Santiago to Puerto Natales. There is only ONE flight per day max during peak season and it’s not every day. I bought my ticket 6 months in advance, so make sure you buy in advance if you want to do this option.
There are taxi stands at the baggage claim at Puerto Natales airport where you pay $8000 CLP (about $10) to go to Puerto Natales city center. It takes about 15 minutes on a scenic drive along the water. You pay and get a voucher and then take it outside to the taxi stand. It’s a fixed price.
My Patagonia Route:
I flew into Puerto Natales and out of El Calafate during my Patagonia trip. I wanted to avoid as much backtracking as possible due to time constraints.
I flew from Santiago to Puerto Natales, then took a bus from Puerto Natales to El Calafate, then a bus to El Chalten, then a bus back to El Calafate where I flew out from. From El Calafate you can continue on to Buenos Aires directly or to Mendoza with a connection. Flying within the country is pretty cheap but it’s expensive if you want to fly between Chile and Argentina.
8 Day Patagonia Itinerary
Day 1: Fly into Puerto Natales from Santiago
Day 2: Mirador Los Torres all day hike (8-10 hrs)
Day 3: Bus to El Calafate
Day 4: Day trip to Perito Moreno Glacier
Day 5: Bus to El Chaltén + Mirador De Los Condores hike for sunset
Day 6: Mirador De Los Tres (Fitzroy) all day hike (8-10 hrs)
Day 7: Laguna Torre all day hike (5-7 hrs)…I dod NOT get to this hike as the weather was bad and my legs were dead. Instead, I had a spa day at Spa Yaten! (see below)
Day 8: Bus back to El Calafate and fly out from El Calafate airport
Pro Tip: I would highly recommend adding an extra day before or after the 2 big hikes (Mirador Los Torres and Mirador De Los Tres) because sometimes the trails are closed due to high winds or other crazy weather. This DOES happen in Patagonia since the weather is so unpredictable. You wouldn’t want to go all the way to Patagonia and then miss one of these bucket list hikes because you didn’t allow enough time. Take an extra day and relax if you need! I actually did that after the first big hike (and due to the weather the second hike as well). The hikes will drain your energy so having that extra time to recover is key!
What to See in Chilean Patagonia
Ok, now let’s get into that famous Patagonia hiking! I mean, isn’t that why most people come to this region?
Torres Del Paine is said to be the most popular destination in Patagonia so no trip would be complete without a visit to this spectacular natural park in Chile.
Most people opt for the multi day hikes such as the W circuit and O circuit in Torres Del Paine. However, if you don’t have the time or are not into overnight camping, you can easily do a day trip to the best hike in the park! (which is what I did). If you only do one thing in Torres del Paine National Park, make it a day hike to Mirador las Torres for the best views!
Patagonia Hikes: Mirador las Torres
Distance: 11 miles round trip
Elevation gain: 3000 ft
Time it takes: 7-10 hours (depending how fast/fit you are)
Where to start: Hotel Los Torres
Which park entrance to use: Amarga
Torres Del Paine Entrance Fee is $21,000 CLP (about $26) and it lasts 3 consecutive days (there are other options if you stay longer to do the multi-day treks). You must pay in CASH in Chilean Pesos only. You must also have your passport number for the form but they didn’t actually ask for the passport.
The drive from puerto Natales to the entrance at Amarga was about 2.5 hours with 2 quick stops for viewpoints. Then it’s another 20 minutes on a dirt road to Hotel Los Torres.
Mirador las Torres Hike
The first hour or so of the hike is uphill, then it evens out a little until you get to Refugio Chileno (about 1.5 hours from the start) where you can buy snacks, food, and use the restroom. (They have pizza, burgers, and sandwiches). They accept cash only. The bathroom costs 500 CLP. This is a good stopping place to rest and eat a snack or lunch. I stopped here on the way in and the way out to rest and recharge.
The next part of the hike is through a little forest where there is shade for about another hour and 15 minutes.
The last part of the hike is about 1 hour uphill on steep rocks. Some of the rocks are loose so just be careful. The last hour is brutal and the hardest part of the hike, But the reward at the end is SO worth it!
https://www.instagram.com/p/B55lGSmp2bx/
Tips:
start early because technically they close the top at 4:30pm (there are park rangers up there and they will make you to start to go back down).
bring plenty of snacks because this is a very tiring hike
you can refill your water bottle in any of the natural springs on the way, the water is fresh
make sure to bring a hat and gloves because the top is windy and chilly
Where to Stay in Puerto Natales
I don’t know if there is such thing as Patagonia for cheap, but I decided to go cheap with accommodations on this trip since everything else was so expensive. Most the places I stayed were around $40 a night on average and I had my own place (except in El Claltén, where I just rented a room in a nice house and it was great!).
I rented this little cabin in the back of the host’s house on Airbnb and it was pretty good for the price. It had 2 floors and could sleep 3 people. The neighborhood wasn’t my favorite but it was only a 10 minute walk to the center of town. It was basic so don’t expect anything too fancy, but I was happy with it. It was $35/night and this was peak season. If you’re new to Airbnb, use this coupon for $30 OFF your first trip!
PS: while staying in Puerto Natales, make sure to go to Coffee Maker for amazing views of the water and mountains and good coffee (they have soy milk, yay!). It had a cute and cozy interior with faux fur cushions and couches. Great place if you like coffee and views!
What to See in Argentinian Patagonia
El Calafate
El Calafate is a small touristy town where you will base yourself for the next big attraction in Argentinian Patagonia: Perito Moreno Glacier!
Perito Moreno Glacier
Here are 5 interesting Perito Moreno Glacier facts:
Perito Moreno Glacier is HUGE, covering 100 square miles (a length of 19 miles and a width of 3 miles). It’s also 560 feet tall! You can’t really appreciate the vast size of it until you see it in person.
Perito Moreno glacier is the 3rd largest freshwater reserve on the entire planet!
Glaciers help regulate the earth’s temperature as they reflect 45-85% of the earth’s sunlight!
Unlike most glaciers which are receding, Perito Moreno is actually advancing! (by 2 meters per day).
it’s a UNESCO World Heritage Site.
How to Get to Perito Moreno Glacier
From El Calafate you can take one of many daily busses that go to the glacier. It takes about 1 hour and 20 minutes to get there by bus.
I went with the company Andesmar. The bus costs $1000 ARS ($16) and it takes about 1 hour and 20 minutes to get there. I heard it gets super busy in the morning so I decided to go in the afternoon, which was a good call! I liked this company since the bus was more like a mini van and it wasn’t crowded at all.
I took the afternoon bus at 1:30pm and departed the glacier at 6pm so you get about 3 hours which is enough in my opinion if you’re not going on the boat tour (boat tour is $1000 ARS).
The entrance fee to Perito Moreno Glacier is $800 ARS ($13). You CAN pay by credit card despite what every blog says that you can’t. However, in my experience the credit card machines in Argentina sometimes don’t work so it’s better to have the cash with you (there are NO ATMs in the park or anywhere around).
I completed the orange, black and the first part of the blue trail in about 2 hours. The green trail was closed. In my opinion, the central trial has the best views (orange) as well as the first part of the blue trail before it wraps around to the other side of the lake.
Tip: Bring some snacks (and some wine) and have a little picnic with great views!
Where to Stay in El Calafate
I stayed in this studio Airbnb right in the middle of the town and it was great! Super spacious and so close to everything. It had AC and cable TV which was also a plus. My only complaint is the pack of dogs barking outside my window at night, but I think that’s a problem everywhere in the city as I saw stray dogs literally everywhere. It cost $40/night.
El Chaltén
El Chaltén was probably the most charming of the 3 small towns I stayed in around Patagonia. It is located in Los Glaciers National Park. It’s also the perfect location for many hikes as most of them start right from the town! The most famous hike here is the Laguna De Los Tres (aka Mt Fitzroy) hike. This ended up being my favorite hike in ALL of Patagonia!
Patagonia Hikes: Laguna De Los Tres hike (aka Mt Fitzroy hike)
Distance: 13 miles round trip
Elevation gain: 3300 ft
Time it takes: 8-10 hours (depending how fast/fit you are)
Where to start: either in El Chalten town or at Hosteria Pilar (my choice)
Laguna De Los Tres hike
This hike is a loop hike so you have the option of going a different way on the way back for different scenery.
What I recommend:
Take a shuttle bus (I used Frontera Sur company) to Hosteria Pilar to start the hike to Mt. Fitzroy. It cuts about 30 minutes off your hike and you get to see Piedras Blancas Glacier on the way (seen in the pic below!).
It’s a pretty flat hike most the way through woods except the last hour to the top. This last hour is pretty steep up a hill and kinda like the Mirador Los Torres hike, except I thought this one was a lot easier. The last 20 minutes you will be climbing up a hill with loose rocks so be careful.
There is a campground called Poincenot on the way about 10-15 minutes before you hit the uphill climb. It takes 2 hours to get to Poincenot campground from Hosteria Pilar. There is an outhouse here (there is also another outhouse at the beginning of the steep climb). Bring your own toilet paper because there was none at either!
Once you reach the top, you can go down towards the lake on the left side and then up the little hill. It takes about 7-8 minutes to get up the hill where there is another glacier thats absolutely gorgeous.
You can see both lakes from the top and it’s an EPIC panoramic view. This was my favorite view in all of Patagonia!
On the way back from the hike, take the route towards Laguna Capri. Stop at laguna Capri on the way back for a rest and a snack. It’s a peaceful crystal clear lake with Mt. Fitzroy in the background. From there it’s about 1.5 hours back to El Chaltén, mostly downhill.
It takes about 4 hours from the top to get back down to El Chaltén. You do go through some wooded areas with mosquitos so bring mosquito bracelets and/or spray (I have mine linked below!).
You can drink all the water in the streams on this hike as they are fresh! Make sure to pack lots of snacks and a lunch as this is going to be a long day. (tip: Circumin vegan restaurant in El Chaltén will pack you a lunch for hiking that’s vegan and gluten free if that’s your thing. Costs is $600 ARS {$10})
Patagonia Hikes: Mirador de los Cóndores
This is more like a little walk than a hike, so it’s super easy to add it onto the end of any day. It takes about 20 minutes one-way from the visitor’s center and about 30 minutes from the town. It’s a super easy hike up to view the whole city and Fitzroy in the backdrop. This hike would be great to do during sunset.
Tip: Go to Spa Yaten in El Chaltén after all your hikes for a nice massage. It costs $1900 ARS ($30) for 30 minutes. They also have a sauna and personal size jacuzzis if you fancy. It’s the perfect way to relax after all that hiking.
Where to Stay in El Chaltén
I stayed in a room in my host’s house and it was perfect! It was right in the center of town and the shuttle bus to the Mt. Fitzroy hike stopped right in front of it (and the host set it up all for me). The host was super helpful and friendly. I would definitely recommend it! This is the Airbnb link HERE. It was $50 per night.
How to Get in Between Towns in Patagonia
I originally wanted to rent a car for all of Patagonia, but realized most companies will not let you cross over the border (and the few that do charge an arm and a leg to do it). So I decided to rent a car from Puerto Natales just to go to Torres del Paine National Park. Then from Puerto Natales I took a bus to El Calafate, and then eventually to El Chaltén.
For the car rental, I found a local branch of Avis called EMSA Rent a Car. I went through them and it was SO much cheaper than any other company for an automatic car. I ended up paying about $71 a day for an automatic when most other companies online were charging about $200 per day (yes, you heard that right). If you can drive stick shift, consider yourself blessed in Patagonia!
The busses were clean and comfortable and most of them allowed you to pick your seat in advance. Make sure to take the front seat on top for the BEST views! I used 3 different companies and all were pretty similar in terms of quality and price.
Views from the top of the double decker bus from El Calafate to El Chaltén
Bus Companies in Patagonia:
Bus-Sur: I took this from Puerto Natales to El Calafate. This trip took about 5 hours and 30 minutes with the border crossing. You get to pick your seat when you book, but it was not a double decker bus. Cost: $20,000 CLP (about $25 at time of this article).
Chaltén travel– I took this from El Calafate to El Chaltén. It’s a a double decker bus and you get to choose your seat when you book. The trip took 3 hours with a stop at the ranger station for orientation and a quick lecture about the rules of Los Glaciers National Park. Cost: $1000 ARS (about $16 at time of this article).
Cal-Tur-I took this double decker bus from El Chaltén to El Calafate. The trip took 2 hours and 40 minutes on the way back (as you don’t need to do the orientation again obviously). This company had free seats so get there early to choose your seat. Cost: $1000 ARS (about $16 at time of this article).
Note: due to the crazy inflation and exchange rates in Argentina, these prices will fluctuate drastically. So it’s hard to predict how much they will cost during your trip. I got lucky and had a very good exchange rate at the time so the prices were very low compared to what I’ve read in other blogs.
What to Pack for Patagonia
This was tough as I only carried a tiny carry on for my Patagonia trip, and I also went to other areas in Argentina for 9 days after that. With 2 different climates, I brought only the essentials.
My foldable backpack really came in handy on my Patagonia hikes! (also pictured: my super comfy leopard leggings, best hiking socks, waterproof hiking boots, and cute baseball cap).
Patagonia is notorious for crazy changing weather and high winds strong enough to blow you down to the ground so you definitely want to be prepared. I went during their summer in December and it was actually a lot warmer than I expected and I hardly got any of the harsh winds. However, I had everything I needed for the crazy weather with me just in case.
The 3 things you absolutely cannot forget to pack for Patagonia are: waterproof hiking boots, rain jacket, and puffer coat.
Here is everything I packed for my Patagonia hikes:
Base layer.-This one from Amazon is a total dupe of Lululemon and such good quality! I loved the thumb holes.
Merino wool hiking socks-hands-down the BEST hiking socks! Expensive but worth it! They don’t absorb sweat so never really smell. You can re-wear them if you don’t have access to a washer. I have 2 pair and recycle them throughout my trips.
Tank tops-a basic tank for when you get hot from hiking is essential. I like the longer ones that cover the bum!
Leopard Leggings-my new favorite Amazon leggings. So comfortable and awesome quality!
Hiking boots-these are my favorite hiking boots! They keep my feet totally dry in wet weather and have good grip.
Waterproof rain pants-I brought these but ended up not needing them, but they were good quality for the price.
Packable puffer jacket-I was amazed at how warm this kept me with how thin it is! Great for traveling light!
Beanie-it gets really cold and windy at the top of the mountains so you definitely want to pack a beanie.
Gloves-again, it gets cold up there so be prepared!
Hiking poles-I didn’t end up buying these but regretted it. They could have saved my knees. These are the ones I had saved to buy on Amazon (so I don’t actually know hoe they perform honestly).
Rain jacket-this is the best lightweight rain jacket! I’ve been using it for years and it keeps me pretty dry.
Hoodie/fleece-you definitely want to bring this for an extra layer.
Sunglasses-my $12 Amazon sunglasses are great! They feel like much better quality and really block the sun.
Packable backpack-this was SO handy for this trip. It was super sturdy quality as well. Was hard to get it to pack into itself the first few tries, but you will get the hang of it after 3-4 times. I’m bringing this on all my trips now!
Baseball cap-I have a blue and black one in this hat and I love it! I always get compliments on it.
All Natural Mosquito bracelets-so glad I brought these because there were more mosquitos than i thought in Patagonia, especially walking through the wooded areas.
Natural Mosquito lotion-I used this in combo with the bracelets and did not get one bite! It does not contain DEET, which is very toxic to breathe in.
Compression socks-these are for all the plane rides to prevent swelling in the legs and possibly a clot. I wear them on any flight over 1 hour!
Electronics
Good power bank-this is the BEST power bank I’ve ever used. It charges your iPhone 3-5 times (Depending on which one you have). It also has 2 plugs so you can plug more than one device into it at once!
GoPro Hero 8-also great for that wide angle effect or if you want to make cool videos!
GoPro selfie stick-been using this one for years! It’s so small and compact and you can screw a little trip onto the bottom.
iPhone selfie stick-this one works for your iPhone and your GoPro. It’s lightweight and super easy to carry around everywhere. It also has a remote!
iPhone 10-the camera on the newer iPhones are incredible!
iPhone 10 screen protector-this is the BEST screen protector I’ve found! I actually forgot my hard case in Patagonia and dropped my phone hard and the screen protector totally protected it. The screen protector cracks and it saves your phone!
Noise cancelling headphones-this is a great alternative to the super expensive Bose headphones. No way I’m paying $300+ for headphones. But i use these and I’m happy with them.
Travel Insurance for Patagonia
I would never travel without travel insurance anymore. I learned my lesson. Too many bad things can happen (and they have unfortunately). Travel insurance is especially important when traveling to islands or remote places in the mountains, as you may need to be air-lifted in the worst case scenario. Do you know how much air-lifting costs? Think at least 5 digits (I.e. Expensive AF!).
My favorite travel insurance that I have been using for the past 4 years is World Nomads. I have made 3 claims so far and have been fully reimbursed for all 3 without any hassle. I highly recommend them.
If you found this post helpful, please PIN it for later!
Disclaimer: this post contains affiliate links, which means I receive a super small commission if you make a purchase using these links, at no extra cost to you. I only recommend products that I have used before on my own and that I truly love♥
Sicily is the largest island in Italy and the largest island in the Mediterranean Sea, surrounded by the Ionian, Mediterranean, and Tyrrhenian seas. Sicily is more rugged and raw than the mainland, which is one thing really I loved about it!
Sicily is quite big so you can’t really see it all in one trip (unless you stay 3+ weeks minimum). During my Sicily road trip, I decided to stick to the south east of the island (with a few day trips elsewhere) and I saw so many incredible places.
Food in Sicily
One of my Favorite parts about Sicily is the food. I stopped in Sicily on a Mediterranean cruise back in 2007 and had the best pizza of my life (that still stands til this day). I personally think they have better pizza than Naples, but hey, that’s just my opinion!
Foods you must try in Sicily: pizza (obviously), cannoli (Sicily is where cannoli originated), granita (flavored slushy ice drinks), Arancini (fried rice balls), and anything with ricotta cheese and/or pistachios. I think I gained 5 lbs from that trip alone…and I’m not even sorry about it.
Gluten free food in Sicily
Sicily was gluten free heaven and probably the most gluten free friendly place in Italy that I have ever been. Almost every restaurant had gluten free options and most pizzerias had gluten free dough. I wasn’t used to all the choices!
Here are a few places I visited on my trip to Sicily:
Licchios bar (Taormina)-gluten free cannoli and fried rice balls. They also had soy milk for coffee.
Mastrociliegia-gluten free canolis in Ragusa.
Gran Caffe del Duomo (Ortigia island in Syracusa) had an entire gluten free menu and gluten free cannoli. The pasta with mussels was really good.
Duomo pizzeria ristorante (Cefalú)-gluten free pizza right in the main square.
Driving in Sicily
Italians drive fast, that’s a given. The more south you go, the wilder it gets. That being said, I didn’t think the driving in Sicily was half as bad as so many people say it is. If you stay in the right lane (slow lane) on the highway no one will bother you, they will just go around you.
However on the country roads where there is one lane, just about everyone will be passing you. They pass pretty close to your car so just know what to expect and maybe scooch over a little bit to make room and you will be fine. Oh, and Sicilians don’t stop at stop signs so keep that in mind and use caution.
I would also recommend a mini car as some of the cities have tiny streets and it would be tough getting through with a regular size car. It’s also much easier to park a mini car also!
I rented a car for $200 for 10 days with Rentalcars.com (through Sicily by car). The company has terrible reviews online but it was my second time using them and it was fine. The big complaint people make is that if you decline their insurance they will take a deposit of 800€ so just know what to expect.
The total I spent on gas for 10 days was 122€ ($145).
If you’re interested in exploring the other famous Italian island, here is a detailed 9 day road trip of Sicily blog post I wrote.
*Make sure you do a walk around to see if there are any additional scratches or dents on the car that haven’t been marked (every time I’ve rented a car in Italy, I ALWAYS find additional scratches and that’s how they get you). If you don’t do this, they may charge you for the scratches later so please don’t forget! (Especially if you are declining their insurance…which I did because I have awesome car insurance through my Chase Sapphire Reserve credit card).
*Please note: my credit card insurance does NOT include 3rd party liability insurance (damage to the OTHER car or bodily harm to the other driver). Most credit card companies do not offer this so you either have to purchase this separately (usually at $15/day) or reserve a car that already has that included. My rental car already had 3rd party liability insurance included so I didn’t need to purchase anything extra. (I always choose the package on Priceline.com that includes the 3rd party liability insurance in the price if there’s an option).
Sicily Road Trip: 9-Day Itinerary
Day 1: Arrive Catania in the evening
Day 2: Taormina
Day 3: Caltagirone/Enna
Day 4:Cefalù
Day 5: Scalia di Turchi/Valley of the Temples
Day 6: Ragusa/Modica
Day 7: Marzamemi/Noto
Day 8: Syracuse/Ortigia
Day 9: Necropolis of Pantalica/Fontane Bianche Beach
*I arrived to Catania in the evening on my first day and then went to Taormina all the next day so I really didn’t get to experience much of Catania. But from what I did see, I don’t think I was missing much as there were SO many other beautiful place to see in Sicily.
Taormina
Taormina is one of the prettiest cities in Sicily and one place you don’t want to miss on your Sicily road trip! There is a lot to see and so much history in Taormina.
I didn’t rent my car until the 3rd day because I wanted to take a train to Taormina. The train from Catania to Taormina costs 8.60€ return and takes about 45 minutes. You must then take a bus from the train station in Taormina up to the Taormina center (3€ return ticket).
What To Do in Taormina:
Teatro Antico di Taormina– the famous Greek theatre built in the 3rd century with epic views over Sicily and the surroundings. Entrance fee is 10€.
Piazza IX Aprile-the main square in Taormina with incredible views, cute cafes, and restaurants. It’s a popular gathering place with musicians playing throughout the day.
Isola Bella (“beautiful island”) -the prettiest beach in Taormina that was purchased by the Department of Cultural Heritage in 1990 and declared a Nature Reserve and remains protected.
Villa Communale-a public garden with spectacular views of the coastline. It’s a peaceful place to get away from the crowds.
Mt. Etna-you can climb to the top of one of the most active volcanos in the entire world! I didn’t have time for this and it remains on my bucket list! Mt. Etna is also a UNESCO site!
Caltagirone
Caltagirone is a beautiful town with a famous 142-step staircase made from ceramic tiles, each with their own unique design. It’s an artistic masterpiece and has often been used as a backdrop for festivals and cultural events, decorated in flowers, candles, and colorful lights.
The Staircase of Santa María del Monte connects the upper old town to the newer lower town. There are some cute shops along the steps. It’s very picturesque and great to photograph. It was a nice stopover on my drive to Agriturismo Bannata, (see below for where I stayed).
Enna
From Catania to Agriturismo Bannata stop in Enna for amazing views of the countryside and hilltop towns. The best view is from the Rock of Ceres (free entrance) where you can see the castle and countryside with 360 degree views
Enna from afar
Cefalú
Cefalù is a cute seaside town located in northern Sicily. It took me about 2 hours to drive there from Piazza Armenia (which is where I stayed at Agriturismo Bannata).
One thing you must do in Cefalú is climb Rocca di Cefalu. It takes about 40 minutes to reach the top and the cost is 4€ cash only.
The top of Rocca di Cefalu gives you a panoramic view over the gorgeous Sicilian coastlines on both sides.
Cefalù has a wonderful promontory near the sea where you can sit and enjoy the view of the “rock” in the backdrop.
*Parking in Cefalù is a bitch, to be frank. But there is a paid lot near the beach for 7€ per 12 hours which is where I parked.
Scala dei Turchi
Scala dei Turchi (“Stairs of the Turks”) is a spectacular site to see in Sicily. You can walk on these ascending stair-like formations composed of soft white limestone marl (it feels like a hardened clay). The dramatic bright blue water contrasting the pure white rock is a natural phenomenon you should definitely add to your itinerary.
Valley of the Temples
The Valley of the Temples consists of 8 well-preserved Greek temples and other historical remains perched atop a hill overlooking the valley and sea.
The Valley of the temples is the most famous archeological site in all of Sicily and is a UNESCO World Heritage Site. Just outside the city of Agrigento, it can easily be combined with a day trip to Scala Dei Turchi.
Tip: Take a taxi from the car park up to the temple then walk down (2.5km) when you’re finished. The taxi costs 3€ and it saves an uphill walk. The entrance fee is3€. They do take credit cards.
Ragusa
The massive earthquake of 1693-destroyed 8 towns in of southeastern Sicily and they all had to be rebuilt. Caltagirone, Militello Val di Catania, Catania, Modica, Noto, Palazzolo, Ragusa and Scicli were all rebuilt in late baroque architecture of the times. The area is known as Val di Noto, and has been designated as a UNESCO World Heritage Site.
Ragusa is a GORGEOUS baroque town with upper and lower cities. This was my favorite city in all of Sicily and I just loved the old world feel.
Ragusa Ibla is the older lower city and more stunning part IMO.
Ragusa Superiore is the upper town and the more modern of the two. The 2 parts are separated by a deep ravine called Valle dei Ponti.
Some of the best views over the old city below are from the upper town at Chiesa Santa Maria (where I took the photo below).
Duomo San Giorgio is a beautiful cathedral in the center of a square with lots of restaurants and shops. It’s a good place to people watch and enjoy a cannoli.
Modica
Modica is another baroque town rebuilt after the earthquake that is known for its chocolate. There are many places where you can go in for a chocolate tasting. It had a weird texture and wasn’t my favorite honestly but the town is very beautiful and definitely worth a stop.
The center of Modica is at the bottom and Modica Alta is at the top, where you will get the best view.
Marzamemi
Marzamemi is a cute little seaside town with a Greek vibe. It’s right on the sea and very quiet. There’s not much to do besides eat at one of the seaside cafes or go shopping in one of the little boutiques. It’s great for an afternoon of relaxation and eating seafood. Parking is 3€ in a designated lot.
Noto
Noto is a beautiful town with baroque architecture (and also one of the towns rebuilt after the 1693 earthquake). Go shopping in one of the cute artisan shops and pick up a painting or hand painted sculpture.
Go up Chiesa Santa Chiara for views over Noto (2€ entrance fee). There is easy parking at central Noto parking lot. Stroll down Vittorio Emanuel street and stop for a coffee with a view of the many baroque churches. It’s a great place to people watch.
Syracuse/Ortigia
Ortigia is the beautiful island connecting to Syracusa. You can walk around the outside along the sea. The water is crystal blue green and gorgeous. There are many cute shops with handmade stuff like leather bags and shoes. It’s a really nice place to just roam around and relax with a view.
Parking in Ortigia is an absolute nightmare, to be honest. I found an underground garage with the most confusing directions. I would definitely ask a local to see if you can actually park where you think you can (I got a ticket mailed to the USA 4 months later ugh).
Necropolis of Pantalica
Necropolis of Pantalica is home to more than 5,000 ancient tombs carved right into the rocks. This important archeological site is now a UNESCO World Heritage Site. The rocky tombs are surrounded by a deep gorge with gorgeous views all around.
You can also take a hike down to the beautiful grotto water below. It might take you 2-3 hours to complete the circuit, so make sure to make some time for it.
*Beware of snakes! I had one slither by me like 3 inches from my foot and it scared the living shit out of me. So watch where you’re stepping! I don’t think it was poisonous, but still.
It takes about 40 minutes to reachNecropolis of Pantalica from both Avila and Catania.
Fontane Bianche Beach
If it’s warm enough, I highly recommend stopping at Fontane Bianche Beach. It’s a gorgeous beach with soft white sand and swirly patterns of deep blue sea.
Where to Stay in Sicily
Staying in an Agriturismo
I’ve always wanted to stay in an agriturismo in Italy but for some reason it took me so long to do it. An agriturismo is a farmhouse that has been converted into accommodation. It’s kinda like a homestay where you rent a room out (usually you will have your own en suite bathroom). They serve the local wine and food from the farm animals and it is a really authentic experience.
Agriturismo Bannata
My first agriturismo stay set the bar really high! Agriturismo Bannata was a secluded piece of paradise with a cozy and homely feel set in the Sicilian countryside. It’s a great place to sit by the pool (seasonal) or lounge on the balcony with a book in hand. There are also some trails you can walk nearby.
My room was spacious and had an amazing round tub in the middle of the room, as well as an ensuite bathroom.
I had dinner there one night cooked with the local ingredients and it was very delicious. I LOVED this place.
Price: $57/night (in April, shoulder season), including breakfast.
Where to Book: I used booking.com and you can check the listing HERE. If you’re new to booking.com, you can use my $20 OFF coupon here.
Baglio Occhipinti
This place was a little more upscale than the other one, but it was nice to try the different styles! I had a single room in the attic with a spectacular view of the land from my window.
There was a pool and lounge chairs as well as huge comfy couches inside for when it was raining. It was a really relaxing environment and was a great spot to explore Ragusa.
Price: $116/night (in April, shoulder season).
Where to Book: I used booking.com and you can check the listing HERE.
Airbnb in Avola
For my last few days on the islands I stayed at a lovely Airbnb in Avola, a great location to explore the southern jewels of Sicily. I rented a room for $26/night but when I arrived the host upgraded me to the private little detached house with a private bathroom right next to the main house. It was such a great place to stay and the veranda at the main house was super cozy and pretty. The host was amazing and I felt instantly at home!
Where to book: You can check the listing HERE. And if you’re new to Airbnb you can use my $30 OFF coupon HERE.
Travel Insurance for Italy
I would never travel without travel insurance anymore. I learned my lesson. Too many bad things can happen (and they have unfortunately). Travel insurance is especially important when traveling to islands, as you may need to be air-lifted to the mainland in the worst case scenario. Do you know how much air-lifting costs? Think at least 5 digits (I.e. Expensive AF!).
My favorite travel insurance that I have been using for the past 4 years is World Nomads. I have made 3 claims so far and have been fully reimbursed for all 3 without any hassle. I highly recommend them.
If you’ve enjoyed this post, please PIN it (just hover over the pic below).♥
Disclaimer: this post contains affiliate links, which means I receive a super small commission if you make a purchase using these links, at no extra cost to you. I only recommend products that I have used before on my own and that I truly love♥
Ahhh Norway, one of my favorite places on earth! This was my 4th visit to Norway, and my second in 6 months. I think it’s safe to safe I am absolutely obsessed with Norway. The natural beauty and outdoor activities on offer are hard to beat. The reason I’ve been back so many times is because everything I wanted to see and do is very spread out as Norway is a long and skinny country. So I decided to rent a car and do an epic road trip, and as a result, came up with this glorious Norway 10 day itinerary!
The one place that didn’t really make sense itinerary-wise was Trolltunga. But hell, it was at the top of my Norway bucket list and I was gonna do it in even if it required a ton of driving!
During my 10 day road trip, there were 2 days that required about 8-9 hours of driving. However, the scenery on the way was half the fun. Renting a car is the best way to explore this beautiful country and saves a lot of time and stress trying to use public transportation.
Driving in Norway
Driving in Norway was so much fun because I could stop anywhere I wanted and take in the view. I didn’t notice any aggressive driving there so it was pretty stress free overall. The only thing you need to keep an eye out is the one-way tunnels. There were only a few of them on my trip and they weren’t too bad (probably because I was used to them after all the one way tunnels in Lofoten islands and Faroe islands).
I rented a car from Sixt in Bergen and returned it to Trondheim. When booking your car, make sure you check the one-way fees because I saw some companies that charged $800 for the one way fee! Sixt charged $250 which was the cheapest I found.
I had also used Sixt before a few times and absolutely loved them. Their customer service is great and I never have to wait in any line when picking up the car. This was a godsend at LAX airport!
Also, I’ve gotten upgrades for free 3 out of the 5 times I’ve rented with them. They really are no hassle and the cars are always shiny and new. And no this is NOT sponsored and I’m not getting paid to say this! I just really like the company.
TIP: Get the smallest car possible for those single-lane roads and narrow driveways. You won’t be able to pass some places with a big car
VERY IMPORTANT TIP: A lot of the drives in Norway require a ferry crossing at some point. For this reason, you can’t plan to drive in the middle of the night because you might get stranded and never make it to your final destination until the next day. All the ferry times are different depending on the route, but when I was looking at the schedules it appeared that the last one was usually around 10pm or 10:30pm. You definitely need to keep this in mind when driving in Norway.
If you use Google Maps and put the address is, you will see if there is a ferry crossing or not on the route. Just look for the little ship symbol (below).
Extra Transport Costs
There are a bunch of automatic tolls (mostly when you go into a tunnel) that you will pass while driving in Norway. Check with your car company because I was told not to stop and pay and that they would be automatically added to my bill in the end (way easier). Otherwise, there is a pay station before or right after the tunnel.
I ended up paying $108 in tolls for my long 10 day journey (ouch). The good news is I got upgraded to a Hybrid car and the total for gas was just $105 for 10 days. And that’s with 2 days of 8+ hours of driving.
I also paid a total of $50 in ferry crossings as well (4 ferries total).
National Scenic Routes in Norway
There are 18 national scenic routes in Norway offering stunning scenery with several viewpoints to stop at and have photo shoot or a picnic. You will see glaciers, fjords, coastlines, stunning architecture, waterfalls, and more. These are some of the most gorgeous drives in all of Norway, so make sure to drive at least a few of them on your Norway road trip!
I drove on a few of them throughout my 10 day Norway road trip including Atlanterhavsvegan (the Atlantic Ocean Road),Sognefjellet (on the way to Geiranger), and Geiranger-Trollstigen.
The Sognefjellet passes through Jotunheimen National Park, with towering mountains and some glaciers as well, it was spectacular.
Norway 10 Day Itinerary
Day 1-2: Bergen
Day 3-4: Odda + Trolltunga hike
Day 5-6: Geiranger
Day 7-8: Trollstigen + Ålesund
Day 9-10: Atlantic Ocean Road +Trondheim
Bergen
Bergen is the most adorable little city and a great introduction to Norway. It is also known as the gateway to the fjords since many of the boat trips out to the fjords start in Bergen.
For all the best things to do in Bergen, I will redirect you to an article I wrote for Eurail HERE.
Where to stay in Bergen
More affordable: I stayed in an Airbnb that was a 15 minute walk to town. It was on top of a hill so the walk had beautiful views most of the way. It was a 2 bedroom apartment on the bottom of the host’s house. It doesn’t have a kitchen or stove but it does have a fridge so you can make sandwiches and such. It was super cute and the host was super warm and welcoming. She even leaves a mug of hot coffee outside your door in the morning. It was only $48/night and for the price, it can’t be beat in Norway! It can sleep 3 people. You can check the listing HERE.
*PS: I was supposed to be on this trip with 2 other friends but they cancelled last minute so I had 2 bedroom places the whole trip because of this…not because I’m ballin’ or anything haha.
More luxurious: on my first trip to Bergen I stayed at Hotel Oleana and LOVED it. You can read my review of the hotel HERE.
Drive from Bergen to Odda
Driving time: about 3 hours
Ferry crossing: there is a ferry crossing from Tørvikbygd to Jondal to get to Odda . It costs 53 NOK ($6) and takes about 20 minutes. (The ferry leaves about every hour). You can pay by credit card. They will come to your car with a card machine while you’re in line and it’s a super easy process. FYI: I didn’t need cash at all on this entire trip!
Odda
Odda is a gorgeous little town set in a fjord and is sort of like the gateway to Trolltunga. This is where you will want to look for accommodations if you plan on doing the Trolltunga hike.
Where to Stay in Odda
Airbnb: I stayed in a 2 bedroom apartment on the top of my host’s house that had the BEST views of the whole city in my opinion! The stairs to get up there were brutal and extra steep, but that’s the small price to pay for incredible views like that. There were sweet views from the main bedroom, the living room, and the kitchen.
The host was just incredible and like your mother greeting you with a big hug like you know each other. She even came and helped me with all my bags up those evil steps. She also brings up a basket of hiking gear that you can borrow like wool sweaters, hats, gloves and gives great tips about the hike and where to park/when to go, etc.
It was also one of the most affordable place to stay in all of Norway at $78/night for an entire 2 bedroom apartment. You can check out the listing HERE.
Trolltunga Hike
Trolltunga is definitely one of the best hikes in Norway and the longest hike I have ever completed. My body was sore for days afterwards and I could barely even walk, but it was definitely worth it!
Tips for Hiking Trolltunga
Parking costs are RIDICULOUS so the more people in your car the cheaper it will be
Trolltunga upper parking only holds 30 cars and opens at 6am. Get there by 5:30am. I arrived at 5:33am on September 4th (end of peak season) and was number 14 in line. It cost is 600 NOK ($72). The cost to park at the bottom lot is 500NOK ($58) so not much difference.
Parking at the upper lot will takes off 3 KM each way of your hike so it’s totally worth it. It turns a 28km hike into a 22km hike.
The entire hike is on uneven rocks the whole time. There are no bathrooms or trash cans. There are also no bushes or trees to hide behind so if your bladder is weak, you’re going to have to get creative for your privacy. (I held mine for 12 hours like a champ).
The hike will take you 8-12 hours round trip, including a break for lunch and waiting in line for pictures. (I heard some people who completed it in 6 hours total, but they must be VERY fast hikers…it took me 11 hours, but I am on the slower side as I had a partially torn ACL on the hike!).
Start the hike as early as possible so you won’t have to wait in the LONG line for pictures on the Troll’s Tongue (Trolltunga). You also don’t want to be hiking back in the dark.
If you get in line for the picture before noon you won’t have to wait long for your picture. I heard that in the peak summer months it can take up to 3 hours to wait for your picture (Sucky!)
Just below Trolltunga on the left is a mini Trolltunga with a spectacular view. You won’t have to wait long for your picture there. You do have to climb down on some slippery rocks so just go slow.
The hike is super safe and can be done solo with no problem. There are many people on the trail so you’re never alone. There is no dangerous wildlife either.
Sunrise on the start of the Trolltunga hike.
Drive from Odda to Geiranger
Driving Time: 8-9 hours. This is the longest drive of this whole trip but you can stop at many places for a picnic or for photo ops. You will pass though a windy road through Icelandic landscape and even a glacier.
Drive through Jotunheimen National Park via Sognefjellet, home to Norway’s highest mountains (see National Tourist Routes above) to get to Geiranger. This road was absolutely breathtaking and the time passed so quickly driving through here. Although, in reality it took me forever since I kept stopping every 2 feet for photos.
There was a small fee for driving this road but it was SO worth it. It cost 80 NOK($10).
Just a glacier in the background, NBD
Stop at Lom Stave Church on the way to admire the beautiful traditional Norwegian architecture (and also to stretch your legs).
Geiranger
Geiranger is a UNESCO World Heritage Site and I think it’s one of the most beautiful places in all of Norway.
What to Do in Geiranger
Flydalsjuvet viewpoint and rock-to get to the rock you have to step over a 1 foot mini fence behind the men’s bathroom. Then walk straight down the path that curves to the right. It takes 1 minute from the bathroom. It’s roped off because it’s dangerous so please don’t bring your children or dogs out there. Also, make sure you’re not wearing sandals or unsturdy shoes. There are no rails or anything and the drop is several hundred feet. BE CAREFUL!
Fjordsetet (the Fjord Seat)-be the queen of the fjord and admire the vast beauty of Norway from this epic seat at the top of the lookout point.
Hike-there are many hikes around Geiranger ranging from 30 minutes to multiple hours. I didn’t attempt any hiking as it was raining most the time, and also because I could barely move from Trolltunga.
There are fjord cruises on offer that will take you around the fjords for 90 minutes. The cost is 350NOK ($41) and it leaves 3 times a day.
Fjordnaer Geiranger Sjokolade-this place is heaven for chocolate lovers. This cozy little cafe does chocolate tastings with unique flavors such as blue cheese chocolate and fresh berry chocolates (It sounds weird, but it’s so good).
They also offer a famous hot chocolate with white, dark, milk, or chili chocolate flavors. Oh, and maybe my favorite, coffee chocolate! My mouth is watering just reminiscing about this place.
Ørnesvingen Eagle road-on your way out of Geiranger, take the Eagle Road up the mountain to a gorgeous viewpoint over the fjord and valley. It’s on the 63 road on the way to Trollstigen.
Where to Stay in Geiranger
I stayed in a cute little 2 bedroom cabin apartment at the top of the hill with a magnificent view of the valley below. The views form the restaurant were mind blowing (pictured below).
A lot of the hikes start right from the accommodation so it’s an excellent place to base yourself. It’s so peaceful and quiet up there and I would definitely recommend it.
Where to book: I used booking.com for this place. It cost $140/night and fit 4 people. You can check the listing HERE. And if you’re new to booking.com, you can use my $20 OFF coupon!
Drive from Geiranger to Trollstigen
It takes 2 hours to get from Geiranger to Trollstigen on Road 63. The drive from Geiranger to Trollstigen is a national tourist route, as mentioned above.
Ferry Crossing: there is a ferry crossing from Geirangervegen to Trollstigen at Eidsal. It takes 10 minutes and costs 98 NOK ($12).
Trollstigen
Trollstigen is known as “The Trolls Road” and is probably the most famous National Tourist Route that you can drive in Norway.
Trollstigen is a famous windy road carved into the mountain that consists of 11 hairpin turns going steeply up the mountain with the gorgeous Romsdal Valley below.
The turns are so sharp at some points that I had to honk because I couldn’t see around the corner. It sounds scary, but if you drive slow, it’s more fun than anything. You’ll also pass some beautiful cascading waterfalls on your way down as well.
NOTE: Trollstigen is usually closed from October/November to mid May due to snow so make sure you plan accordingly (the dates may vary, but you can check the status here on the official page of the Norwegian Scenic Routes.
Drive from Trollstigen to Ålesund
It takes 2 hours to drive from Trollstigen to Ålesund.
Ålesund
A fire in the early 1900s basically burned Ålesund to the ground and they rebuilt it in the art nouveau style. That’s why it looks different than any other city in Norway. It looks like the old town of a Central European city.
What to Do in Ålesund
Hike up to Aksla viewpoint (Aka Fjellstua), a mere 418 steps to the top. There is a cafe with an awesome view at the top where I sipped cappuccino and had a lovely GF pastry.
The Ålesund harbor is a nice place to grab a drink and people watch.
Kayak-there are kayaks available to rent to take around the harbor if it’s a nice sunny day.
Ålesund can easily be done in one day (or even a day trip from somewhere else), but it was a nice place to relax and unwind after all the driving I had been doing.
Where to Stay in Ålesund
I stayed in a 2 bedroom penthouse apartment with the most amazing views of the city throughout the whole penthouse. It was right in the center of town so it was nice to just walk outside and be around all the restaurants, attractions, and shops. It was also only a few minutes from the walk up to the viewpoint.
View of the center from the living room
View from the bedroom
Where to book: My 2 bedroom Airbnb was $200/night and could fit 4 people. This was in September so it might be a little more during peak season. You can check the listing HERE.
Drive from Ålesund to Atlantic Ocean Road
It takes a little less than 3 hours to get from Ålesund to the Atlantic Ocean Road.
Ferry Crossing: You must take a ferry from Vestnes to Molde. It costs 152 NOK ($18) and takes about 40 minutes. (The ferry runs about every 45 minutes).
Atlantic Ocean Road
The Atlantic Ocean Road is an epic windy road connected by peninsulas in northern Norway. The road goes over the powerful ocean and on stormy days the waves come crashing onto the road. Google pictures of it, it’s quite scary looking!
The Atlantic Ocean Toad takes less than 10 minutes to drive and has many stop-off places to park and take pictures. There is a little visitor center with a cafe and toilets. They also built a 360 degree walkway that you can walk full around and see both sides of the road.
Ferry Crossing: from the Atlantic Ocean road to Trondheim takes about 3.5-4 hours and requires a ferry crossing from Halsa to Kanestraum. It costs 106 NOK ($12.50) and takes about 20 minutes. (The ferry runs about every 20 minutes).
Trondheim
Trondheim was founded by the Vikings in 997 and used to be the Viking capital of Norway until 1217. Trondheim is a super colorful town that has lots of things to do so don’t overlook this awesome city. It really surprised me!
What to Do in Trondheim
Go to the old town bridge for the best views of the colorful buildings against the water. The old wooden buildings used to be housing for the working class. They have been beautifully preserved and now house cute cafes, shops, and restaurants.
Walk through Bakklandet area for the cutest little neighborhood and cafes. This was my favorite area of the city and I could have gone cafe hopping all day.
Walk up to the Kristiansten Fortress for great views over the city. There were many picnic tables and people jogging and working out up there.
Go to the famous Bakklandet Skydsstation for fish soup (and GF bread). This is a traditional little restaurant with a homey feel inside.
Where to Stay in Trondheim
I stayed in a 2-bedroom apartment that was about a 15 minute walk to the main part of town. The tram was also right outside so it was very convenient to get around. It was super spacious and cost $120/night and fit 4 people. You can check the listing HERE.
Travel Insurance for Your Norway Road Trip
Shit happens, especially when you’re out being adventurous every day. That’s why I would never travel anymore without travel insurance. Travel insurance doesn’t just cover your delayed/cancelled flights, it also covers medical expenses in case of emergencies, lost or stolen items on your trip, and lost baggage.
My go to travel insurance is World Nomads. I’ve been using them for 4.5 years now and I love them. I have had to file 3 claims so far and I got fully reimbursed for all of them with no hassle. It’s not the cheapest on the market, but they have some of the highest coverage of any travel insurance. For this reason, I will continue to use them!
How to Get World Nomads for Your Next Trip
If you want an idea of how much travel insurance is going to cost, you can get a quick quote below:
If you’ve enjoyed this article, please PIN it for later. ♥
This website uses cookies to improve your experience. We'll assume you're ok with this, but you can opt-out if you wish.AcceptRejectRead More
Privacy & Cookies Policy
Privacy Overview
This website uses cookies to improve your experience while you navigate through the website. Out of these, the cookies that are categorized as necessary are stored on your browser as they are essential for the working of basic functionalities of the website. We also use third-party cookies that help us analyze and understand how you use this website. These cookies will be stored in your browser only with your consent. You also have the option to opt-out of these cookies. But opting out of some of these cookies may affect your browsing experience.
Necessary cookies are absolutely essential for the website to function properly. This category only includes cookies that ensures basic functionalities and security features of the website. These cookies do not store any personal information.
Any cookies that may not be particularly necessary for the website to function and is used specifically to collect user personal data via analytics, ads, other embedded contents are termed as non-necessary cookies. It is mandatory to procure user consent prior to running these cookies on your website.


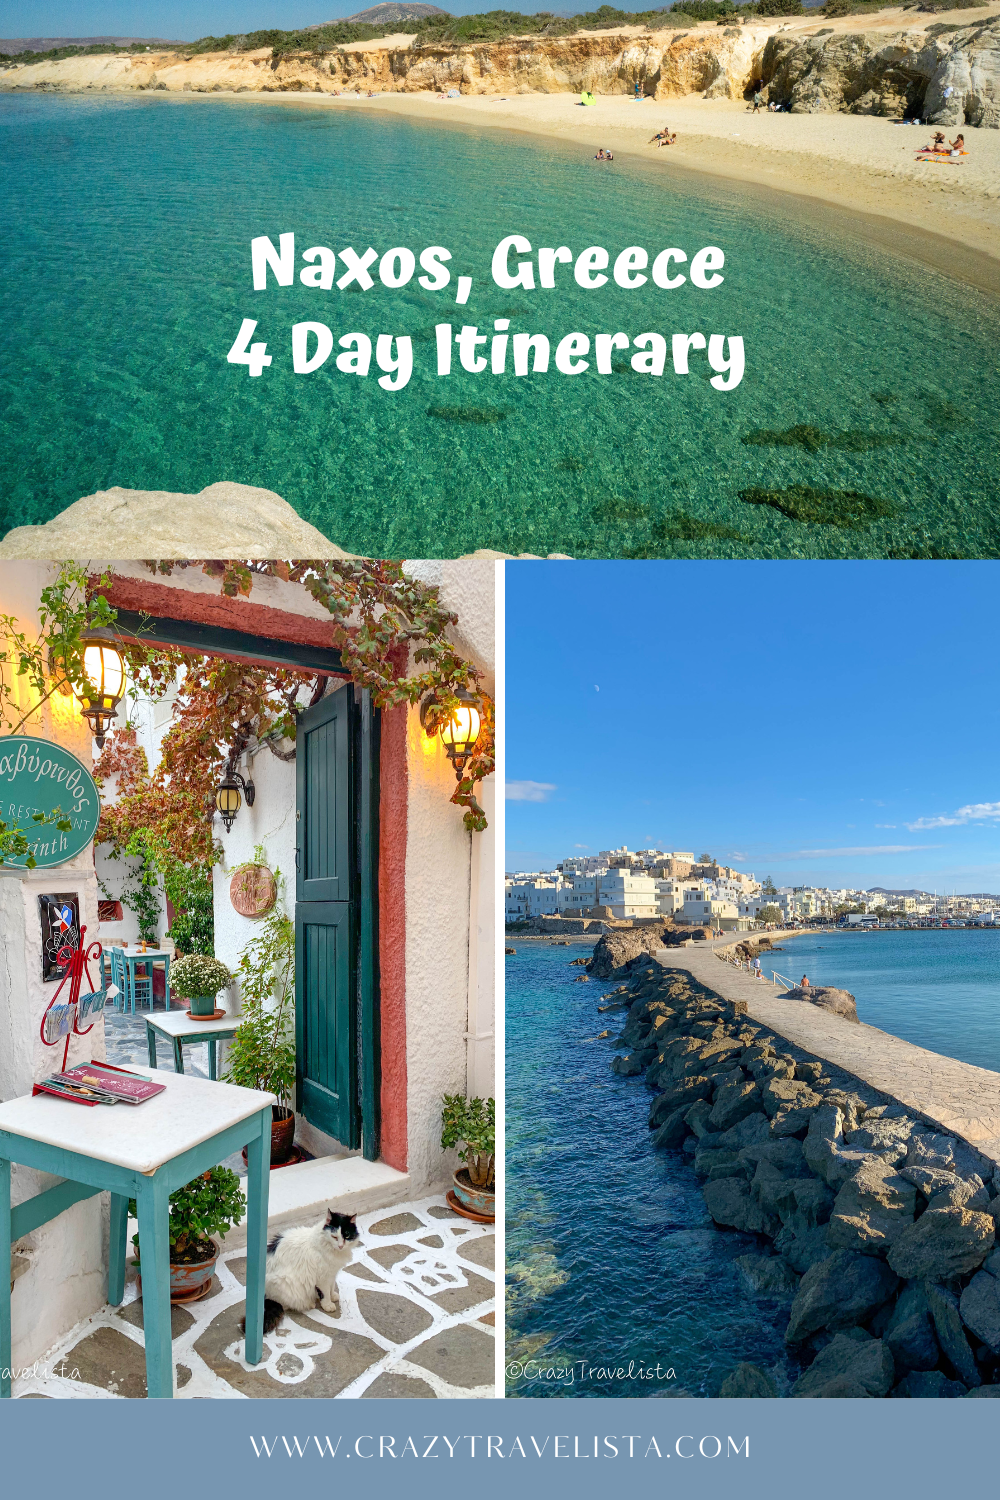


, Chile by thejourney1972 (South America addicted)")


